Index Profiles are IFP files that store a list of Visible Metadata Fields and the order in which they appear within the Visible Metadata Fields pane of the Main User Interface. Cases with Electronic Discovery enabled come equipped with their own unique <Default> profile, which is automatically created at the user-level for whoever creates that Case File. Beyond that, new profiles can be created and made available at multiple different Storage Levels depending on who should have access to them, and can be reused across multiple Case Files.
The possible Storage Levels are as follows:
•User - Available only to the current user.
•Shared - Available to all users with access to the current Case File.
•Global - Available to everyone.
You can view and manage the list of all available Index Profiles by accessing the Manage Field Profiles tool through the Modify Fields utility:
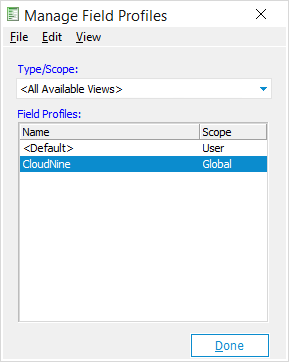  Manage Field Profiles Manage Field Profiles
This tool lists the various Index Profiles available to the current user within its Field Profiles display at the bottom, depending on the Storage Level selected from the Type/Scope drop-down menu near the top. You can left-click on any Index Profile listed to set it as the the Active Profile. Right-click on any profile to open a pop-out menu, allowing you to Delete them.
The Menu along the top also has the following management options available for Index Profiles selected from within the Field Profiles display:
•File - Allows you to Save As... a new profile (explained below), or Exit (Ctrl+X) the tool. •Edit - Allows you to Delete (Del) the selected profile. •View - Allows you to Refresh (F5) the tool. |
  Creating New Index Profiles Creating New Index Profiles
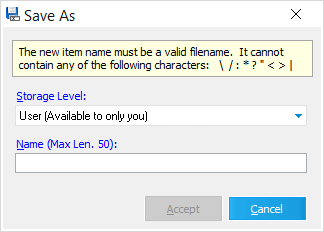
1.From within the Modify Fields utility, click on the Save As... button located to the right of the Active Profile drop-down in the Index Profiles pane. i.You can also click on the down-arrow next to the Field Profiles button in the Toolbar, and select Save As... from the drop-down menu. 2.The Save As window opens. Select a Storage Level from the first drop-down (explained above). 3.Enter a name for this new Index Profile in the Name box. i.The following characters cannot be used for profile names < > : " / \ | ? * 4.When you're finished, click on Accept to save your new Index Profile. |