With the Report Writer, you can create simple reports, exploded sort reports, complex reports from concatenated databases, or reports where you need to print tens of thousands of records. The reports are based on a sort query.
You can select the fields to use, column widths, and page and individual column formats and alignment. The report columns can contain stacked fields, truncated fields, calculated data, and combined data and quoted text with tab alignment. The Report Writer supports date and math calculations, and advanced if-then-else logic. While many of these features are powerful, the report writer was designed to be easy and flexible.
In Concordance Desktop, the Report Writer is only available in the Table view, but you can also use the Report Writer in conjunction with CPL (Concordance Desktop Programming Language) scripts.
|
If you are primarily exporting your data to Microsoft Excel 2003, you need to be aware that this version has limitations for a maximum number of rows and characters per cell. |
Understanding the Report Writer
Editable Areas
The Report Writer screen is divided into four horizontal edit areas:
•Page Header
oThe top edit box is the page header. It is printed at the top of every page. Any text can be typed into the page header. The header can be pulled down to give you more room for a large header or font. There is no limit to the number of lines in the header. If you do not want a page header, just pull it up until it disappears.
•Column Headers
oThe next row of the report contains the column headers. These are printed at the top of every page, above the data columns. As with the page header, the column headers are resized by grabbing the window borders and pulling them up or down. There is no limitation on the number of lines of text they can hold. Make them as large or small as you need. Resizing one column header will resize all column headers, they are always uniform in height.
•Data Columns
oThe next row contains the data columns. These contain the actual data printed in your reports. The data columns are interpreted; if you place a field's name--it must be in upper case--in the column, then that field's data ends up in the report. If you place something like, "Data: " + SUMMARY into the column, then the word "Data: " precedes the text from the field named SUMMARY. Any text or function or mathematic operator defined in the programming language can be used in a data column. This allows you to do things like convert data to upper or lower case, print only the first 100 characters, or calculate dates and other values in your reports.
•Page Footer
oThe bottom edit box is the page footer. The page footer is printed at the bottom of every page. Any text can be typed into the footer. The footer can be pulled up or down to give you more or less room for text or type size. Make the footer's window smaller if too much room appears between the footer and the page numbers or dates.
Adding Field Titles and Data
There are two drop-down lists on the Report Writer toolbar. The first list contains a list of every field in the database. The second list contains a list of useful CPL functions and operators. When adding fields to a report, you should always select fields from the list box. It will automatically include necessary conversions for you, such as converting dates to text so that they can be printed. For instance, selecting the date field DATE will actually place dtoc(DATE) into the report column. This uses the date-to-character function to convert a numeric date into text. To add a field, function, or operator to a report, click on the report where you want to add a field, function, or operator and make a selection from the field or function list.
|
If you need to type field names manually, make sure that you use upper case letters. The report writer will not recognize field names unless they are in upper case. |
Stacked Fields and Other Useful Tricks
The Report Writer is very powerful and flexible. It can use any of the CPL (Concordance Desktop Programming Language) Operators and Functions. With the Report Writer, you can create some wonderful and complex reports. There are however, just a handful of functions and operators, like the plus sign, which you will use most of the time. This section describes the most useful functions and how to use them.
The first thing you may want to do is to combine some text with a field or two. The following example does just that. It stacks two fields in one column with titles for data:
"Date "+dtoc(DATE)+newline()+
"Customer "+CUSTOMER
Enclose any static text in quotes. Combine quoted text and other data with the plus sign. The newline() function forces anything that follows it onto the next available line. Also included in the example, but not shown, are tabs. The quoted text includes a tab character to align the two data fields--there are no spaces in the line.
Always remember to use plus signs to combine everything with everything else. Leaving one out, or putting two plus signs in a row, are the two most common report errors.
Sometimes you may have a very large field which would use a lot of paper if it were printed. The next example uses the substr() function to print the first 200 characters of the summary field, it sub-strings it.
substr(DIGEST,1,200)
The example about uses the substr() function to grab 200 characters, starting with the first character. For this scenario, it would be really useful if we could check first to see if the brief field was actually more than 200 characters long. Then we could append ellipses (…) to show that we truncated the entry, if we need to truncate it at all.
(len(DIGEST)>200?substr(DIGEST,1,200)+"…": DIGEST)
This example uses two new features: the len() function and the conditional operator. The len() function determines the length of the text in any field. The conditional operator allows us to embed if-then-else logic into a report column. The conditional operator has the following format: (statement?true-response:false-response). The Report Writer tests the statement. If it is true, the true-response is the result, otherwise the false-response is the result. In our example the Report Writer determines if the length of the digest field is greater than 200 characters. If it is, the true-response returns the first 200 characters of the field with ellipses appended to show that it was truncated. If the statement is false, the entire field is printed. The parentheses around the conditional operator are required.
Report Writer Guidelines
•Use if-then-else syntax is (:?) and put literal text within quotes
oIf a date = 00/00/0000, then you can place quotes around “no date available”
•Stack fields with newline()
o“Beg Bates : ”+BEGNO+newline()+“End Bates : ”+ENDNO
Report Writer Toolbar
Once you have generated a report using the Report Writer, the report and the Report Writer toolbar are displayed in Concordance Desktop. You can use the Report Writer toolbar to open, save, and insert files, select print options and font settings, and more. You can also select fields and codes to customize your report options.
![]()
Button Definitions
Report Writer Toolbar Buttons |
||
|---|---|---|
Button |
Name |
Description |
|
Open |
Opens the Open dialog box. Click the Open button to open an existing .arp report file in the Report Writer. |
|
Save |
Saves your latest report changes to the .arp file currently opened. |
|
Save as |
Opens the Save As dialog box. |
|
Insert |
Inserts a column to the left of a selected column. Click a column in the report and click the Insert button to open the Report Columns dialog box. Type the number of columns to insert and click OK to insert the new columns. |
|
Delete |
Deletes a selected column. Click a column in the report and click the Delete button to open the Report Columns dialog box. Type the number of columns to delete and click OK to delete the selected column, and if you entered more than one column, the remaining number of columns you entered to the right of the selected column. |
|
Options |
Opens the Report Options dialog box. In the Report Options dialog box, you can edit the report's current settings. |
|
Page Setup |
Opens the Page Setup dialog box. In the Page Setup dialog box, you can edit the report's page setup settings,including the paper size, source, orientation, the page margins, and printer. |
|
Justify |
Opens the Justify dialog box. Select the check box that applies to the text you want to format, click OK to open the Text Alignment dialog box, click the alignment option you want to use, and click OK. |
|
Font |
Opens the Font dialog box. Select the check box that applies to the text you want to format, click OK, modify the font, and click OK again. |
|
Print Preview |
Opens the report in the print preview screen. The print preview screen allows you to browse through up to 100 pages of your report before printing the report. |
|
Opens the Print dialog box. Select you printer settings and click OK to print the report. |
|
|
Exit |
Closes the Report Writer in Concordance Desktop. You will be prompted to save the report if any changes were made. |
|
Field List |
Contains a list of the database fields you can add to the report. |
|
Function List |
Contains a list of available CPL functions and operators you can add to the report. |
You can create reports in the Report Writer using the wizard or manually create reports in the Report Writer's Report Options dialog box. You can also edit existing reports in the Report Options dialog box.
To Generate Reports Using the Report Writer Wizard
1.Run a search query to locate the documents you want to include in the report.
i.For more information about searching, see Available search tools.
2.In the Table view, use a table layout to organize the columns and column order you want to include in the report.
i.For more information about custom layouts see, Using table layouts.
3.With the Table view still open, on the Standard toolbar, click the down arrow next to the Report button and click Report writer.
i.Clicking Report writer opens the Report Writer dialog box.
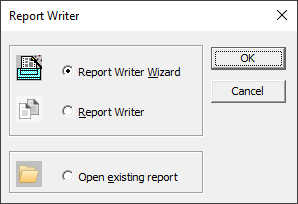
4.Select the Report Writer Wizard option and click OK.
i.Clicking OK opens the Report Wizard - Documents dialog box.
5.In the Report Wizard - Documents dialog box, define the report's document range settings.
a.To define the settings in the Report Wizard - Documents dialog box:
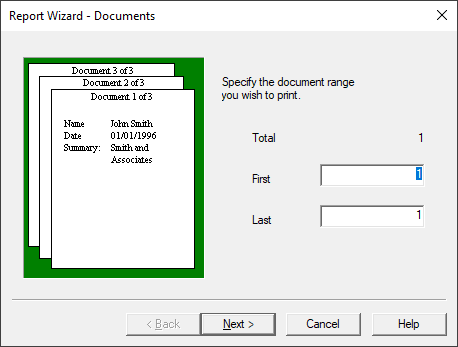
i.In the Report Wizard - Documents dialog box, the First and Last fields default to the first and last record in the current Concordance Desktop query.
1.To modify the range of the records to be printed, in the First field, type the record number for the first record in the range you want to print, and in the Last field, type the record number for the last record in the range you want to print.
2.Click Next to open the Report Wizard - Page numbering and dates dialog box.
6.In the Report Wizard - Page numbering and dates dialog box, define the report's page numbering and date stamp settings.
a.To define the settings in the Report Wizard - Page Numbering and Dates dialog box:
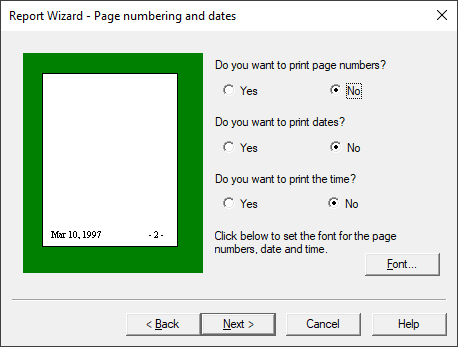
i.In the Report Wizard - Page numbering and dates dialog box, the page number, date, and time stamp options all default to No. If you choose to print page numbers and/or date and time stamps, they will be printed at the bottom of each page in the report footer.
1.To print page numbers, in the Do you want to print page numbers field, select the Yes option.
i.Page numbers are printed in the lower-right corner of the report.
2.To print the current date, in the Do you want to print dates field, select the Yes option.
i.The date is printed in the lower-left corner of the report.
3.To print the current time, in the Do you want to print the time field, select the Yes option.
i.The time is printed in the lower-left corner of the report.
ii.The default font for page numbers and date and time stamps is Arial 9pt. The report uses the same font settings for page numbers and date and time stamps on the report.
4.To modify the font settings, click the Font button.
i.Clicking the Font button opens the Font dialog box.
5.Specify the font settings and click OK to save your changes.
i.The font changes apply to all the page numbers and date and time stamps on the report.
6.Click Next to open the Report Wizard - Header/Footer dialog box.
7.In the Report Wizard - Header/Footer dialog box, define the report header and footer settings.
a.To define the settings in the Report Wizard - Header/Footer dialog box:
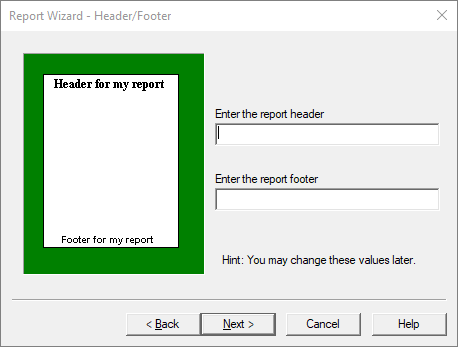
i.In the Report Wizard - Header/Footer dialog box, you can preset the header and footer text for all of the fields default to No, except for the Do you want a blank line between records field.
1.To print a report header, in the Enter the report header field, type the header text you want to print.
2.To print a report footer, in the Enter the report footer field, type the footer text you want to print.
3.Click Next to open the Report Wizard - Options dialog box.
8.In the Report Wizard - Options dialog box, define the report's record break, column border, and field printing settings.
a.To define the settings in the Report Wizard - Options dialog box:
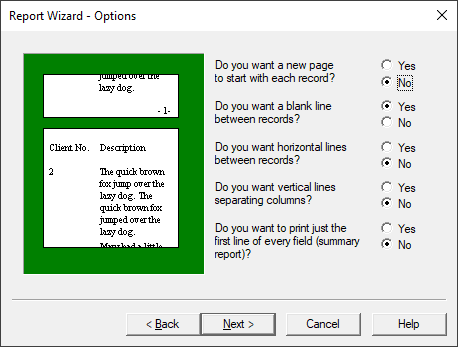
i.In the Report Wizard - Options dialog box, all of the fields default to No, except for the Do you want a blank line between records field.
1.To print each record on a separate page, in the Do you want a new page to start with each record field, select the Yes option.
2.To disallow a blank line between each record on the report, in the Do you want a blank line between records field, select the No option.
3.To add a horizontal line between each record on the report, in the Do you want horizontal lines between records field, select the Yes option.
i.The Do you want horizontal lines between records field is only available if you are also adding blank lines between each record.
4.To add vertical lines between each report column, in the Do you want vertical lines separating columns field, select the Yes option.
5.To print only the first line from each field in the report, in the Do you want to print just the first line of every field (summary report) field, select the Yes option.
i.If you choose to only print the first line of each field, Concordance Desktop prints a summary report with one line per record.
6.Click Next to open the Report Wizard - Margins dialog box.
9.In the Report Wizard - Margins dialog box, define the report's page margins and intercolumnar spacing setting.
a.To define the settings in the Report Wizard - Margins dialog box:
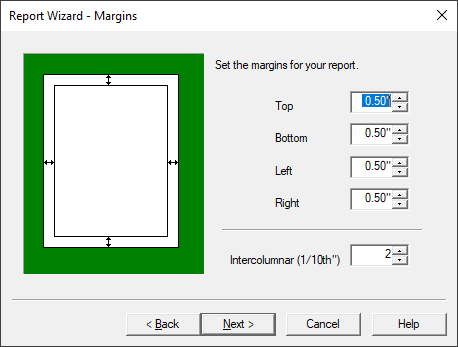
i.In the Report Wizard - Margins dialog box, all page margins default to .50 inches from the edge of the page, and the Intercolumnar (1/10th") field defaults to 2 tenths.
1.To edit the print margins, type or select the margin sizes in inches, that you want to print on the report.
i.Some printers have an unprintable reserved area and the margins cannot be set below this limit.
2.To edit the intercolumnar spacing, in the Intercolumnar (1/10th") field, type or select the spacing, in tenths of an inch, that you want to print on the report.
i.The intercolumnar spacing determines the distance between columns in your report.
3.Click Next to open the Report Wizard - Printer dialog box.
10.In the Report Wizard - Printer dialog box, define additional report page settings including page breaks and orientation.
a.To define the settings in the Report Wizard - Printer dialog box:
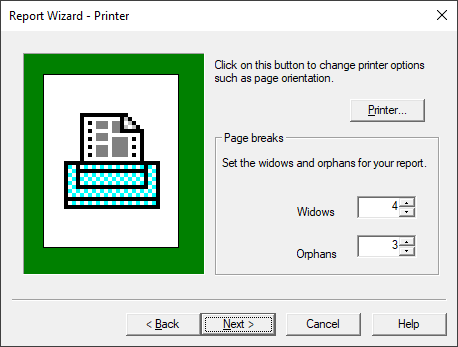
1.To change the paper size or source, page orientation or margins, or default printer, click the Printer button.
2.Clicking the Printer button opens the Page Setup dialog box.
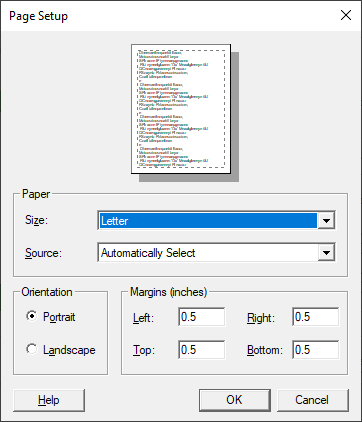
3.Make the applicable edits.
i.To change the default printer for the report, click the Printer button, make the applicable edits, and click OK to save your changes.
4.In the Page Setup dialog box, click OK to save your changes and return to the Report Wizard - Printer dialog box.
i.In the Report Wizard - Printer dialog box, the Widows field controls the minimum number of lines Concordance Desktop will allow to remain at the bottom of a page. If the number of lines to print at the bottom of the page is less than the value in the Widows field, then the document is moved to the top of the next page.
ii.The Orphans field controls the minimum number of lines Concordance Desktop prints at the top of a page when splitting a document between pages. If the lines left to print are less than the value in the Orphans field, then lines are borrowed from the previous page until the orphan minimum is met. This may cause the preceding page to go below the Widows threshold, causing the entire column to print at the top of the next page.
iii.The Widows field defaults to 4 lines and the Orphans field defaults to 3 lines.
5.To change the widows value, in the Widows field, type or select the number of lines you want the report to use for page widows.
6.To change the orphans value, in the Orphans field, type or select the number of lines you want the report to use for page orphans.
7.Click Next to open the Report Wizard - Exploded Sort dialog box.
11.In the Report Wizard - Exploded Sort dialog box, define the report's exploded sort settings.
a.To define settings in the Report Wizard - Exploded Sort dialog box:
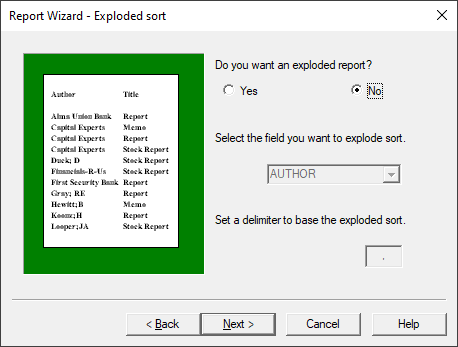
i.An exploded sort is a report where each entry in a multiple entry field is sorted in alphabetical order and given its own line in the report as if it were a separate record. Concordance Desktop determines each sub-entry in a field by grabbing the data between delimiters such as a comma. Any punctuation character can be used as the delimiter as long as it is used consistently.
ii.Example - An attorney has placed bibliographic entries for all of the documents needed in a case into Concordance Desktop. The counselor then searched for financial reports, and wanted to print a report showing each author alphabetically for an upcoming deposition. With a typical report, the attorney would get a printout sorted by the first author’s name appearing in the author field. Finding a specific author’s name would require looking through each multi-author entry in the report. Using an exploded sort places each author in alphabetical order in the first column, repeating the data in the other columns for each entry. Now the attorney can find the authors quickly and easily, during the deposition.
1.To create an exploded sort report, in the Do you want an exploded report field, select the Yes option.
i.If you do not want to create an exploded sort report, select the No option and click Next to open the Report Wizard - Fields dialog box.
2.In the Select the field you want to explode sort field, click the field you want to use for the exploded sort.
i.The field selected in the Select the field you want to explode sort field will always be the first column in your exploded sort report.
|
Records should be sorted by the field used in the report's second column before entering the Report Writer. That way duplicate records are sorted by the second column’s contents. |
ii.The Set a delimiter to base the exploded sort field defaults to a comma.
3.To change the delimiter used for the exploded sort, in the Set a delimiter to base the exploded sort field, type the delimiter you want to use.
4.Click Next to open the Report Wizard - Fields dialog box.
12.In the Report Wizard - Fields dialog box, define the fields that print in the report columns.
a.To define the settings in the Report Wizard - Fields dialog box:
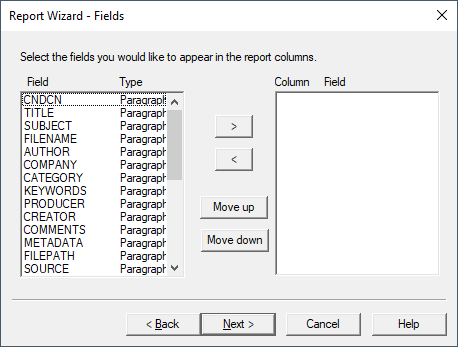
i.The order the fields are listed in the Column list is the order the fields will be displayed in the report columns. If you are creating an exploded sort report, the field you selected on the Report Wizard - Fields dialog box is automatically added to the first column in the report, and cannot be moved from the first column. The wizard automatically sets the number of columns in the report to the number of fields selected in the Report Wizard - Fields dialog box.
1.To add a field to the Column list, click the field in the Field list, and click the right arrow, >, button.
2.To remove a field from the Column list, click the field in the Column list, and click the left arrow, <, button.
3.To change the column order of a field, click the field in the Column list, and click the Move up or Move down button to move the field to the applicable column.
i.When you move a field in the Column list, the wizard automatically updates the column order number for the field.
4.Click Next to open the Report Wizard - Field Options dialog box.
13.In the Report Wizard - Field Options dialog box, define the individual report field settings.
a.To define the settings in the Report Wizard - Field Options dialog box:
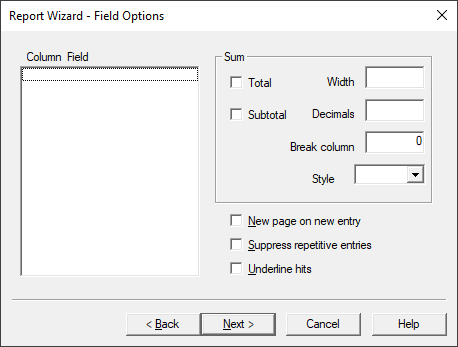
i.In the Report Wizard - Field Options dialog box you can define settings for the individual fields in the report including totalling and defining how the Report Writer handles the data in the field, such as underlining search hits.
1.In the Column list, click the field you want add report settings for.
2.To print a grand total of the field data in the selected column, select the Total check box, in the Width field, type the total field size in number of characters, and in the Decimals field, type the number of decimal points you want to use in the grand total.
i.The Width and Decimals fields are only available when the Total check box is selected. The grand total is printed at the end of the report.
3.To print subtotals, select the Subtotal check box and in the Break column field, type the number of the column to break on for the subtotals.
i.A break column can be any other column in the report. The report should be sorted by the break column. For example, if the subtotal column contains the PRICE field and the break column contains the PART_NUMBER. The PRICE column prints a subtotal whenever the PART_NUMBER changes, and it will print a grand total when the report is complete.
ii.The Break column field is only available when the Subtotal check box is selected. Every time the column in the Break column field changes contents, Concordance Desktop will subtotal the field data.
4.To print each record on a separate page whenever the column's contents change between one record and the next, select the New page on new entry check box.
i.The database should be sorted by the selected field in the report column.
5.To suppress all repetitive entries in the selected field on the report, select the Suppress repetitive entries check box.
i.When the Suppress repetitive entries check box is selected, only the first instance of duplicate entries will be printed on the report. The report should be sorted by the selected field in the report column.
6.If you want all search hits in the selected field to be underlined on the report, select the Underline hits check box.
7.Click Next to open the Report Wizard - Finish dialog box.
14.In the Report Wizard - Finish dialog box, click the Finish button to create the report template.
i.Clicking the Finish button opens the report template within the Report Writer in Concordance Desktop, and the Report Writer toolbar is now displayed in Concordance Desktop below the Standard toolbar.
15.In the Report Writer, you can further customize the report, including adjusting the column widths, adding and removing columns, adjusting report settings, and adjusting text properties.
i.For more information about working in the Report Writer, see the Concordance Desktop Report Writer User's Guide.
16.Make the applicable edits to the report in the Report Writer.
17.Click the Print Preview button on the Report Writer toolbar to preview the report.
18.When you are ready to print the report, to send the report directory to the designated printer, click the Print button in the print preview screen.
i.To make any final print adjustments before printing, click the Print button on the Report Writer toolbar to open the Print dialog box, edit the print settings, and click OK to print the report from the designated printer.
19.To save your report settings, on the Report Writer toolbar, click the Save as button.
20.To close the report, on the Report Writer toolbar, click the Exit button.
To Generate a Report Using the Report Options Dialog Box
1.Run a search query to locate the documents you want to include in the report.
i.For more information about searching, see Available search tools.
2.In the Table view, use a table layout to organize the columns and column order you want to include in the report.
i.For more information about custom layouts see, Using table layouts.
3.With the Table view still open, on the Standard toolbar, click the down arrow next to the Report button and click Report writer.
i.Clicking Report writer opens the Report Writer dialog box.
4.Select the Report Writer option and click OK.
i.Clicking OK opens the Report tab in the Report Options dialog box.
5.On the Report tab, define the report's document range, record break, field printing, and column settings.
a.To define the settings on the Report tab:
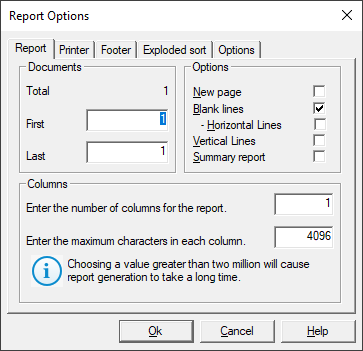
i.On the Report tab, the First and Last fields default to the first and last record in the current Concordance Desktop query.
1.To modify the range of the records to be printed, in the First field, type the record number for the first record in the range you want to print, and in the Last field, type the record number for the last record in the range you want to print.
i.By default, only the Blank lines check box is selected in the Options section of the Report tab.
2.To print each record on a separate page, select the New page check box.
3.To disallow blank lines between each record on the report, clear the Blank lines check box.
4.To add a horizontal line between each record on the report, select the Horizontal Lines check box.
i.The Horizontal Lines check box is only available if you are also adding blank lines between each record.
5.To add vertical lines between each report column, select the Vertical Lines check box.
6.To print only the first line from each field in the report, select the Summary report check box.
i.If you choose to only print the first line of each field, Concordance Desktop prints a summary report with one line per record.
7.In the Enter the number of columns for the report field, type the number of columns you want to create in the report.
8.In the Enter the maximum characters in each column field, type the maximum number of characters allowed in each column. The default is 4096 characters.
6.Click the Printer tab to define the report's page margin and intercolumnar spacing settings, widow and orphan settings, additional page settings, and the default printer settings.
a.To define the settings on the Printer tab:
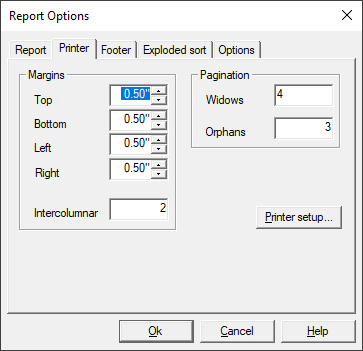
i.On the Printer tab, all page margins default to .50 inches from the edge of the page, and the Intercolumnar (1/10th") field defaults to 2 tenths.
1.To edit the print margins, type or select the margin sizes, in inches, that you want to print on the report.
i.Some printers have an unprintable reserved area and the margins cannot be set below this limit.
2.To edit the intercolumnar spacing, in the Intercolumnar (1/10th") field, type or select the spacing, in tenths of an inch, that you want to print on the report.
i.The intercolumnar spacing determines the distance between columns in your report.
ii.On the Printer tab, the Widows field controls the minimum number of lines Concordance Desktop will allow to remain at the bottom of a page. If the number of lines to print at the bottom of the page is less than the value in the Widows field, then the document is moved to the top of the next page.
iii.The Orphans field controls the minimum number of lines Concordance Desktop will print at the top of a page when splitting a document between pages. If the lines left to print are less than the value in the Orphans field, then lines are borrowed from the previous page until the orphan minimum is met. This may cause the preceding page to go below the Widows threshold, causing the entire column to print at the top of the next page.
iv.The Widows field defaults to 4 lines and the Orphans field defaults to 3 lines.
3.To change the widows value, in the Widows field, type the number of lines you want the report to use for page widows.
4.To change the orphans value, in the Orphans field, type the number of lines you want the report to use for page orphans.
5.To change the paper size or source, page orientation or margins, or default printer, click the Printer setup button.
6.Clicking the Printer setup button opens the Page Setup dialog box.
7.Make the applicable edits.
i.To change the default printer for the report, click the Printer button, make the applicable edits, and click OK to save your changes.
8.In the Page Setup dialog box, click OK to save your changes and return to the Printer tab.
7.Click the Footer tab to define the report's page number, date and time stamp, and footer font settings.
a.To define the settings on the Footer tab:
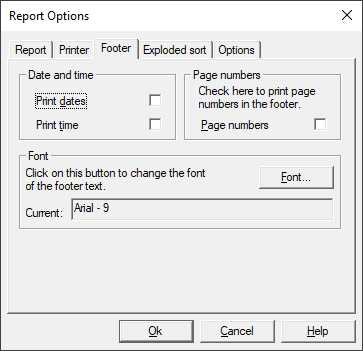
i.On the Footer tab, by default the Print dates, Print time, and Page numbers check boxes are not selected. If you choose to print page numbers and/or date and time stamps, they will be printed at the bottom of each page in the footer.
1.To print the current date, select the Print dates check box.
i.The date is printed in the lower-left corner of the report.
2.To print the current time, select the Print time check box.
i.The time is printed in the lower-left corner of the report.
3.To print page numbers, select the Page numbers check box.
i.Page numbers are printed in the lower-right corner of the report. The default font for footer text is Arial 9pt.
4.To modify the font settings, click the Font button.
i.Clicking the Font button opens the Font dialog box.
5.Modify the font and click OK to save your changes.
i.The font settings apply to all text in the report footer.
8.Click the Exploded sort tab to define the report's exploded sort settings.
a.To define the settings on the Exploded Sort tab:
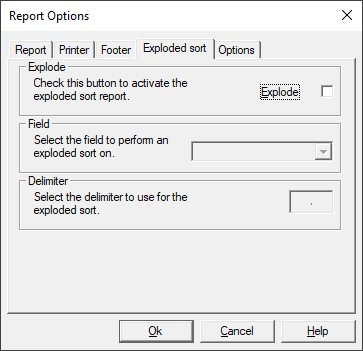
i.An exploded sort is a report where each entry in a multiple entry field is sorted in alphabetical order and given its own line in the report as if it were a separate record. Concordance Desktop determines each sub-entry in a field by grabbing the data between delimiters such as a comma. Any punctuation character can be used as the delimiter as long as it is used consistently.
ii.Example - An attorney has placed bibliographic entries for all of the documents needed in a case into Concordance Desktop. The counselor then searched for financial reports, and wanted to print a report showing each author alphabetically for an upcoming deposition. With a typical report, the attorney would get a printout sorted by the first author’s name appearing in the author field. Finding a specific author’s name would require looking through each multi-author entry in the report. Using an exploded sort places each author in alphabetical order in the first column, repeating the data in the other columns for each entry. Now the attorney can find the authors quickly and easily, during the deposition.
1.To create an exploded sort report, select the Explode check box.
i.If you do not want to create an exploded sort report, clear the Explode check box.
2.In the Select the field to perform an exploded sort on field, click the field you want to use for the exploded sort.
i.The field selected in the Select the field to perform an exploded sort on field will always be the first column in your exploded sort report.
|
Records should be sorted by the field used in the report's second column before entering the Report Writer. That way duplicate records are sorted by the second column’s contents. |
ii.The Select the delimiter to use for the exploded sort field defaults to a comma.
3.To change the delimiter used for the exploded sort, in the Select the delimiter to use for the exploded sort field, type the delimiter you want to use.
9.Click the Options tab to define the report's individual column settings.
a.To define the settings on the Options tab:
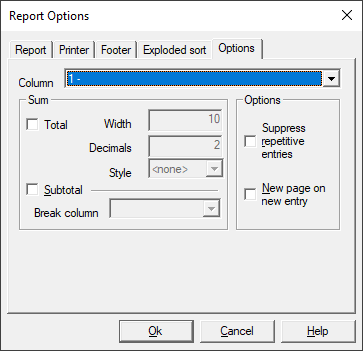
i.On the Options tab, you can define settings for the individual columns in the report including totalling and defining how the Report Writer handles the field data in the column, such as underlining search hits.
1.In the Column list, click the column you want add report settings for.
2.To print a grand total of the field data in the selected column, select the Total check box, in the Width field, type the total field size in number of characters, in the Decimals field, type the number of decimal points you want to use in the grand total, and in the Style field, click numbering style you want to use for the grand total.
i.The Width, Decimals, and Style fields are only available when the Total or Subtotal check box is selected. The grand total is printed at the end of the report.
3.To print subtotals, select the Subtotal check box and then in the Break column field, click the number of the column to break on for the subtotals.
i.A break column can be any other column in the report. The report should be sorted by the break column. For example, if the subtotal column contains the PRICE field and the break column contains the PART_NUMBER. The PRICE column prints a subtotal whenever the PART_NUMBER changes, and it will print a grand total when the report is complete.
ii.The Break column field is only available when the Subtotal check box is selected. Every time the column in the Break column field changes contents, Concordance Desktop will subtotal the field data.
4.To suppress all repetitive field data entries in the selected column on the report, select the Suppress repetitive entries check box.
i.When the Suppress repetitive entries check box is selected, only the first instance of duplicate entries will be printed on the report. The report should be sorted by the selected field in the report column.
5.To have the report print each record on a separate page whenever the column's contents change between one record and the next, select the New page on new entry check box.
i.The database should be sorted by the selected field in the report column.
10.Click OK to create the report template.
i.Clicking OK opens the report template within the Report Writer in Concordance Desktop, and the Report Writer toolbar is now displayed in Concordance Desktop below the Standard toolbar.
11.In the Report Writer, you can further customize the report, including assigning fields to columns, adding header and footer text, adjusting the column widths, adding and removing columns, adjusting report settings, and adjusting text properties.
i.For more information about working in the Report Writer, see the Concordance Desktop Report Writer User's Guide.
12.Make the applicable edits to the report in the Report Writer.
13.Click the Print Preview button on the Report Writer toolbar to preview the report.
14.When you are ready to print the report, to send the report directory to the designated printer, click the Print button in the print preview screen.
i.To make any final print adjustments before printing, click the Print button on the Report Writer toolbar to open the Print dialog box, edit the print settings, and click OK to print the report to the designated printer.
15.To save your report settings, on the Report Writer toolbar, click the Save as button.
16.To close the report, on the Report Writer toolbar, click the Exit button.
To Edit an Existing Report in the Report Writer
1.In the Table view, on the Standard toolbar, click the arrow next to the Report button and click Report writer.
i.Clicking Report writer opens the Report Writer dialog box.
2.Select the Open existing report option and click OK.
i.Clicking OK opens the Open dialog box.
3.Navigate to and open the report .arp file you want to edit.
i.The report opens in the Report Writer in Concordance Desktop.
4.Make the applicable edits to the report in the Report Writer.
i.For more information about working in the Report Writer, see the Concordance Desktop Report Writer User's Guide.
5.Click the Print Preview button on the Report Writer toolbar to preview the report.
6.When you are ready to print the report, to send the report directory to the designated printer, click the Print button in the print preview screen.
i.To make any final print adjustments before printing, click the Print button on the Report Writer toolbar to open the Print dialog box, edit the print settings, and click OK to print the report to the designated printer.
7.To save your report settings to the current .arp file, on the Report Writer toolbar, click the Save button.
i.To save your report settings to a new .arp file, on the Report Writer toolbar, click the Save as button.
8.To close the report, on the Report Writer toolbar, click the Exit button.
For more information about using the Report Writer, including using the Report Writer with CPL scripts, see the Concordance Desktop Report Writer User's Guide. You can request a PDF file of the guide from Concordance Desktop Technical Support.