|
It is recommended that you review your load files prior to creating a Load File Database. |
1.From the the File menu in Concordance, click New.
2.At the prompt, select either Yes to use Concordance Viewer, or No for another viewer.
3.In the New Database Creation Wizard, click the Load Files button. The Load Files wizard displays.
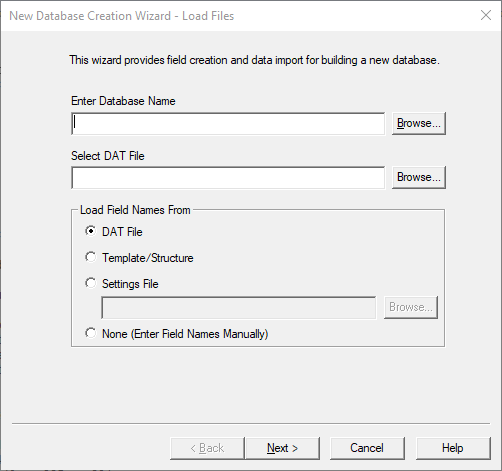
4.Click the Browse button next to Enter Database Name. Navigate to where you want to save the new database, type a File name for the database, and click Save.
5.Click the Browse button next to Select DAT File. Navigate to and select the .DAT file you want to load, and then click Open.
|
Only files with the .DAT file extension can be loaded through the Import Wizard for the Select DAT file option. If you have a .CSV, .TXT, or .ASC file, you must rename the file extension to .DAT to use it with the wizard. |
6.In Load Field Names From select one of the following options:
•Select DAT File to load the database field names from the DAT file header row you are importing. The field type settings are automatically set to Paragraph.
•Select Template/Structure to import the field names and types from a template or existing database structure. In the Load Database Structure dialog box, click Browse to locate and select the template/database you want to load.
•Select Settings File to import the fields names and field type settings from a Field Properties text file. Click Browse to locate and select the Field Properties file.
•Select None (Enter Field Names Manually) to manually enter the field names.
|
The Field Properties file is a text file that can be exported using the Save to File option in the Modify dialog box (File > Modify). The properties file lists the field names and type settings for the database structure. |
|
Concordance requires that each field name be unique; therefore, if the imported settings file and/or DAT file contain duplicate fields, the duplicate field names will be appended with a suffix of 01 up to the maximum number of characters allowed for field length. |
7.Click Next to continue. The Choose Delimiter screen displays.
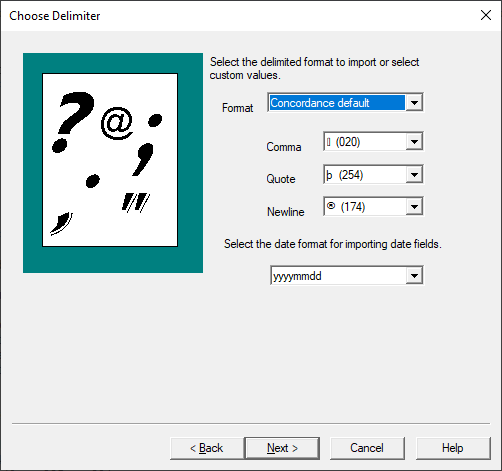
8.Select the appropriate delimiter and date format:
•Select the delimiter Format that works with your data. The Format defaults to Concordance default, which works for Concordance documents. You can also choose Comma delimited, Tab delimited, and Custom. Once you choose an item in the Format dropdown, the Comma, Quote, and Newline values will update to match your selection. For Custom, you can define whatever you want for these delimiters.
oComma - separates one field from another. (Concordance Default is numeric value 20)
oQuote - encloses text to differentiate it from field delimiters that may appear in the data. (Concordance Default is numeric value 254)
oNewline - substitute for a carriage return. Some programs use this character to designate multi-level fields or fields within fields. For the data within a field, Concordance replaces all carriage returns or combinations of carriage return and linefeed with this newline code. (Concordance Default is numeric value 174)
•Select an appropriate value under the Select the date format for importing date fields drop down. This format should match the data in your delimited text file.
9.Click Next to continue. The Modify screen displays.
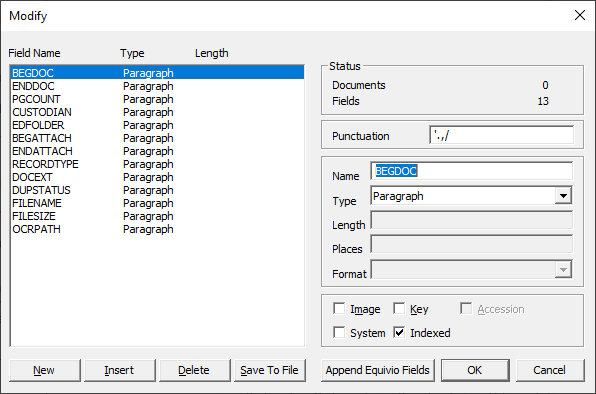
10.Review and edit any field properties as needed. Select a field in the Field Name list on the left and edit the field properties on the right. Field names must begin with an alphabetic character. Only alphanumeric characters and underscore characters are allowed in a field name. Field names can be a maximum of 12 characters. The order of fields listed on the left will be the order in which they appear within Concordance.
|
If you selected to import the field names from a DAT file, the field names are created from the header row of the DAT file and the type property for each field is set to Paragraph by default. |
11.Select a field and click Delete to remove any fields that are not needed.
12.Click New or Insert on the bottom-left to add any new fields as necessary. If you are creating database fields using an existing database template/structure or a settings file, make sure that the fields you define match the fields in the header row of the corresponding delimited text file being used to import the field data. Be sure to specify all appropriate parameters for the new fields as follows:
Field Type |
Additional Parameter(s) |
Notes |
|---|---|---|
Text |
Length is the number of characters allowed in the field. Text fields can have from 1 to 60 characters. |
Sorting for text fields is alphanumeric so 1000 comes before 9 unless you zero-fill the text field (0009 comes before 1000). |
Numeric |
Length is the number of characters allowed in the field. Numeric fields can have up to 20 characters, including the decimal place. Negative numbers use an extra character for the negative sign. Places is the number of decimal places in the numeric field. Format determines how numeric fields are displayed and printed. Select Plain, Comma, Currency, or Zero Filled. |
The number 1234.56 would have a Length of 7 and Places value of 2. |
Date MMDDYYYY |
|
This field will be displayed in Concordance as month-day-year. |
Date YYYYMMDD |
|
This field will be displayed in Concordance as year-month-day. |
Date DDMMYYYY |
|
This field will be displayed in Concordance as day-month-year. |
Paragraph |
|
Paragraph fields are variable in length, and can hold up to 12 million characters. Concordance only sorts paragraph fields by the first 60 characters in the first line of text. |
|
The field length affects the column width and how the field name appears in Table View. You need to use the appropriate date format for a field when searching for dates or entering dates during data entry. Dates are always sorted correctly, regardless of the date format chosen. |
13.For each field, verify the additional property check boxes on the lower right:
•Image - an image field is used to link Concordance with a viewer, such as Concordance Native Viewer, Concordance Image or Opticon. The Image check box should only be selected for one database field. It is best practice to select the Image check box for the BEGNO field or it's equivalent.
•Key - a key field performs a function similar to indexing, but does not require re-indexing. When fields are designated as key fields, Concordance creates a database .key file that is used to through them. Any field can be a key field, but most often they are fixed-length fields and/or date, numeric, and text fields that require searching. Key fields take up additional space for the key file, so it is best to not define too many key fields unless they are needed. Paragraph fields are normally NOT key fields - unless you specifically need to quickly locate empty paragraph fields.
•Accession - Accession numbers are unique serial numbers stored with each record and managed entirely by the database software. They do not change even if other records are deleted. Accession numbers cannot be edited - they can only be viewed. This check box should only be selected for ONE database field. It is best practice to select the Accession check box for the ACCESSID field or it's equivalent. The internal accession number for each record will be displayed in the accession field you create.
•System - These fields are created by Concordance and are hidden fields with no read or write privileges for end users. These fields should never be indexed, added, deleted, or modified by users.
•Indexed - A field must be Indexed in order to use Concordance full-text search capabilities. The Indexed check box is automatically selected for paragraph fields. You can modify the indexed setting at any time, but the dictionary files are not updated until the database is re-indexed.
14.The Punctuation field is used in full-text searching. Review the Punctuation field and add any other punctuation characters that are integral to your searches. See Punctuation for more details. The default is apostrophe, period, comma, and forward slash.
15.When you are finished editing information on the Modify screen click OK.
16.You will be prompted to verify that the Image field you set is correct. Click Yes to confirm, or No to re-open the Modify screen and update the Image field selected.
17.After confirming the Image field selection, the Fields dialog displays. This screen allows you to define which fields will be imported.
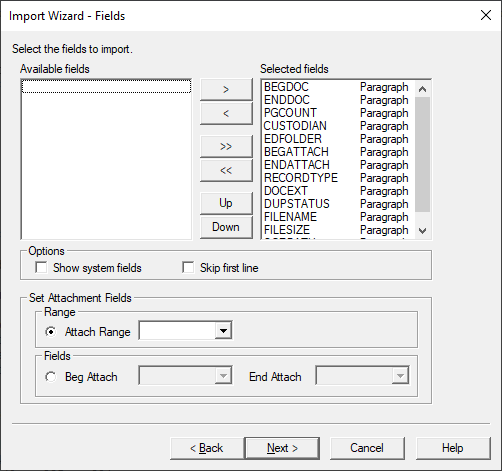
18.By default, all database fields are added to the Selected fields list. Use the buttons in the center of the screen to add and remove selected fields, and to change the field order. The field order must match the field order of your delimited text file. If the field structure and order in the Selected fields list does not match your delimited text files, then the data won’t transfer into Concordance properly.
19.Select the Options that apply:
•Show system fields - check this box to display hidden system fields. System fields are used by Concordance to administer database functions, such as replication. They are generally not visible, but you can display and import them if you select the Show system fields check box.
•Skip first line - check this box to prevent Concordance from creating a database record for your field name row. The first line of a data file sometimes contains the field names for the records in the database. When this check box is selected, Concordance ignores that line of data during import.
20.If you want to setup attachment fields, update the Set Attachment Fields section. You can choose either an attachment range field, or both a beginning and ending attachment field. By default Range is selected, but no field is specified (effectively no attachment fields specified).
•To setup an attachment range field, select the radio option at the far left of the Range section. Select a field in the Attach Range drop down to use for storing attachment range data.
•To set up beginning and ending attachment fields, select the radio option at the left of the Fields section, then select a specific field in the Beg Attach and End Attach drop downs.
|
When using the Find Attachments feature, it is best practice to setup the fields as paragraph type fields to increase the performance and make sure to index/re-index the database. For more information see Options. |
21.When you are finished editing information on the Fields screen, click OK. The Load OCR Text/Tag List screen is displayed.
22.To load OCR text:
•Inside the Load OCR Text section, click the Browse button to navigate to and select the OCR directory that contains your OCR text files, and then click Select Folder.
•In the OCR field drop down, select the OCR field you want to use for OCR text. By default, the OCR field list contains all Paragraph type fields. To properly load OCR data, make sure OCR fields are numbered sequentially.
|
The wizard can import both single or multi-page OCR text files. To import these files correctly, make sure that all the text files are located within the same directory. |
23.To load a list of tags from a text file, in the Load Tag List section, click Browse to navigate to and select your tag file, and then click Open.
|
Tags and tag folders do not support Unicode characters. Only ASCII (values 032-126) characters are allowed. If a tag name or tag folder name contains an invalid character, you will be prompted to make corrections. For more information about tags, see the Tagging topics. |
24.When you are finished with OCR text and tag settings, click Next. The Import Imagebase screen displays.
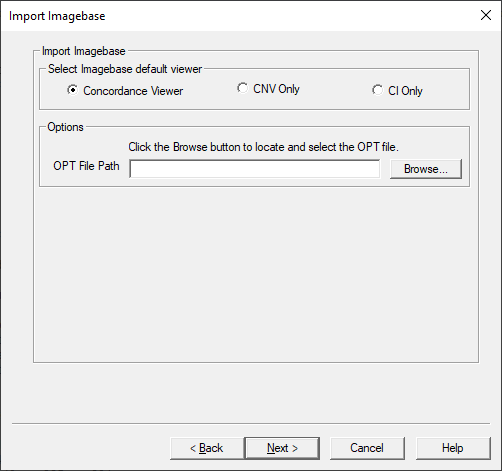
25.Choose your imagebase viewer in the Select Imagebase default viewer section. Depending on the viewer selected, the Options section will update accordingly.
•For Concordance Viewer or CNV Only, click the Browse button to locate and select the corresponding OPT file for the imagebase.
•For CI Only:
oTo scan images from a directory, select the Scan Images option and click Browse to locate and select the directory containing the image files.
oTo load an opt file, select the Load OPT option and click Browse to locate and select the corresponding OPT file for the imagebase.
|
When importing the image files using the Scan Images option, make sure that all the image files are located in the same directory. |
26.Click Next to continue. The Preview screen displays.
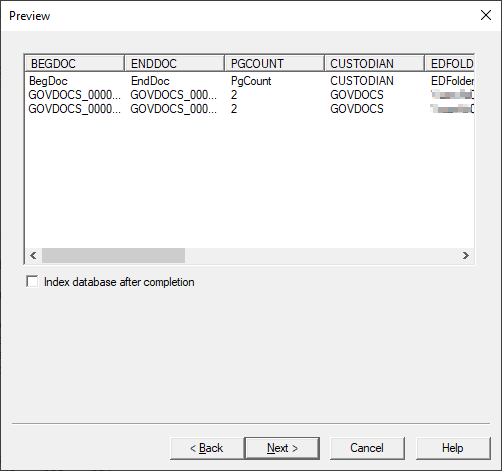
27.Preview shows the fields you have specified for the first three records. Verify that these fields contain the proper data. If not, go Back to previous wizard steps to make any necessary changes.
28.Select Index database after completion to automatically index the new database after it is created.
29.When you are satisfied with the information displayed on the Preview screen, click Next. The Summary screen displays.
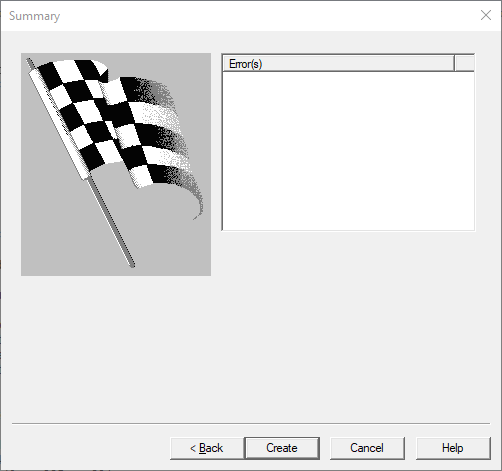
30.Click Create to create the database and load the data. The Summary screen updates to display any Errors, along with information about the data that was loaded.
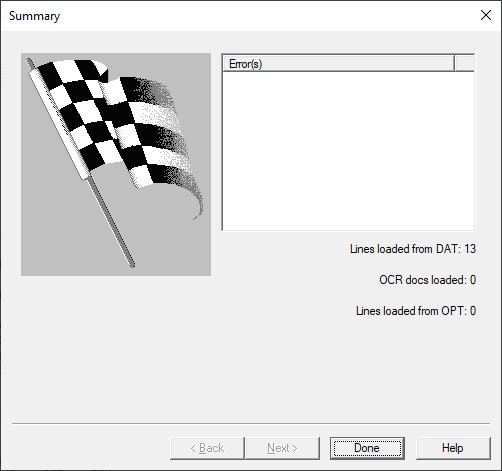
31.Click Done to exit the database wizard. You should now review the Concordance records to verify the data and imagebase loaded correctly.