If you receive TIFF images without a load file, you have some options on how to prepare the images for review.
If the images relate to an existing Concordance database, they can be loaded into the database's imagebase in Concordance Image on the Register - Scan tab in the Imagebase Management dialog. For more information about adding images to an imagebase, see Scanning images.
When you receive TIFF images without a load file and there is no database associated with the images, the most efficient solution is to contact the delivering party and ask them to send a load file for the images. If this is not possible, you can create a simple load file and simple Concordance database to link to the images.
|
The process described below is designed for use with single-page TIFF files with unique names and a .TIF extension. |
Create a Text File Containing the Image File Names
There are several good software utility programs that can be used to create a text file containing file names in a specific folder. Consider TreeSize and CopyPath. Refer to the software documentation or help system for instructions.
On a Microsoft Windows operating system, DOS commands can be used. This is often described as porting a file list.
1.Copy the images from the delivery media, such as a CD or thumb drive, to a folder on the computer network.
2.On the Start menu, click Run to open the Run dialog box.
3.In the Open field, type cmd and click OK. A command prompt window displays.
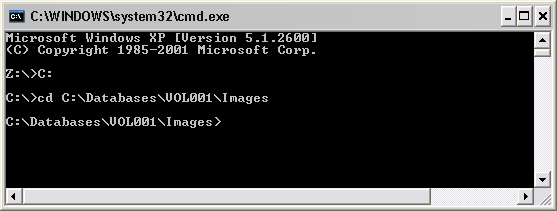
4.In the command prompt window, type the drive letter where the .tif images are currently stored followed by a colon and press Enter.
5.Type cd [directory path to the folder containing the .TIF images] and press Enter. The command prompt directory now reflects the folder where your images reside.
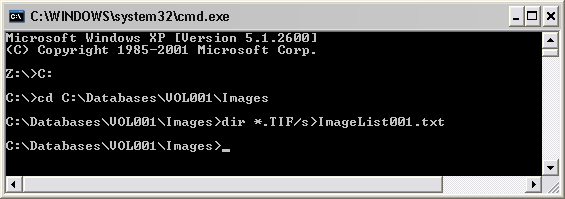
6.Type dir *.TIF/s>[image text file name].txt and press Enter. After pressing Enter, the .txt file is created in the same directory as the .tif images you entered. The .txt file contains a list of the TIFF file names from the directory you entered. You need to repeat this procedure for each image volume you have.
7.When you are done creating the text files, type exit and press Enter to close the command prompt.
Create a Data Load File for the Images
After creating the text files for your image files, you need to create a data load file for the images.
1.In Windows Explorer, browse to the .txt file you created for the images.
2.Open the .txt file using a text editor program.
3.Highlight only the image file names in the .txt file and copy all the file names. Do not include the .tif file extension when you are copying the image file names. If you are using TextPad or UltraEdit, the easiest way to copy only the file names is to use the block selection feature in the editor. For example, in TextPad, on the Configure menu, click Block Select Mode to turn on the block selection feature.
4.Open a new file in the text editor and save the new file as a .dat file. The .dat file will be the data load file for the images.
5.In the .dat file, paste the image file names.
6.If you have more than one image volume and created multiple .txt files for the images, open the other .txt files, copy the image file names, and paste these image file names into the .dat file as well.
7.Add a carriage return at the end of the last record in the image list. Concordance will not load the last record if the carriage return at the end of the record is missing.
8.Save the .dat file.
Create a Database
After creating a data load file for the images, you need to create a simple database. The instructions for creating a database in this topic only include the steps necessary for creating a very simple database that can be used for importing a data load file created for images. For detailed information about creating a Concordance database, see Creating a Database.
1.In Concordance, on the File menu, click New. The General tab in the Create database from template dialog displays.

2.Select the Blank template and click OK.
3.Navigate to the directory for the database, type the File name of the database, and click Open. The New dialog displays.
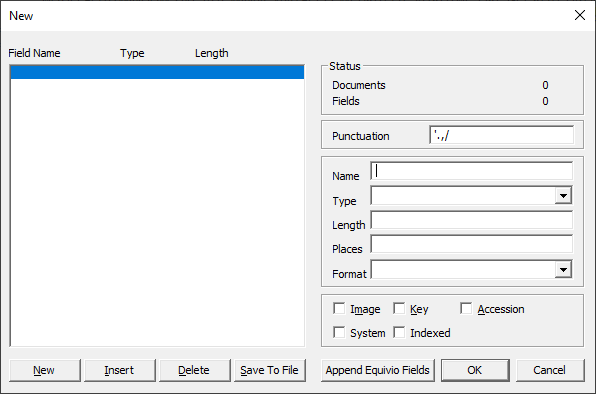
4.Click the New button to add an image field to the database.
5.In the Name field, type the name of the image field.
6.In the Type field, select Text.
7.In the Length field, type a field length number long enough to include all the characters in your image file names.
8.Select the Image check box.
•An image field is used to link Concordance with an image viewer, such as Concordance Image or Opticon. The Image check box only needs to be selected for one of the database's fields. It is best practice to select the Image check box for the BEGNO field or it's equivalent.
•If you are using Concordance Image as your image viewer, all you have to do to launch Concordance Image and link your imagebase files with your database records is open the database in Concordance and click View image (camera) in Concordance.
•If you are using an image viewer that is not Concordance Image or Opticon, you will need to configure the image view for Concordance on the Viewer tab in Preferences dialog box. See Viewer Preferences for more information.
•Regardless of the image viewer you use, when you view a document associated with an image in Concordance, the corresponding image is displayed in the selected viewer.
9.Create any additional field you want to add to the database. For more information, see Data Fields.
10.Click OK to save your database.
|
If you accidentally click the OK button or press Enter while entering fields in the New dialog box, you will close the dialog box. To reopen it, on the File menu, click Modify. Click the New button to add a new field to your database. Clicking OK saves the data entered in the dialog box and saves the database. When you reopen the New dialog box in the database, the dialog box name is changed to the Modify dialog box. |
Import the Data Load File Into the Database
Now that you have created the data load file and database for the images, you are ready to import the data load file into the database.
1.With the database you created open in Concordance, on the Documents menu, select Import, and click Delimited Text. The Import dialog displays.
2.Select Update current database and Import dialog box, then click OK. The Import Delimited Text dialog displays.
3.The image field you created is displayed in the Selected fields list. Comma, Quote, and Newline default to the default delimiters for Concordance. The Date format defaults to yyyymmdd, and by default, Ignore first line is not selected.
4.Click the Go button to open the Load delimited file dialog.
5.Navigate to and open the .dat file you created for the images.
6.The .dat file is imported into the database. When the .dat file is imported, the number of documents that successfully loaded is displayed in the Documents loaded field. Verify that the number of documents matches the number of image file names in the .dat file. The Status field also displays the number of documents loaded into the database.
6.Click the Done button to close the Import Delimited Text dialog box.
Scan the Images Into the Imagebase
After the data load file is imported into the database, you need to create the imagebase and scan the images into the imagebase. See Scanning Images for more information.
1.In Concordance, click View image (camera) on the Dynamic toolbar.
2.Clicking the View image button generates the imagebase for the database. Creating an imagebase creates the database's dir, .vol, and redlines .dcb file. The first time you click the View image button, Concordance Image launches with an error message displayed.
3.Click OK to close the message.
4.See Scanning Images for details on how to scan the images using the Register - Scan tab on the Imagebase Management dialog.