Working With Projects
In CloudNine™ LAW, assigning cases to projects can make it easier to find and manage cases. When you first create a case, you can assign it to a project or you can assign cases to projects after you create your cases. After cases are assigned to projects, you can use a tree control that lists projects and member cases to easily navigate to the case you are interested in.
Organizing cases by project can be useful, for example, when you need to work with multiple cases from the same client.
The steps to create a new project vary, depending upon whether you create a project at the same time as you create a new case, or create a project for an existing case.
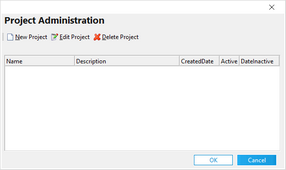
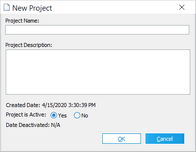
1.On the File menu click New Case or alternatively click the New Case icon from the toolbar. The New Case - Properties dialog box appears. 2.Click Edit next to the Client or Project Name. The Project Administration dialog box appears. 3.In the Project Administration dialog box click New Project. The New Project dialog box appears. 4.Type a Project Name and a Project Description. 5.Next to Project is Active, keep the default, Yes, if the project will be initially active, otherwise select No. 6.Click OK. The new project is added to the list. 7.Click OK to close the Project Administration dialog.
|
1.On the File menu click Open Case. 2.In the Open Case dialog box, select a case and then click Properties. The Case Properties dialog box appears. 3.Click Edit next to the Client or Project Name. The Project Administration dialog box appears. 4.In the Project Administration dialog box click New Project. The New Project dialog box appears. 5.Type a Project Name and a Project Description. 6.Next to Project is Active, keep the default, Yes, if the project will be initially active, otherwise select No. 7.Click OK. The new project is added to the list. 8.Click OK to close the Project Administration dialog.
|
1.On the File menu click Open Case. 2.In the Open Case dialog box, select a case and then click Properties. The Case Properties dialog box appears. 3.Click Edit next to the Client or Project Name. The Project Administration dialog box appears. 4.In the Project Administration dialog box, select a project. 5.Click Edit Project. The Edit Project dialog displays. 6.Edit the project name, description, or active status. 7.Click OK.
|
1.On the File menu click Open Case. 2.In the Open Case dialog box, select a case and then click Properties. The Case Properties dialog box appears. 3.Click Edit next to the Client or Project Name. The Project Administration dialog box appears. 4.In the Project Administration dialog box select a project. 5.Click Delete Project. 6.Click OK to confirm deletion and OK again to close the Project Administration dialog. The project name will revert to <none> for any CloudNine™ LAW case previously associated with the deleted project.
|


