Advanced Tab
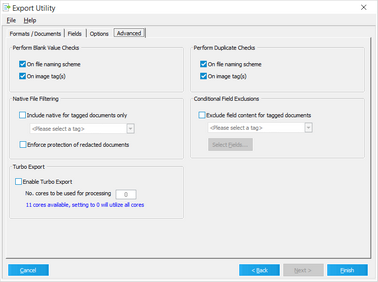
The Advanced tab of the Export Utility contains settings to control blank values and to check for duplicate values for the selected image tag and file naming fields. The blank value and duplicate check settings are enabled by default. The Advanced tab also contains settings for exporting native files by tag, making sure redacted text and the native files for redacted documents are excluded from exports, and excluding field content for tagged documents. The native file and conditional field exclusion settings are disabled by default.
|
Disabling checks for blanks and duplicates could result in files being overwritten in the export path. Or you may experience problems with loading into the target application. If these checks are not needed, a speed increase in export initialization is a potential benefit of disabling the settings in larger cases. |
1.In the Export Utility dialog box, click the Advanced tab. 2.Set these options to determine whether CloudNine™ LAW performs a check for blank values prior to exporting: •On file naming scheme - When enabled, LAW checks the selected field(s) used as the file naming scheme on the Options tab for blank values and notifies you if any are found. •On image tag(s) - When enabled, LAW checks the selected image tag field on the Fields tab for blank values and notifies you if any are found. 3.Configure other export options as needed, and then click Finish.
|
1.In the Export Utility dialog box, click the Advanced tab. 2.Set these options to determine whether LAW performs a check for duplicate values prior to exporting: •On file naming scheme - When enabled, CloudNine™ LAW checks the selected field(s) used as the file naming scheme on the Options tab for duplicate values and notifies you if any are found. •On image tag(s) - When enabled, LAW checks the selected image tag field on the Fields tab for duplicate values and notifies you if any are found. 3.Configure other export options as needed, and then click Finish.
|
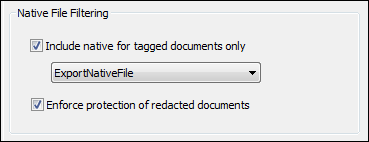
On the Formats/Documents tab in the Export Utility dialog box, the Include Native Files check box allows you to globally include or exclude native files during the export. However, if you only want to export some, but not all, native files along with other case items, The Include native for tagged documents only check box on the Advanced tab allows you to only include native documents for documents tagged with a specific tag in the export.
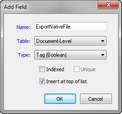
To export native files by tag: 1.Identify or create a Tag (Boolean) field that you will use to tag documents for native file export. For more information about creating tag fields, see Manipulating Fields. 2.Apply the tag to the documents for which you want native files to be included in the export. For more information about applying tags, see Tagging Records. 3.In the Export Utility dialog box, click the Advanced tab.
4.Select the Include native for tagged documents only check box, and then select the applicable tag. 5.Configure other export options as needed, and then click Finish.
|
The Enforce protection of redacted documents check box determines whether the export will ensure redacted text is excluded from the export. By default, the Enforce protection of redacted documents check box is not selected, but once the setting is defined for an export, the last export setting for the check box will be retained for new exports.
If the Enforce protection of redacted documents check box is selected, the following will occur during the export: •The export identifies all documents with the HasRedaction fields set to Y. When redactions are applied and saved to a document in CloudNine™ LAW, the HasRedaction field is set to Y (Yes) for the document. For more information about the HasRedaction field, see Field Descriptions - LAW. •If native files are being exported, the export automatically prevents the native files for redacted documents from being exported. •If images are being exported, redactions applied to a document will automatically be merged with the image to hide the redacted text when the document is exported. •OCR text for documents with redactions will be excluded from the export if redactions were applied to a document after OCR was performed on the document. OCR text for documents with redactions will be included in the export, except for any redacted text, which will automatically be excluded from the export, if redactions were applied to a document before OCR was performed on the document. •Extracted text for documents with redactions are excluded from the export, regardless of the text priorities defined in the Text Priority section of the Text Options dialog box. For example, if the text priority in Text Options dialog box is 1) Extracted Text, 2) Printed Text, 3) OCR Text, having the check box selected will force the export to use the OCR text for the document if the document OCR was performed on the document after applying the redaction. If redactions were applied after OCR was performed on the document, OCR text will also be excluded from the export. For more information about defining text priorities, see Formats/Documents Tab.
When the Enforce protection of redacted documents check box is selected, and the export encounters documents with redacted text, the export generates a warning message in the export error log. •If native files are being exported, the Export of native file blocked due to redactions message is displayed in the ErrDetails column. •If OCR was performed after redactions were applied to a document, the OCR contains redacted content, export was prohibited message is displayed in the ErrDetails column.
|
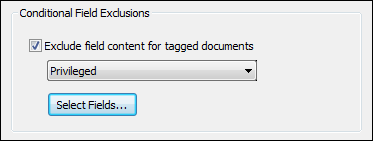
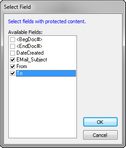
The Exclude field content for tagged documents check box determines whether content from specific fields is excluded from the export for documents tagged with a specific tag. Before content from a field can be excluded from an export, the field must be added to the Selected Fields list on the Fields tab in the Export Utility dialog box. For example, you can select the Exclude field content for tagged documents check box if you want to exclude content from the Email_Subject, From, or any other field that may contain privileged content, for all documents currently tagged with the Privileged tag from the export. By default the Exclude field content for tagged documents check box is not selected.
To exclude field content from the export 1.In the main window, on the Tools menu, click Export Utility. Clicking Export Utility opens the Formats/Documents tab in the Export Utility dialog box. 2.Click the Fields tab. 3.Make sure the fields you add to the Selected Fields list for the export include the fields you want to exclude content from during the export. 4.Click the Advanced tab. 5.Select the Exclude field content for tagged documents check box.
6.In the tag list, select the tag that has been applied to the documents containing field content you want to exclude from the export. 7.Click the Select Fields button. Clicking the Select Fields button opens the Select Field dialog box. 8.Select the check box next to the fields from which you want to exclude content. 9.Click OK. Clicking OK saves your field selections and closes the Select Field dialog box. 10.Configure other export options as needed, and then click Finish.
|
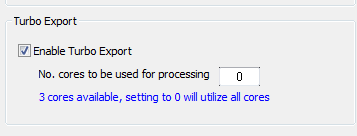
The Turbo Export feature is an enhanced way of getting documents out of LAW vs the traditional export processing. Turbo Export takes advantage of multiple cores on the LAW workstation to achieve faster throughput when processing an export. For example, you have a 4 core LAW workstation and want to export out 90000 documents. Using Turbo Export your result would look something like this: <Volume Group > Folder <C01 – 001> Folder = A Load file and corresponding documents 1-30,000 <C02 – 001> Folder = A Load file and corresponding documents 30,001-60,000 <C03 – 001> Folder = A Load file and corresponding documents 60,001-90,000 Only 3 cores are used by Turbo Export because the remaining core is needed to run the OS and LAW Application.
When enabling this option, there are a few things to consider: • To take advantage of this feature, the LAW workstation must have at least 3 cores or more.
• Only one Admin license is needed even though it is using multiple cores as workers
• This export has a different output vs the traditional export: a) The volume folder acts as a volume group folder b) Within the volume group folder are folders prefixed with ‘C01-’, ‘C02-’, etc. These folders are where exported documents and load files will be placed. One folder is created for each core used when exporting.
• Across the folders, we will not break apart families or documents.
• The process is evenly distributed across all cores.
• If the export needs to be partitioned out, it too is supported like our traditional export.
To enable Turbo Export: 1. In the main window, on the Tools menu, click Export Utility. Clicking Export Utility opens the Formats/Documents tab in the Export Utility dialog box. 2. Click the Advanced tab. 3. Select the Enable Turbo Export check box. 4. LAW will collect the number of cores on your machine. 5. Use No. cores to be used for processing setting to manage hardware resources when using multiple programs at the same time. The No. cores to be used for processing field defaults to 0. When it is set to 0, all available cores will process data for this case during the export process.
|

