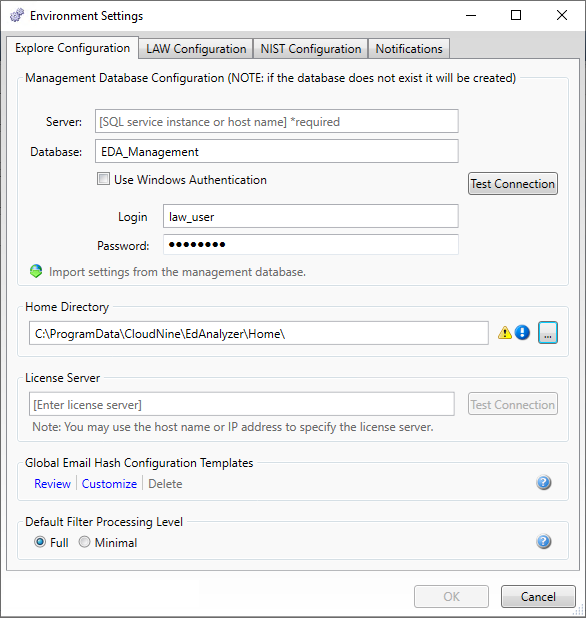
When you run CloudNine™ Explore for the first time, you must perform a few configuration tasks:
1.Specify a connection to an SQL Server. As a part of this step, you must select an authentication method for CloudNine™ Explore to use when logging into the SQL Server. You can use either a Windows domain login, or an SQL Server security login.
|
Note that specifying an authentication method for connecting to an SQL Server is different from specifying the authentication method for running CloudNine™ Explore as a Windows service. This distinction is important for troubleshooting CloudNine™ Explore, especially when using a distributed environment. You can select an authentication method for the CloudNine™ Explore service when you run the full installation of CloudNine™ LAW and CloudNine™ Explore. You can change the authentication method for SQL Server by opening the environment settings in CloudNine™ Explore. You can change the authentication method of the CloudNine™ Explore service by using the Windows Services management console. For more information on installing CloudNine™ Explore, see Installing CloudNine™ Explore. |
2.Select a home directory for storing case files. The home directory should be accessible via UNC path to all computers that will participate in processing.
|
If you plan to use one or more additional computers to access or process data for CloudNine™ Explore cases, then the path value must be supplied as a UNC path. For example: \\SomeServer\SomeFolder\MyCases\. The folder must also be accessible by all computers that are running CloudNine™ Explore. |
|
Why can't a mapped drive be used? CloudNine™ Explore processing is performed by Windows Services running on one or more machines. Windows services running on one machine cannot see the drives mapped on another machine and thus cannot access the files located on them. Additionally, persistent drive mappings are only restored during an interactive login, which the windows service does not use. Thus, even if the drive is mapped on all CloudNine™ Explore machines, the services running on those machines would not be able to access or use those mapped drives. Refer to this MSDN Services and Redirected Drives for more details |
3.Select a license server.
After configuring these elements, you can create cases and begin prefiltering operations immediately. If you want to run prefiltering operations using multiple computers, you can add more CloudNine™ Explore clients by repeating these configuration steps on different computers.
Configuring environment settings at startup
1.From Windows Start, expand the CloudNine™ LAW folder and select CloudNine™ Explore. The Configure Environment dialog box appears.

2.Configure options as needed:
Option |
Description |
||
|---|---|---|---|
Server |
Type the name of the SQL Server computer followed by a slash (\), followed by the SQL Server instance name. For example, if the computer name of the server is SomeServer and the name of the SQL Server is SQLServer, you would type: SomeServer\SQLServer |
||
Database |
Use the default database name provided: EDA_Management |
||
Use Windows Authentication ON |
Select this option to connect to the database server using the current Windows login. |
||
Use Windows Authentication OFF |
If the Use Windows Authentication check-box is not selected, you must also provide a valid Login and Password that has access to the SQL Database configured above. |
||
Home Directory |
The Home Directory is where all shared configuration data is stored, and will serve as the default directory for new cases. If you plan to use one or more additional computers to access or process data for CloudNine™ Explore cases, then you must supply a UNC network path that is accessible to all computers that are running CloudNine™ Explore (ex. \\SomeServer\SomeFolder\MyCases\).
|
||
License Server |
Provide the name of a computer that is operating as a license server. The warning icon is visible if the value you provide resolves to the local computer. |
||
Default Filter Processing Level |
This setting determines the number of filters that will be available for new cases: •Full includes the following filters: File Hash Filter (NIST Items and Custom File Hash Items), Duplicate Document Filter, Date Range Filter, File Type Filter, E-Mail Sender Domain Filter, and Language Filter. •Minimal includes only the following essential filters that will be run post-analysis: File Hash Filter (NIST Items and Custom File Hash Items), Duplicate Document Filter.
|
3.Click OK.
Creating a case is the next step. For more information on creating and configuring a new CloudNine™ Explore case, see Cases in CloudNine™ Explore.