CloudNine™ Explore creates an index when you import files into a case. During the indexing process, CloudNine™ Explore reads each imported file and compiles an index based off each word it reads. The index is used when you run searches so you can locate important words, dates, and text phrases easily in your case records.
When you import new files into a case, the new files are automatically indexed and included when running new or saved searches.
The index settings for a case are defined on the Indexer tab in the New Case Settings and Edit Case Settings dialog boxes. On the Indexer tab, you can also customize which fields are indexed when a case is indexed. By default, all fields in a case are indexed. If you modify a case's index settings or change a case custodian name, you will need to manually re-index the case by rebuilding the index. You can access the Indexer tab from the Index Management dialog box by clicking the Index Settings button.
For more information about the Indexer tab, see Indexer Case Settings.
To maximize search indexing and performance, CloudNine™ Explore will distribute documents to a maximum of 32 indexes. Indexes are initially limited to 250,000 documents, but the maximum number of documents per index will double if all 32 indexes have more than 250,000 documents.
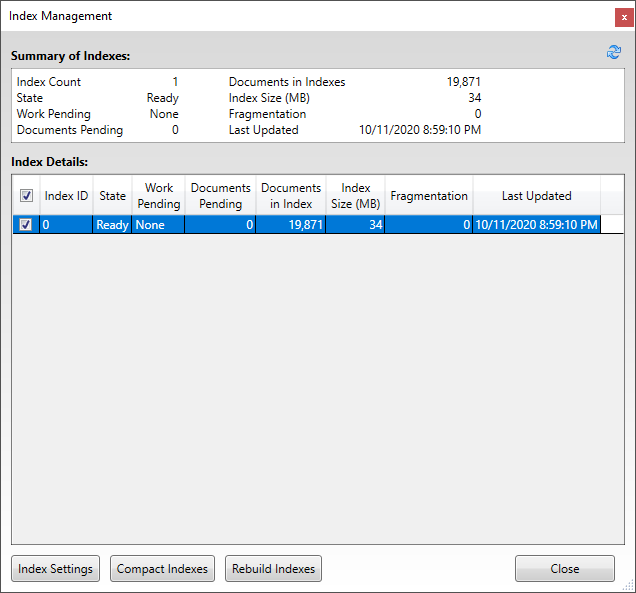
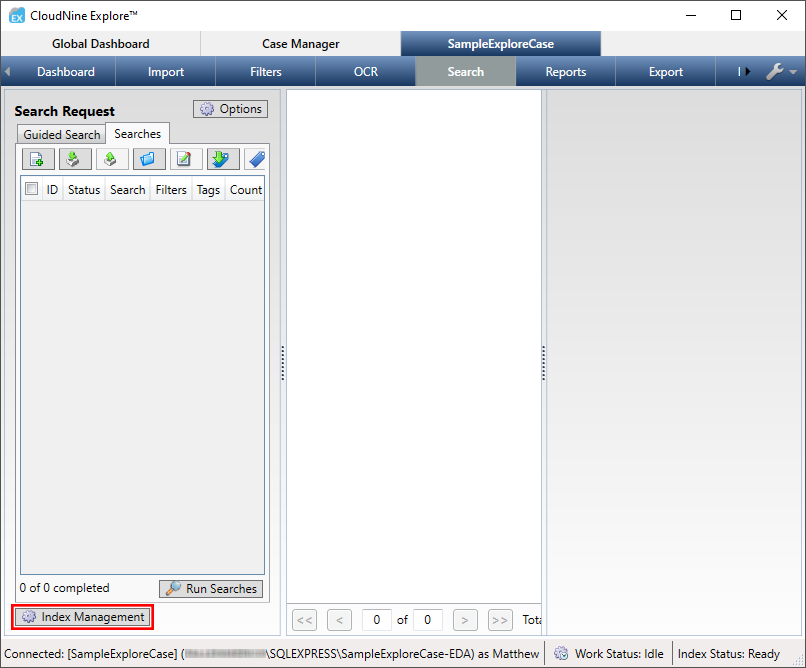
The Index Management dialog box in CloudNine™ Explore allows you to view the details of a case's indexes and compact and rebuild all or individual case indexes. The Index Management dialog box is accessed by clicking the Index Management button on the Search tab.
The Summary of Indexes section of the Index Management dialog box displays the index information for all the case's indexes. The Index Details section lists the individual indexes in the case index and the individual case information.

Index Management Field and Column Definitions
Name |
Description |
|---|---|
Index Count |
Number of indexes in the case's index |
Index ID |
Index identification number |
State |
Current index state: •Ready – Indicates there are currently no index processes (indexing new documents, rebuilding the index, or compacting the index) running and the index is ready for processing •Compacting – Index is in the process of being compacted •Re-Indexing – Index is in the process of being rebuilt •Indexing - New case documents are being indexed |
Work Pending |
Pending work state: •None – No work (indexing, rebuilding, or compacting) is currently pending •Indexing – New case documents are being indexed •Compacting – Index is in the process of being compacted •Re-Indexing – Index is in the process of being rebuilt |
Documents Pending |
Number of documents in queue to be indexed |
Documents in Indexes |
Total number of documents whose full text has been indexed in all the case's indexes |
Documents in Index |
Total number of documents whose full text has been indexed in the individual index |
Index Size (MB) |
Total case index file size (Summary of Indexes) or individual index file size (Index Details) in megabytes |
Fragmentation |
Fragmentation measures the extent to which an index is fragmented by being built in multiple indexing jobs. The number displayed in the Fragmentation field is the number of fragments in the binary tree. Compressing an index eliminates fragmentation. Fragmentation of an index increases the size of the index and slows searching, but the effect is generally not noticeable unless the fragmentation is severe. |
Last Updated |
Date and time the case index was last updated. |
 How to Compact or Rebuild a Case Database
A Knowledge Based Article on this subject can be found here: Compacting or Rebuilding a Case Database (cloudnine.com)
1.From the Case Manager tab, double-click on the desired Case to open it, and then navigate to Search sub-tab.
2.From here, click the Index Management button at the bottom-left.

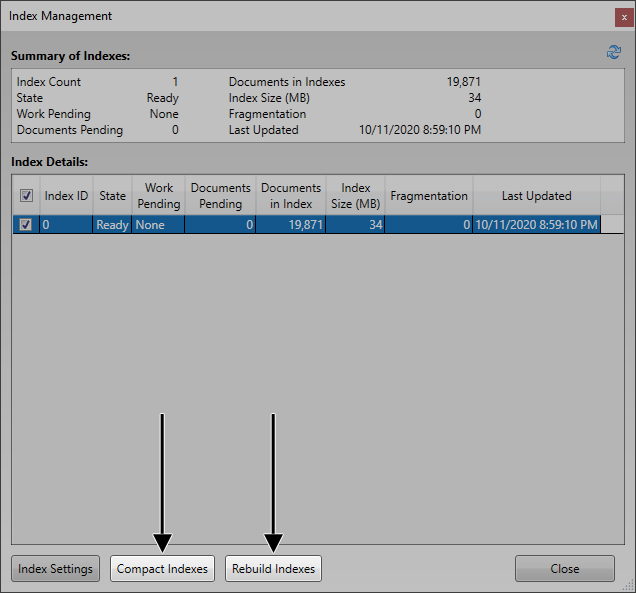
3.The Index Management window will open. Select the desired indexes from the Index Details list by checking their boxes in the far left column.
4.Compacting Indexes: Click the![]() button, and then select Yes at the Compact prompt to begin compacting the selected indexes.
button, and then select Yes at the Compact prompt to begin compacting the selected indexes.
5.Rebuilding Indexes: Click the![]() button, and then select Yes at the Rebuild prompt to begin rebuilding the selected indexes.
button, and then select Yes at the Rebuild prompt to begin rebuilding the selected indexes.
