|
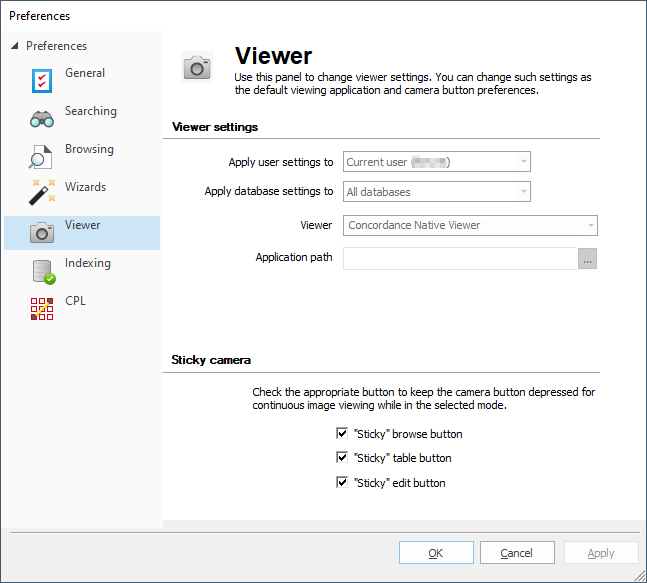
Viewer Settings can be defined at different levels - all users, the current user, or database. Settings at the lowest level take precedence. If you define viewer settings for all users and an individual database, when accessing that specific database the database settings will be used (not the all user settings). Viewer settings for all databases are stored in the local user's registry settings and only apply to the local user. Viewer settings that are applied to a specific database are stored in the .ini file of the database and will impact all users that access that database. |

Viewer settings |
|
|---|---|
Apply user settings to |
Determines whether user settings apply to the Current user or All users. |
Apply database settings to |
Determines whether the database settings apply to the Current database or All databases. |
Viewer |
Use this drop-down to select the application that you want to use as the default image viewer. Other fields may be displayed depending on the viewer chosen. The following options are available: •Concordance Viewer: This database will use the Concordance Viewer. •Concordance Native Viewer: Click the ellipses button to the right of Application path. In the file explorer window, navigate to the location of your ConcordanceNativeViewer.exe and click Open. •Concordance Image (Option): Click the ellipses button to the right of Application path. In the file explorer window, navigate to the location of your ConcordanceImage.exe and click Open. •CPL: Click the ellipses button to the right of Viewer CPL. In the file explorer window, navigate to the location of the .cpl file to execute when you click the View Image button in Concordance, and click Open. See more information below on using the CPL option. •IPRO: Click the ellipses button to the right of Application path. In the file explorer window, navigate to the location of IPRO.exe and click Open. Click the ellipses button to the right of Viewer CPL. Browse to and select the applicable .cpl file. You can download the CPL script from Ipro Tech. For more information about the IPRO viewer and setup options, see the IPRO documentation. •IPRO Thin Client: Enter the appropriate Alternate project name. For more information about the IPRO Thin Client viewer and setup options, see the IPRO documentation. •<none>: No viewer is defined for the user and/or database selected. •<Use Global Settings>: No specific viewer settings are defined for the user and/or database selected, global settings will be used. |
Sticky camera |
|
|---|---|
"Sticky" browse button |
The View Image button will automatically be selected in the Browse view. |
"Sticky" table button |
The View Image button will automatically be selected in the Table view. |
"Sticky" edit button |
The View Image button will automatically be selected in the Edit view. |
Using CPL Viewer
The CPL (Concordance Programming Language) viewer option is intended for programmers and systems integrators who have knowledge of programming languages and technical expertise. Concordance can execute a CPL program when clicking the View Image button in the Browse, Edit, or Table view, or right-clicking highlighted text and clicking View image. The CPL program can then pass the image key to another program through DDE or as a startup parameter.
The CPL program you select needs to take the appropriate action to bring up the viewer and the proper image. The CPL program should check the clipboard by using the paste() function. If nothing is in the clipboard, your program should use the data in the image-key field. You need to check the clipboard because the end user can highlight text in the Edit or Browse view and send it to your program with the right mouse button. Your program must not perform any screen displays. For information about DDE functions that may be useful to your program, see Developing with Concordance.