Return to Topic![]()
TIFF Profiles are INI files that store a full list of configuration settings established within the e-Print Options and TIFF Conversion Options windows. There is no default Tiff Profile, so each new Case File will have a blank profile loaded until a new one is created/saved. These profiles can be saved in any location, allowing anyone with access to the file itself to use them. You can manage your Tiff Profiles through the use of the File Menu within either Options window, which is available from any Category.
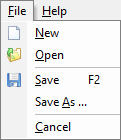
File Menu
•New - Resets all E-Print and TIFF Conversion settings back to their default values, allowing you to configure a new Tiff Profile and displaying "(Unsaved Profile)" in the window header. •Open - Opens the Open TiffOptions Profile File Explorer, allowing you to navigate to and select the desired TIFF Profile to load/open. •Save - Saves any changes made to the active Tiff Profile, or functions as Save As instead if no profile is currently opened. •Save As... - Opens the Save Tiff Profile As File Explorer, allowing you to save the current E-Print or TIFF Conversion configuration as a new Tiff Profile at the desired location. •Cancel - Closes the e-Print Options or TIFF Conversion Options window.
Recently used or saved Tiff Profiles will also appear listed within this File Menu, between the Save As... and Cancel menu options. Click on the desired Tiff Profile to immediately load it. |
 Creating New Tiff Profiles
1.Launch the Batch Processing Utility from the Main User Interface by clicking ![]() from the Toolbar OR using the Menu to select Tools > Batch Process....
from the Toolbar OR using the Menu to select Tools > Batch Process....
2.Use the Options Menu menu to select either E-Print Options OR TIFF Options.... The appropriate configuration window will open.
3.From the File Menu, select New to create a new (Unsaved Profile), and then configure the settings for all Categories as desired.
![]() Refer to the E-Print & TIFF Conversion Options topic for information on each Category present within either configuration window.
Refer to the E-Print & TIFF Conversion Options topic for information on each Category present within either configuration window.
4.When you're finished configuring, press F2 on your keyboard to open the Save Tiff Profile As File Explorer.
5.Navigate to the desired storage location, enter a File name, and then click Save to save your new Tiff Profile.
6.If you want this Tiff Profile to be shared between both the E-Print and TIFF Conversion configuration windows, then do the following:
A.Close out of the current configuration window by clicking either OK or Cancel.
B.From the Batch Processing Utility, repeat Step 2 by selecting the opposite menu item.
C.Configure the only Category that is exclusive to this window.
D.When you're finished, press F2 on your keyboard again to save your Tiff Profile.
7.You have now successfully created a new Tiff Profile.