Managing Existing Cases

<< Click to Display Table of Contents >>

Navigation:  Using CloudNine LAW > Getting Started > Case Files >

Managing Existing Cases

All Case File management tasks can be performed within the Open Case utility of CloudNine™ LAW. This utility opens automatically each time LAW is launched.

There are two other ways to access the Open Case utility:

1)From the Menu of the Main User Interface, select File > Open Case.

2)Click on the Open an Existing Case button in the Toolbar of the Main User Interface.


OpenCaseWindowIcon Open Case

Toolbar

New Case - Opens the Select Database Engine window, starting the process for creating a new Case File.

Browse... - Opens a File Explorer, allowing you to navigate to and open Case Files on your computer which aren't listed in the Case List.

Properties - Opens the (New) Case - Properties window, allowing you to view or make changes to the selected Case File.

Delete From List - Deletes the selected Case File from the list. A warning prompt will display before proceeding.

Project/Client View - Toggles the Case List between project and client based list viewing. Useful for finding specific cases in longer lists.

RightArrowFor more information on Projects, see the Case Templates and Projects topic.

Tabs

The following Tabs determine which Case Files appear in the Case List below:

Recent Cases - The ten most recently opened cases are listed.

Active Cases - Only active cases are listed.

All Cases - All available cases are listed, with added Search functionality only available within this tab. Choose either CaseName or DateCreated from the drop-down menu, and start typing into the adjacent box in order to start searching.

Case List

Displays the list of available of Case Files, determined by the tab selected above. Columns along the top indicate the Database Type, a Case Name and Description (when available), the Date Created, and the Date Last Opened for each case listed. Left-click on any column to organize the list by that column.

When upgrading from a previous version of LAW, a CaseMigrationWarning under the far right column indicates that migration needs to be performed. Open the associated Case File and select Yes on the Pending Migrations prompt to begin the process.

Management Options

These are advanced options regarding the deletion of Case Files:

Delete SQL databases from server on case deletion - The entire Case Database and all log files are also removed from their associated SQL server upon deletion.

Perform backup before deleting database from server - Creates backups of SQL Case Databases upon deletion. Leaving this option enabled is recommended.

RightArrowInstructions for removing these options can be found in the Advanced Case Management topic.


InfoIcon 
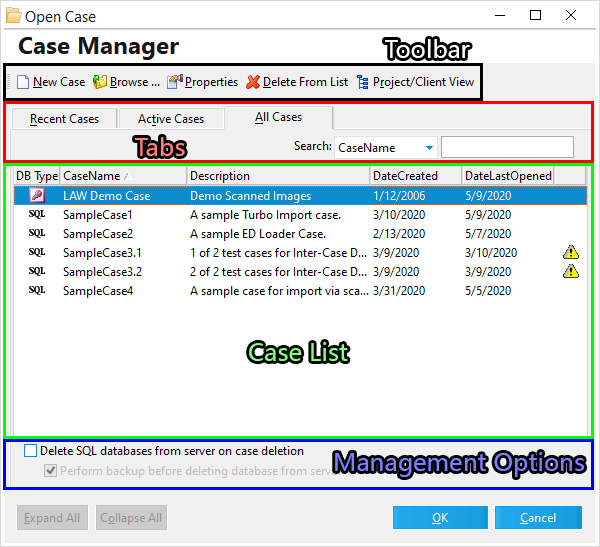
Opening an Existing Case

This can be achieved in two different ways from the Open Case window, depending on whether or not your case appears in the Case List:

1)For cases shown in the list:  Select between the various Tabs to display lists of available cases, using the optional search functionality if needed for longer lists. Once you have found the case you wish to open, select it from the list, and click on OK at the bottom right of the window to begin working.

2)For cases not shown in the list:  Click on the Browse... button in the Toolbar to open up a separate file browser. From here, you can browse your computer for a case file (case.mdb, case.add, case.ini) not listed. Once you have your case file selected, click on Open to add that case file to the list and begin working. Note that you may have a few choices here as well:

a)Click on the down arrow next to Open to select Open as Read-Only instead. This allows you to view the case without performing any editing.

b)Sometimes there will be a naming conflict with a case currently on the list. In these cases, you will be prompted to enter a new case name before the case file is added to the list.


InfoIcon Viewing/Editing Case Properties

1.From the Open Case window, select the desired case to be viewed within the Case List.

2.Click on the Properties button in the Toolbar to open the Case - Properties window for the selected case.

i.This window will allow you to view or make changes to the properties of that case.

3.Click on OK at the bottom right of this window when finished to apply any new changes made.


InfoIcon Deleting Cases

1.From the Open Case window, select the desired case to be deleted within the Case List.

2.Click on the Delete From List button in the Toolbar.

3.Doing so will bring up the Delete Case warning prompt. Press Yes to proceed, or No to cancel.

4.Proceeding with deletion may bring up additional prompts, depending on Management Options enabled. Follow these prompts to complete the deletion process.