Notifications

Contents
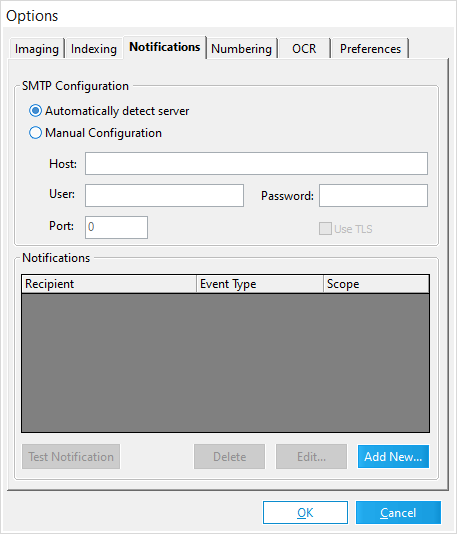
In LAW you can have LAW automatically generate and send email notifications to specific email recipients when import, batch processing, and export jobs are completed. Notifications can be set up for individual cases or set up globally for all cases. Notifications are created and managed from the Notifications tab in the Options dialog box.
If there are errors sending an email notification, the error is written to the notification log located in the following directory: %CASEDIR%\$Logs\notifications.log.
To configure the SMTP settings
When setting up notifications, you can have LAW automatically detect the SMTP server, or you can manually configure the SMTP server information to send the notification emails from a specific SMTP server and email address in the SMTP Configuration section of the Notifications tab. By default, Automatically detect server is selected. To have LAW automatically detect the SMTP server, make sure the Automatically detect server option is selected on the Notifications tab. When the Automatically detect server option is selected, the default email address for the notification email sender is LAW@noreply.com.
To manually configure the SMTP server information 1.From the main window in LAW, on the Tools menu, click Options. 2.Click the Notifications tab. 3.In the SMTP Configuration section, select the Manual Configuration option. 4.In the Host field, type the SMTP mail server address. For example: smtp.gmail.com 5.In the User and Password fields enter appropriate credentials that should be used as the sender for the email notifications. 6.In the Port field, enter the port number for connecting to the SMTP server. 7.If TLS is required, select the "Use TLS" checkbox.
|
To create a notification
1.From the main window in LAW, on the Tools menu, click Options. 2.Click the Notifications tab. 3.Click the Add New button. Clicking the Add New button opens the Add Notification dialog box.
4.In the Recipients box, enter the email addresses where you want to send the email notification. To enter multiple email addresses, place a semi-colon, ;, between each email address. 5.In the Event Type list, click one of the following: •Batch Complete. Sends an email notification whenever a batch process is completed or canceled, and when a distributed batch process is completed. •Export Complete. Sends an email notification whenever an export job is completed or canceled. •Import Complete. Sends an email notification whenever an Electronic Discovery import job is completed. (This is not enabled for Turbo Import enabled cases.) 6.In the Event Scope list, click one of the following: •All Cases. The notification applies to all LAW cases. Notification will be displayed in the Notifications list on the Notifications tab for all cases. •Current Case. The notification only applies to the current LAW case. Notification will only be displayed in the Notifications list on the Notifications tab for the case the notification was created in. 7.Click OK. Clicking OK saves the notification and adds the notification to the Notifications list on the Notifications tab.
|

To edit a notification
1.In the Options dialog box, click the Notifications tab. 2.In the Notifications list, select the notification you want to edit. 3.Click the Edit button. 4.Clicking the Edit button opens the Edit Notification dialog box.
5.Edit the notification. 6.Click OK to save your changes.
|

To delete a notification
1.In the Options dialog box, click the Notifications tab. 2.In the Notifications list, click the notification you want to delete. 3.Click the Delete button. 4.Click Yes when asked, Would you like to proceed?. Clicking Yes deletes the notification.
|
To test a notification
You can test a notification to make sure it is set up correctly.
1.In the Options dialog box, click the Notifications tab. 2.In the Notifications list, click the notification you want to test. 3.Click the Test Notification button. 4.LAW sends a test email to the email addresses entered in the Recipients box in the Add Notification and Edit Notification dialog boxes. The email Subject field contains one of the following: •For imports - LAW Notification: [Import Complete] on [case name] •For batch processes - LAW Notification: [Batch Complete] on [case name] •For exports - LAW Notification: [Export Complete] on [case name] The email body for all types of notifications is: --- THIS IS A TEST NOTIFICATION ---
|
Here are the contents of each notification email message:
Import Complete message:
Batch Complete message (standalone batch process):
Batch Complete message (distributed batch process):
Export Complete message:
|