Establishing Folder Structures
Creating a folder structure in CloudNine™ LAW will allow better organization of documents and the ability to mimic the structure of the original documents. This helps scanner operators find their place in the case more easily and aids in finding and correcting scan errors. The folder structure is also useful for EDD projects, allowing organization by media type or custodian, for example.
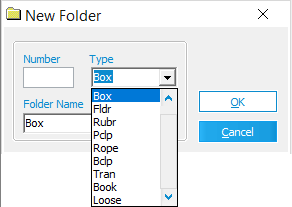
LAW provides a set of pre-defined folder suffixes to quickly create a folder structure, or you can customize the folder names as needed. When naming folders, one important item to note is that the folder structure generally determines the order of processing, i.e. folders are processed in alphabetical order.
|
The files referenced in the document list are not necessarily physically stored in the folders shown in the folder tree. Displaying the records in this manner will allow the desired representation of folders and records to be maintained. For example, folders created via TIFF conversion in LAW are stored in <case root>\$Image Archive; however, the records will appear in the document list when clicking on the original folder structure created by ED Loader or Turbo Import during import. See the topic related to the type of function being performed in order to see how the associated files are stored. |
|
The Folder Structures on this page are for Electronic Discovery enabled cases only. The folder structure can not be altered in Turbo Import enabled cases except by deleting or expanding & collapsing. |
1.Create a new case or open an existing case. 2.On the Folder menu click New. The New Folder dialog appears.
3.Configure the folder naming scheme.
5.Click OK. The new folder is created as a subfolder of the currently selected folder. To create a new folder on the same level as the current folder, select the parent of that folder prior to adding the new folder.
|
LAW also provides a quick and easy method for creating a series of folders. The Auto-Create feature automatically creates the next logical folder on the same level as the current folder. For example, if currently in "C:\Case1\0001Box\0001Fldr" and Auto-Create is selected, LAW creates "C:\Case1\0001Box\0002Fldr" and makes that the current folder.
•On the Folder menu click Auto-Create. Or •Right-click a folder that will contain the folder series and then click Auto-Create.
Note the following considerations when auto-creating folders: •If the next logical folder already exists, LAW will jump to that folder and make it the current folder. •The next folder is created on the same level as the current one. •Folders cannot be auto-created while the root image folder is selected, as this would create a folder outside of the root case folder. •On the Folder menu if you select Auto-Create N Folders you can to create up to 999 folders automatically with names based on the current folder.
|
1.On the main interface in the tree view select a folder. •Any subfolders appear in the folder tree. •Any files contained in the folder appear in the document list below the folder tree. 2.As necessary you can expand or collapse folders and subfolders as described in the following table:
|
1.Select a folder to delete. 2.On the Folder menu click Delete.
|
1.Select a folder to rename. 2.On the Folder menu click Rename. Note the following considerations when renaming folders: •The folder name must not contain any characters that the operating system cannot support (i.e. ? / \). •The root case folder cannot be renamed. •When a folder is renamed, the path for all documents in and below that folder must be updated to reflect the name change. This process can take some time if the folder is near the top of the case, depending on the number of documents affected by the name change. •If the number of documents affected by folder renaming is near or greater than 10,000 the folder renaming process could fail due to file locking. The upper limit is typically > 10,000. If such an error occurs, you can edit a setting in the registry to allow the renaming of the folder to proceed. Contact CloudNine for specific details if this occurs.
|
1.In the folder tree click the folder to be moved. 2.Do one of the following: •On the Folder menu click Move. Or •Right-click the folder and then click Move. The Move Folder dialog box displays the same folder structure as the tree in the main interface. 3.Select the folder into which the folder should be moved or create a new folder. 4.Click Accept. The folder will be moved to the designated location. This process may take longer to complete for folders containing a large number of documents. Note the following considerations when moving folders: •You can move any folder below the root folder that is displayed in the folder tree. •All subfolders and records contained in the folder will be moved to the new location as well.
|
Summaries for folder properties, images, and document area are available. These are described in the following table:
|

