CaseMap
To configure export to CaseMap
1.In the main window, on the Tools menu, click Export Utility.
2.In the Export Utility, click the Formats/Documents tab.
3.In the Available Formats list, click CaseMap and then click the Select > button.
4.In the Selected Formats list, click CaseMap and then click Configure.
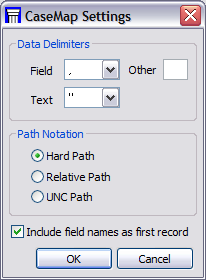
The CaseMap Settings dialog box appears.

5.Select options according to the following guidelines:
•Choose the desired delimiters to surround each field and/or field value in the load file.
•To specify a delimiter not in the Field drop-down list, choose <other> and type the delimiter into the Other text box.
•To specify how image paths are written to the load files during the export process, edit the path notation.
•With Hard Path selected, the load file will display a full path to each output file, such as C:\Exports\TestCase\Vol001\image.tif.
•The Relative Path setting uses a relative path to the images from the export path instead of the entire path (minus the drive letter).
•If the UNC Path option is selected, and the export path is a mapped network drive, the image paths are written using an UNC notation for example, \\my-server-name\my-folder-name.
•To force CloudNine™ LAW to place the names of any included index fields in the first row of the load file, enable Include field names as first record setting.
