In Concordance Desktop, you can drag and drop a DAT update file onto a Concordance Desktop Load File (DAT) database, an e-Document database, or an e-mail and attachments database to add information to existing records. To use the drag and drop functionality, you must either log onto the Concordance Desktop server/computer where the database you want to add to resides, or use Windows Remote Desktop to log onto that server/computer.
|
When importing records using a DAT file, ensure that the carriage return delimiter is set to something other than "new line" (value 013). If the new line (value 013) delimiter is set, change the delimiter in the DAT file before attempting to import the file. |
|
Prior to dropping a DAT file onto a database, ensure that the document file path listed in the DAT file is the same as the document file path in the database, as document file paths do not update. If the file paths are different, when you click on a document link it will open the old document in the database as opposed to the updated document. |
To Update Existing Database Records
1.In Concordance Desktop, open the database in which you need to update records.
2.In Windows Explorer, open folder containing the updated DAT file.
3.Drag the updated DAT file onto the database in the Concordance Desktop workspace.
i.A DAT File Drop Operation box opens.
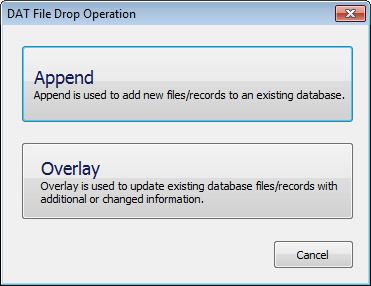
4.Click the Overlay button.
i.If the database is part of a concatenated set of databases, a Databases for overlay box opens. If not, skip to step 6.
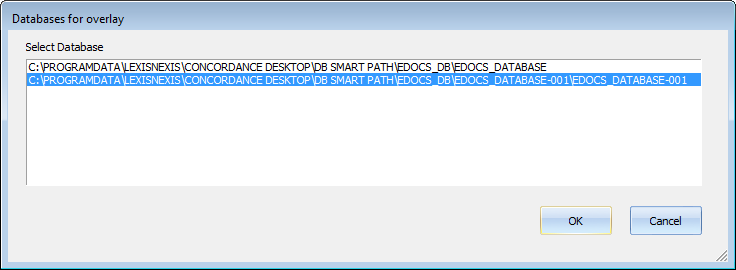
5.Select the database to update, and click OK.
i.An Overlay Database box opens.

ii.The import process attempts to determine which field to use as the indicator that a record has an update, and then preselects that field in the Key Field box.
iii.If the delimiters in the update DAT file match those in the database, all fields currently containing information in the database are selected (checked) for updating. System fields, and any fields in the DAT file that do not have a corresponding field in the database, are grayed out.
iv.If the delimiters in the update DAT file do not match those in the database, no fields are checked in the box. Please see the 'Using the Customize Load File Preview' section below if no fields are checked. Once you are done in the customize window, you can continue on with step 6 below.
6.If the preselected field in the Key Field box is not correct, click the down-arrow and select the appropriate field.
7.Do one of the following to select the fields you want the import process to update, if you do not want all fields to be updated.
•To deselect only a few fields: Remove the check mark from each field you do not want to update.
•To select only a few fields: Click the None button to remove the check mark from all fields, and then check only those fields you want to update.
i.If you click the None button in error, click the All button to re-check all the fields.
8.Click Start.
The updated information from the fields in the updated DAT file replace the information in the fields in existing matching records.
Using the Customize Load File Preview
If your update DAT file field delimiters do not match those in the database, you can change the delimiters in the load file to match those in the database by using the Customize button.
1.After the Overlay Database box opens, click the Customize button.
i.A Load File Preview box opens displaying the first three lines of the DAT file. Within those lines, only fields that can be found, based on the delimiters being used, are displayed. If no fields are displayed, it indicates that the fields cannot be found because the delimiters are not matching those found in the database. If this happens, you need to correct each delimiter until all fields are displayed in the view.
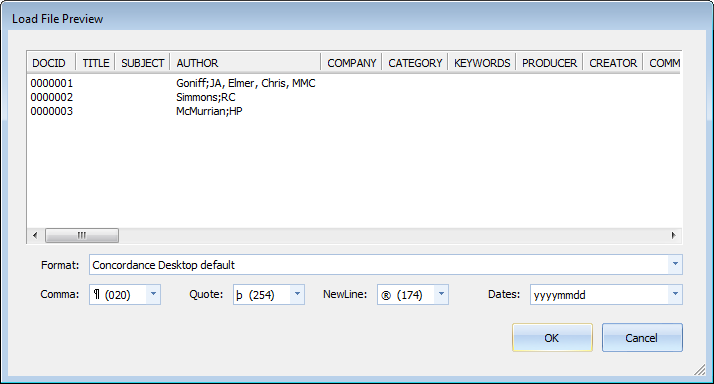
2.Click the Format down-arrow and select the format of your update DAT file.
i.If all fields appear, you are finished – go to the last step.
ii.If only some of the fields appear, please continue with the next step.
3.Click on the down-arrow of the delimiter that appears to be causing the issue, and select the appropriate code.
4.Repeat step 3 until all fields appear in the display area.
5.Click OK.
You are returned to the Overlay Database box where you can continue one with step 6 (in the section above) to complete the import of the overlay files.