When creating an Email and Attachments database, Concordance Desktop uses a Database Creation Wizard to walk you through each step of the database creation process. Using the wizard, Concordance Desktop imports one or more .pst formatted files. When importing multiple .pst files, a new database is created for each .pst, and all database are automatically concatenated.
Concordance Desktop provides you with an E-mail and Attachments template, but you may also create your own. The E-mail and Attachments template includes typical metadata fields from Outlook and takes care of the field mapping for you. The template also allows you to create and modify fields as needed.
|
If you need to export your e-mail from Concordance Desktop back to a .pst file, then consider using CloudNine's LAW software for processing before importing to Concordance Desktop. |
|
Some earlier versions of Microsoft Excel files are no longer supported through Microsoft and cannot be opened from Concordance Desktop. |
To Create an E-Mail database
A Knowledge Based Article on this subject can be found here: 'Create an E-mail Database in Concordance Desktop'
The second step is to create a database and import the e-mail and attachment files.
1.In Concordance Desktop, on the File menu, click New. A logon dialog box opens.
2.Enter your logon name and password, and then click Connect.
3.In the New Database Creation Wizard window, choose the viewer for the new database, and click the E-mail and Attachments button.
i.The Create E-Mail Database window opens.
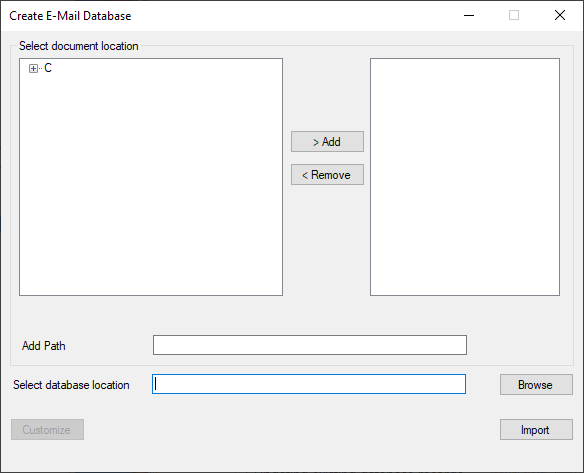
4.Select the location of the .pst files by either:
a.Select a PST from the folder list:
1.In the Select document location list, expand the folders.
2.Browse to the location where the .pst file you want to import is located.
3.Click on the .pst file to select it.
4.Click the Add button.
5.To add more .pst files, repeat the steps for each file.
b.Entering the full path and PST file name:
1.In the Add Path field, type the full path to the .pst file, including the .pst file name.
2.Click the Add button.
3.To add more .pst files, repeat the steps for each one.
5.Repeat step 4 for each .pst file you want to add to the import.
6.Select the location where you want to create the database.
a.In the Select database location field, click the Browse button.
b.Navigate to the location where you want to save the new database.
c.In the File name field, type a name for the new database.
|
The Concordance Desktop server does not support Unicode characters (such as Chinese or Japanese characters) in database names. Currently, only single-byte characters (such as English characters) are supported. |
d.Click Open.
7.To customize the import settings:
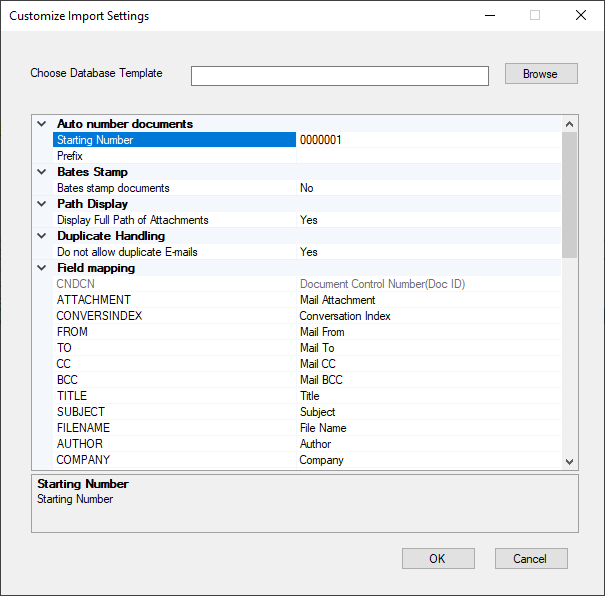
a.Click the Customize button, and then do any of the following:
i.To use an existing database template:
1.Click the Choose Database Template Browse button.
2.Locate the database template to use.
3.Click Open.
ii.To change the document numbering defaults:
1.Click on the Auto number documents arrow to open that section, if it is not already open.
2.In the Starting Number field, enter the number you want to begin with for numbering the documents. The default is 0000001.
i.Make sure to precede the starting number with enough zeros to cover the total number of records being imported. For example, if you are importing a DAT file that includes includes 999 records and you want to start numbering with 1, enter 001 as the starting number. If the file includes 550,500 records and you want to start the numbering with 1, enter 000001.
3.Optional: In the Prefix field, type the prefix you want to use in front of the numbers.
iii.To add Bates Stamping to the documents:
1.Click the Bates Stamp arrow to open that section, if it is not already open.
2.To enable Bates stamping, click on the Bates stamp documents field. A down-arrow appears at the end of the field.
3.Click the down-arrow and select Yes.
i.The default is No, do not put Bates Stamps on the documents.
ii.After you select Yes, two other fields appear under the Bates Stamp section.
4.Optional: In the Bates prefix field, enter the prefix you want to use in front of the Bates Stamp number.
|
You cannot currently use Unicode characters in the Bates stamp prefix. The Unicode character will not display correctly. |
5.In the Bates starting number field, enter the beginning Bates Stamp number you want to use.
iv.Specify whether to display the full path of attachments:
i.You can specify whether to display the full path of e-mail attachments.
1.Click on the Path Display arrow to open that section, if it is not already open.
2.Click on the Display Full Path of Attachments field to select it.
3.Click the down-arrow and select Yes or No. The default is Yes.
oYes indicates that you want to display the full path of attachments.
oNo indicates that you do not want to display the full path of attachments.
v.Specify whether to allow duplicate e-mails:
i.Most e-mails have a unique message identifier called the message-id. This entry is stored in the MESSAGEID field. Before importing a message, the Import e-mail wizard checks to see if any previously imported e-mails have the same message-id. If the wizard finds another record with this message-id, it does not import the message.
ii.You can specify whether to allow duplicate E-mails to be included in the database.
1.Click on the Duplicate Handling arrow to open that section, if it is not already open.
2.Click on the Do not allow duplicate E-mails field to select it.
3.Click the down-arrow and select Yes or No. The default is Yes.
oYes indicates that you do not want to allow duplicate E-mails to be included in the database.
oNo indicates that you want to allow duplicate E-mails to be included in the database.
vi.To change imported data (document metadata) mapping to Concordance fields:
1.Click on the Field mapping arrow to open that section, if it is not already open.
2.Click on a field that you want to change, to select it.
3.Click on the down-arrow and select the imported data type.
vii.When importing .pst files, Concordance Desktop captures metadata when possible. Concordance Desktop also captures the metadata present in formatting such as font changes, bolding, underlining and highlighting. Each of the fields in the Field mapping section are automatically set to the default Concordance Desktop field mappings.
|
To ensure that the documents import properly, the Document Text field must be set to the first OCR paragraph field with an alpha prefix and numeric suffix. For example, if you have TEXT01, TEXT02, and TEXT03, you must set the OCR paragraph field to TEXT01. Do not set the OCR field to any other type of paragraph field. |
b.When finished customizing, click OK.
i.You are returned to the Create E-Mail Database window.
8.Click the Import button.
9.If one or more files did not import properly, a dialog box displays telling you to see the log file. Click OK.
10.In the E-Document Database dialog box:
•If all files imported properly (i.e., you did not see a dialog box stating one or more files imported properly) , click the Open button to open the database in Concordance Desktop.
•If any files did not import properly, click the View Log button to check the log for any files that did not import properly.
To Verify the Imported Files
Once you have created the email database, it is best practice to verify that the files imported correctly. After verification, you also need to index the database.
1.In Concordance Desktop, open the Browse view.
2.In the Browse view, verify that the e-mail messages you imported display properly.
3.If you have not already indexed the database, run a full index now.
i.For more information about indexing and reindexing databases, see Indexing and reindexing updates.
ii.If you receive the following message, Dictionary file exists, overwrite?, click Yes.