While users can be manually added and domain users inserted from within FYI Server, it is best practice to set up the user accounts in Microsoft Active Directory or a Concordance database first, and then import the users into FYI Server when registering databases.
For more information about best practices for adding domain users to FYI Server, see the Best Practices for New Databases section in the Server setup and security topic.
For more information about adding users in Microsoft Active Directory, see Setting up users in Active Directory.
For more information about adding users in Concordance databases, see Setting up users in Concordance.
When user accounts are set up in Active Directory and Concordance databases, the users are automatically added when a database is registered. User settings and log on information associated with the database is recognized by the FYI Server and the user names are automatically added to the user list in the FYI Admin Console.
New users can be added manually to the list of users and domain users can be manually inserted in the FYI Admin Console.
|
The FYI Server and FYI Reviewer do not support user names, passwords, or database names containing characters in Unicode, such as Chinese or Japanese characters. Currently, FYI Server and FYI Reviewer only support user names, passwords, or database names containing single-byte characters, such as English characters. If your organization uses FYI Server and FYI Reviewer, be sure to only use single-byte characters when creating user names, passwords, and database names in Concordance. |
Users can be manually added from both the Users and Tree side tabs on the Management tab in the FYI Admin Console.
To Manually Add Users
On the Tree side tab you can add new users from the Users folder or from any database or user in the Clients, Matters, or Databases folder. When you create a user from a database or existing user in the Clients, Matters, or Databases folder, the user is added to the users list and the selected database.
1.On the Management tab, click the Users or Tree side tab.
2.Do one of the following:
•If you clicked the Users side tab, in the Tasks panel, click Add new user, in the Users panel, and type the user's logon name.
•If you clicked the Tree side tab, and are adding a new user from the Users folder, right-click the Users folder or an existing user, click New user, and type the user's logon name.
•If you are adding a new user from an existing user in the Clients, Matters, or Databases folder, right-click an existing user, click New user, and type the user's logon name.
•If you are adding a new user from a database, right-click the database, click Insert new user, and type the user's logon name.
i.The maximum number of characters allowed for logon names is 48.
|
You can also add existing users to a database by right-clicking on a database in the Databases folder and selecting Insert existing user. |
3.Click the General side tab.
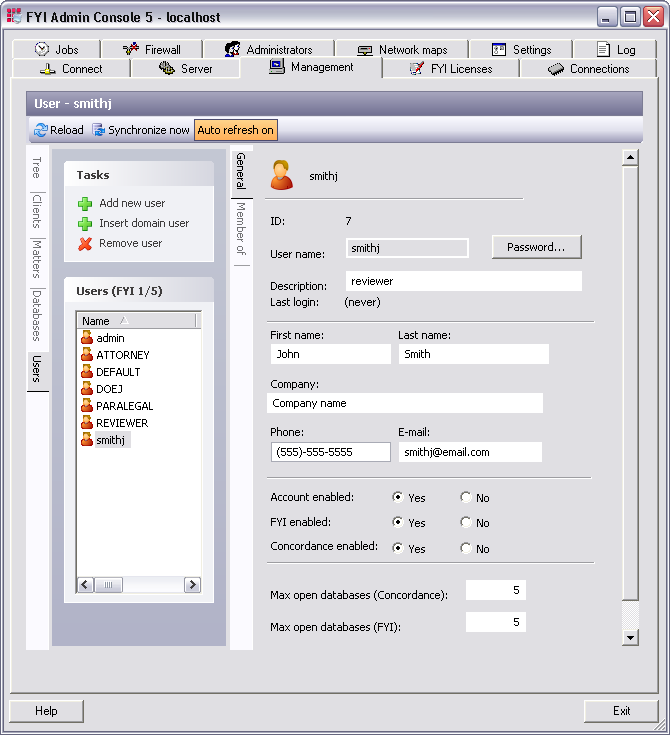
4.To set the password for the user, click the Password button.
i.Clicking the Password button opens the Change password dialog box.
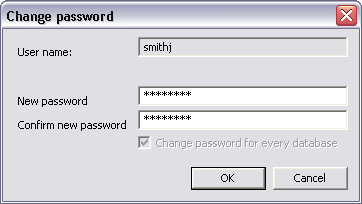
5.In the New password and Confirm new password field, type the user password and click OK.
|
User passwords cannot be changed when using an external authentication method. |
6.In the Description field, type a description for the user.
i.Adding the user's contact information is optional, and what you enter should be based on your organization’s user account guidelines.
7.In the First name field, type the user's first name.
8.In the Last name field, type the user's last name.
9.In the Company field, type the user's company name.
10.In the Phone field, type the user's phone number.
11.In the E-mail field, type the user's e-mail address.
12.In the Account enabled field, select the Yes option to activate the account, or select the No option to deactivate the account.
i.The Account enabled field defaults to Yes.
13.In the FYI enabled field, select the Yes option to allow the user access to FYI Reviewer, or select the No option to disable access.
i.The FYI enabled field defaults to No.
14.In the Concordance enabled field, select the Yes option to allow access to Concordance using FYI files, or select the No option to disable access.
i.The Concordance enabled field defaults to Yes.
ii.The Max open databases fields determine the maximum number of databases a user can open from the same IP address. These two field can be set for users who share their accounts with co-workers.
15.In the Max open databases (Concordance) field, type the maximum number of databases the user can open from the same IP address in Concordance.
i.The Max open databases (Concordance) field defaults to 5.
16.In the Max open databases (FYI) field, type the maximum number of database the user can open from the same IP address in FYI Reviewer.
i.The Max open databases (FYI) field defaults to 5.
To Insert Domain Users
Domain users can only be added to FYI Server when FYI Server uses external domain authentication.
Domain users can be inserted from both the Users and Tree side tabs. When the External by domain authentication type is selected on the Settings tab in the FYI Admin Console, the Insert domain user option is available on the Users and Tree side tabs.
On the Tree side tab you can insert domain users from the Users folder or from any database or user in the Clients, Matters, or Databases folder.
1.On the Management tab, click the Users or Tree side tab.
2.Do one of the following:
•If you clicked the Users side tab, in the Tasks panel, click Insert domain user.
•If you clicked the Tree side tab, and are inserting a domain user from the Users folder, right-click the Users folder or a user, and click Insert domain user.
•If you are inserting a domain user from a database or user in the Clients, Matters, or Databases folder, right-click the database or user, and click Insert domain user.
i.Clicking Insert domain user opens the Domain user import dialog box.
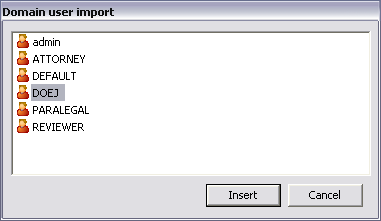
3.Click the domain users you want to insert, and click the Insert button.
i.To select multiple users, use SHIFT+click or CTRL+click.
4.After inserting a domain user, click the user's name in the Users panel, and click the General side tab.
|
User passwords cannot be changed when using an external authentication method. |
5.In the First name field, type the user's first name.
6.In the Last name field, type the user's last name.
7.In the Company field, type the user's company name.
8.In the Phone field, type the user's phone number.
9.In the E-mail field, type the user's e-mail address.
10.In the Account enabled field, select the Yes option to activate the account, or select the No option to deactivate the account.
i.The Account enabled field defaults to Yes.
11.In the FYI enabled field, select the Yes option to allow the user access to FYI Reviewer, or select the No option to disable access.
i.The FYI enabled field defaults to No.
12.In the Concordance enabled field, select the Yes option to allow access to Concordance, or select the No option to disable access.
i.The Concordance enabled field defaults to Yes.
ii.The Max open databases fields determine the maximum number of databases a user can open at the same time during a session. These two field can be set for users who share their accounts with co-workers.
13.In the Max open databases (Concordance) field, type the maximum number of databases the user can open during a session in Concordance.
i.The Max open databases (Concordance) field defaults to 5.
14.In the Max open databases (FYI) field, type the maximum number of database the user can open during a session in FYI Reviewer.
i.The Max open databases (Concordance) field defaults to 5.