If you want to print multiple records or transcripts, you can generate a standard report. Your current search query determines which records or transcripts are available to print on a standard report.
Standard reports have a number of customizable features such as headers, footers, date and time stamps, page numbering. When you print a standard report in Concordance, by default the printed font format for records is determined by your personal Concordance display settings. If you do not want to use the default format, you can define your preferred print settings on the Print documents dialog box before printing. You can also save your preferred print settings for future printing, or reuse previously saved print settings.
To ensure records print the way you want, it is recommended to preview your print job before sending it to the printer. To preview your print job, click the Print preview button on the Print tab in the Print documents dialog box.
To Print Standard Reports
1.On the toolbar, click the Print button.
2.Click the Fields tab. The Fields tab is used to define the fields and their order to include on the report for the selected database. The fields are listed alphabetically in the Available fields field.
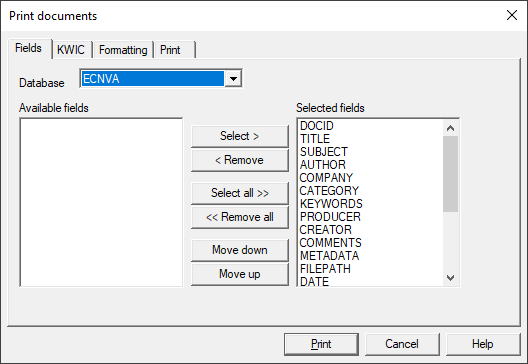
3.In the Database list, select the database containing the records you want to print. The Database field defaults to the current Concordance database.
4.In the Available fields list, choose the fields you want to include on your report and add them to the Selected fields list using the Select and Remove buttons in the center. You can also reorder the Selected fields as needed with the Move buttons.
5.To print the keywords (search hits) for the current query, click the KWIC tab and select the Print key words in context (KWIC) check box.
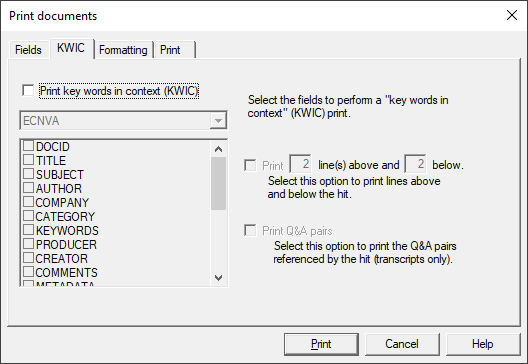
6.The database and fields you selected on the Fields tab are displayed below the Print key words in context (KWIC) check box. In the list, select the check box next to the fields you want to print keys words in context.
7.To include record text above and below the key words, select the Print line(s) above and below check box and type the number of lines to include above and below in the line number fields.
8.To print the question and answer pair associated with the key words in transcripts, select the Print Q&A pairs check box. This check box only applies to transcripts.
9.To add header and footer text, and define other printing controls, click the Formatting tab.
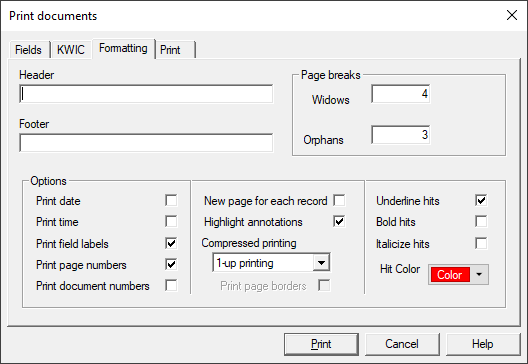
10.In the Header field, type the report header. The header displays at the top of each printed page and is left justified on the page.
11.In the Footer field, type the report footer. The footer displays at the bottom of each printed page and is left justified on the page.
12.In the Widows and Orphans fields, type the number of widows and orphans to allow on each page. Widows are the lines of text left at the bottom of a page when a record is split in two. Orphans are the lines of text at the top of the next page. The number entered in the Widows field controls the minimum number of lines Concordance allows to remain at the bottom of a page. If the number of lines to print at the bottom of the page is less than the number in Widows field, then the document is moved to the top of the next page. The number entered in the Orphans field controls the minimum number of lines Concordance prints at the top of a page when splitting a document between pages. If the lines left to print are less than the number in the Orphans field, then lines will be borrowed from the previous page until the orphan minimum is met. This may cause the preceding page to go below the widows threshold, causing the entire document to print at the top of the new page.
13.Select any additional Options that are necessary:
•Print date puts the current date on each page below the footer.
•Print time puts the current time on each page below the footer.
•Print field labels prints the field name before each field.
•Print page numbers puts the page number at the bottom of each page on the right.
•Print document numbers will number each page of the report with current and total page numbers.
•New page for each record prints each document on a separate page.
•Highlight annotations highlights both notes and annotations in the report.
•Compressed printing allows you to compress multiple pages on one printed page.
•Print page borders is only available for Compressed printing and prints borders around the page.
•Underline hits, Bold hits, Italicize hits, and Hit Color all affect how search hits will display in full-text paragraph fields
14.In the Options section, select the print options you want to apply to your report. Search hits are only highlighted in the full-text paragraph fields, not in fixed-length text, date or numeric fields. If a record is edited after the search, the record's search hit will not be highlighted in the report. To include the edited record's search hit, index or reindex the database and re-run the search.
15.To finalize the rest of your print settings click the Print tab.
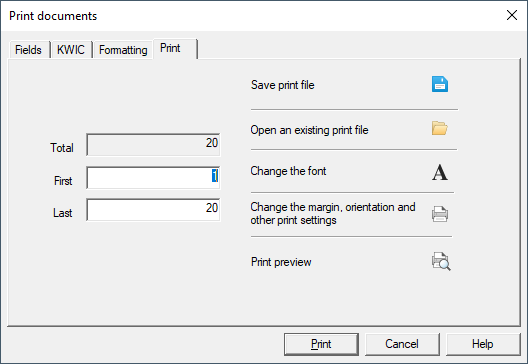
16.Total is read-only, and displays the total number of documents in the current query. In First, type the number of the first document you want to include in the report. In Last, type the number of the last document you want to include in the report. You can also click:
•Save print file - allows you to save your print settings to a print format file (.fmt).
•Open an existing print file - allows you to load settings from an existing print format file (.fmt).
•Change the font - allows you to select fonts for the fields, data, transcripts, and header/footer in the report.
•Change the margin, orientation and other print settings
•Print preview - shows a preview of your report.
17.Click the Print button to generate and print the report.