Navigation:
Using CloudNine LAW > Importing Documents > Document Scanning >
Using the Scan Toolbar
The Scan Toolbar provides convenient and comprehensive access to all the scanning-related features and functionality found within LAW. It can be used to make quick changes to the active Scan Profile, create new scanner-exclusive profiles, or import physical documents/pages/attachments into the active Case File via the connected scanner. A scanner must be connected for the Scan Toolbar to be available.
To open the Scan Toolbar from the Main User Interface, use the Menu to select Scan > Scan Toolbar.
You can also double-click on the name of the active Scan Profile within the Scanner Status Bar at the bottom-right corner of the Main User Interface:
Scan Toolbar
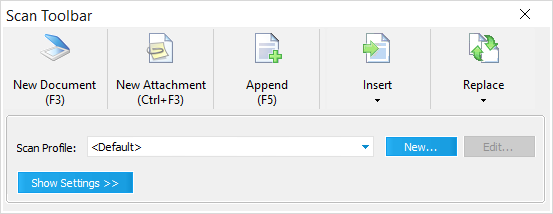
In its collapsed mode (shown here), the Scan Toolbar provides quick access to the essential LAW scanning commands. You can run these commands either by clicking on the appropriate button within this toolbar, or by pressing their corresponding shortcuts on your keyboard instead. The commands are as follows:
•New Document (F3) - Scans and imports all physical pages into the Case Directory (bottom of current folder) as multiple new documents based on the current Set Page Limit. If no limit is set, then all physical pages will be scanned and imported as a single new document instead.
•New Attachment (Ctrl+F3) - Requires a document to be selected within the Case Directory. Scans and imports all physical pages as multiple attachments of the selected document based on the current Set Page Limit. If no limit is set, then all physical pages will be scanned and imported as a single attachment instead.
•Append (F5) - Requires a document to be selected within the Case Directory. Scans and imports all physical pages onto the end of the selected document as additional pages. This command ignores any Set Page Limit.
•Insert - This button defaults to Insert Document. Click on the down-arrow to select between the following command options instead:
oInsert Pages (Ctrl + Insert) - Requires a specific page from a document to be selected (image displayed) within the Document Viewer. If a page is not selected, then this command will default to the first page of a document selected within the Case Directory instead. All physical pages are be scanned and imported into this document above (before) the selected page. You will be prompted to set a starting Page # within the Number Document window for the new pages being inserted into this document. This command ignores any Set Page Limit.
oInsert Document - Requires a document to be selected within the Case Directory. All physical pages will be scanned and imported as new documents based on the current Set Page Limit, being inserted in order above the currently selected document within the Case Directory. If no limit is set, then all physical pages will be scanned and imported as a single document instead.
•Replace - This button defaults to Replace Document. Click on the down-arrow to select between the following command options instead:
oReplace Pages (F6) - Requires a specific page from a document to be selected (image displayed) within the Document Viewer. If a page is not selected, then this command will default to the first page of a document selected within the Case Directory instead. All physical pages are scanned and imported as replacements of the selected page, continuing for every following page in this document until all physical pages have been scanned. This command ignores any Set Page Limit.
oReplace Document (Ctrl + F6) - Requires a document to be selected within the Case Directory. Scans and imports all physical pages as multiple replacement documents based on the current Set Page Limit, overwriting the selected document and maintaining the same position within the Case Directory. If no limit is set, then all physical pages will be scanned and imported as a single replacement document instead.
Additionally, you can create new Scan Profiles that are unique to the currently connected scanner model, or edit any existing profiles for that scanner:
See the Scan Profiles topic for more information on creating/editing these profiles.
•Scan Profile - Use this drop-down menu to set the active Scan Profile.
oNew... - Opens the New Profile window, allowing you to create a new Scan Profile.
oEdit... - Opens the Edit Profile window, allowing you to edit/delete the active Scan Profile.
•Show Settings >> - Expands the Scan Toolbar downwards, providing access to the full range of scanner Settings for the active Scan Profile.
Tabs:
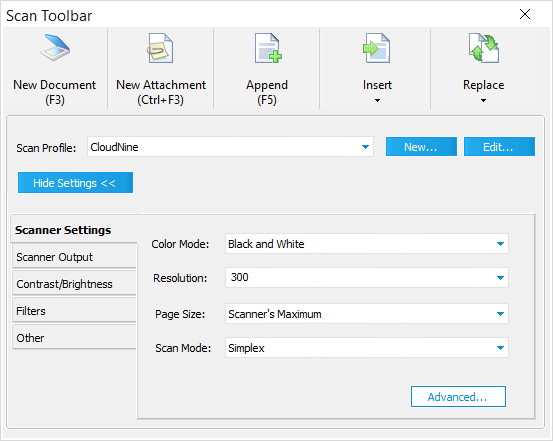
Scanner Settings
These settings determine how physical document pages are to be handled by the scanner. The availability of some options depends on the scanner being used.
•Color Mode - Determines how colors on scanned pages are treated:
oBlack and White - Converts all colors into black or white.
o256-Level Gray - Converts all colors into one of 256 different shades of gray.
o24-Bit Color - Retains all colors as accurately as possible within a 24-bit color range.
•Resolution - Determines the image quality of scanned pages. Higher DPI (dots per inch) values increase both quality and scan time.
•Page Size - Determines the size of the pages being scanned. Most modern scanners will correctly determine sizing automatically.
•Scan Mode - Determines how and where pages will be scanned:
oSimplex - Only one side of each page is scanned from the feeder.
oDuplex - Both sides of each page are scanned from the feeder.
oFlatbed - Scans pages from the glass flatbed. Defaults to Simplex and scans only a single page from the feeder if page if no pages are available in the flatbed.
•Advanced... - This button opens the separate Scanner Settings window.
These settings determine how scanned documents are saved within the active Case File. The availability of some options depends on the Color Mode selected within the Scanner Settings tab.
•File Type - Determines the file format that each scanned document is saved as. TIFF is considered the industry standard. If PDF is desired, it is still recommended to scan as TIFF first and then later export as PDF in order to have all LAW features available to the scanned documents during processing.
•Compression - Determines the compression scheme being used for the selected File Type. This helps to save storage space.
•Storage Schema - Determines how and where scanned documents consisting of multiple pages are stored:
oSerialized - Each page of a document is stored as a separate image file within the case's $Image Archive folder (located within the root case folder).
oMultipage - All pages of a document are stored as a single image file within the selected Case Directory folder.
•Rotation - Used to automatically rotate page images as they are scanned.
Return to:
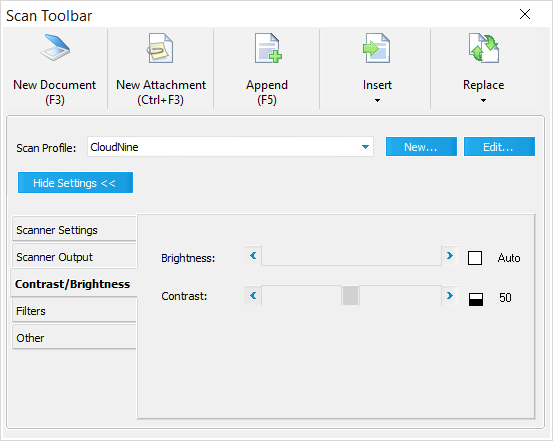
Contrast/Brightness
These settings recalibrate the lightness and darkness of pages as they are scanned. Adjusting these values can help improve the visibility of some images.
•Brightness - Determines the overall lightness or darkness of page images. Higher values are lighter, lower values are darker.
•Contrast - Determines the difference between max lightness and darkness of the images. Higher values increase this difference, lower values decrease it.
Return to:
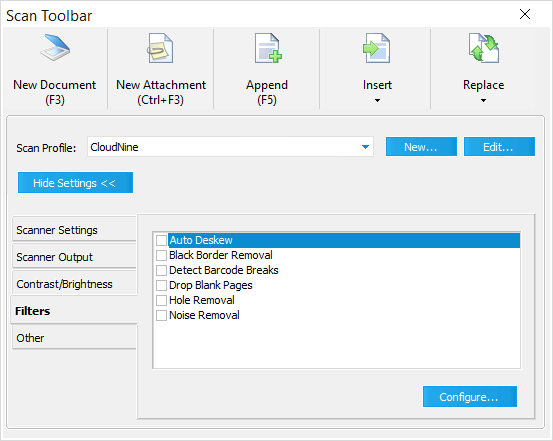
Filters
The following Scan Filters are image manipulations that can automatically be applied to document pages during the scanning process. These filters (not including Detect Barcode Breaks) can also be applied to images during document processing after they have been imported.
•Auto Deskew - Straightens images as they're scanned if they appear crooked or misaligned.
•Black Border Removal - Removes black edges from the borders of scanned images. These borders are often the result of the scanner model being used, and will prevent LAW from recognizing blank pages. If these borders are uneven, then they will not be removed automatically, and you may need to adjust the Scan Area in order to correct the issue.
•Detect Barcode Breaks - Allows scanning of multiple documents with varying page amounts at once by inserting Break Sheets (Slip Sheets) that contain barcodes between separate documents. These barcodes can indicate either the start of a new document, or a new folder to be created.
•Drop Blank Pages - Images containing very small pixel ratios (as is typically the case with blank pages of any color) are automatically removed as they're scanned. This is useful when scanning documents containing both double-sided pages and single-sided pages.
•Hole Removal - Removes visible holes from the images of hole-punched pages. Only standard-sized holes (1/4" - 5/16") are supported.
•Noise Removal - Reduces the amount of dots/specks that can appear randomly on poorly scanned images. This noise often reduces the accuracy of OCR.
•Configure... - This button opens a configuration window for the selected Scan Filter.
Filters:
Return to:
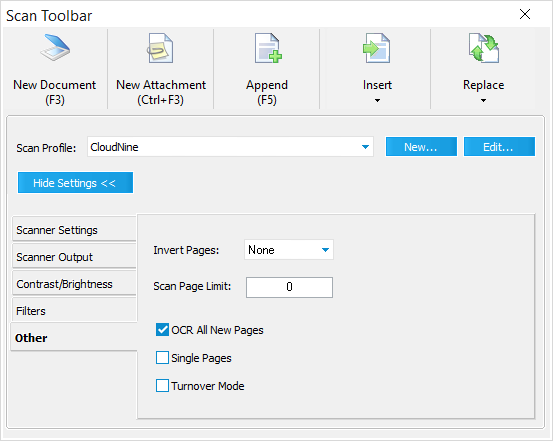
Other
These are supplemental settings for more uncommon scanning needs.
•Invert Pages - Select Odd or Even from this drop-down menu to automatically rotate select pages 180º while scanned. This is helpful when scanning double-sided pages that have opposite orientations on the front and back sides.
•Scan Page Limit - Sets a limit on the number of physical pages (front and back) comprising each document while scanning. Useful when scanning large numbers of checks, note cards, business cards, etc. without the need for Break Sheets or individually scanning documents one at a time. Note that for double sided pages, both sides of the page are treated as a single page with this setting.
•OCR All New Pages - Automatically flags every scanned page for OCR. Does not perform OCR - this will need to be done separately after scanning has completed.
•Single Pages - Overrides the Scan Page Limit and sets it to 1. All pages being scanned are treated as separate one-page documents.
•Turnover Mode - Used to scan double-sided pages in the flatbed without using a duplex scanner. LAW will prompt users to flip pages during the scanning process, and will rebuild documents in their correct page order afterward. This setting will disable the Detect Barcode Breaks filter.