Default Case Template

<< Click to Display Table of Contents >>

Navigation:  Using CloudNine LAW > Getting Started > Case Files > Case Templates and Projects >

Default Case Template

"#Default.xml" is used as the default Case Template file for all new cases created in LAW. You can directly edit this template as desired for your case Metadata Field needs, but it's highly recommended that you create customized copies of the #Default.xml instead, and apply these copies to each new case during/after creation. You will find the default template within your main LAW install directory inside the "Templates" folder.


InfoIcon Modifying the Default Case Template

1.Start by using a File Explorer to navigate to the "Templates" folder located within your main LAW install directory (default C:\Program Files (x86)\LAW50\Templates).

2.Locate the "#Default.xml" template within this folder, and make a copy of that file. Rename it to something easily identifiable.

3.Open this newly created template file with any text-editor, such as Notepad.

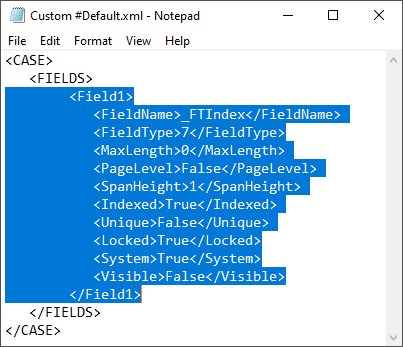
4.Copy the lines of text (highlighted in the screenshot below) found between the <FIELDS></FIELDS> tags, and paste them on a new line after the </Field1> tag (last line highlighted).

5.Increase the # of these new <Field#></Field#> tags by 1, and edit the enclosed text within the new <FieldName></FieldName> tags to rename this field.

i.The following characters cannot be used for field names < > : " / \ | ? *

ii.Field names cannot begin with a number.

iii.Field names are case-insensitive, and must be unique. For example, "data" = "Data" = "DATA" when naming fields.

6.Change the text enclosed within the other Definition Tags (explained below) as desired for this new field.

7.For each additional field you wish to create, copy the same text as described in step 4, but paste that text on a new line after the previous </Field#> tag instead, and repeat steps 5-6 for that field.

8.Once you have created the desired number of Metadata Fields, save all changes made to this new template, and close the text-editor to finish.


CustomDefaultCaseTemplateCustom #Default.xml

Container Tags - Holds the Definition Tags used for each field:

<Field#></Field#> - The # for each new field should increment by 1.

Definition Tags - Identifies various parameters for each field:

<FieldName></FieldName> - Defines the name of the field.

<FieldType></FieldType> - Determines the Field Type with a number from 0-7:

o0="Text", 1="Auto-Increment", 2="List", 3="Memo", 4="Date", 5="Numeric", 6="Tag (Boolean)", 7="TinyInt"

<MaxLength></MaxLength> - Determines a max character limit for the values displayed in this field. 0 = no limit.

<PageLevel></PageLevel> - Set to "True" or "False" to determine whether or not the field is page-level, rather than document-level. Only page-level fields can be set as unique.

<SpanHeight><SpanHeight> - Applies to Memo fields only. Determines the height of the field (in rows) within the Visible Metadata Fields pane of the Main User Interface.

<Indexed></Indexed> - Set to "True" or "False" to determine whether or not the field is indexed. Indexed fields have their text data available when performing full-text searches.

<Unique></Unique> - Set to "True" or "False" to determine whether or not the field is unique. Unique fields cannot contain the same data across multiple records.

<Locked></Locked> - Set to "True" or "False" to determine whether or not the field is editable within LAW by users.

<System></System> - Set to "True" or "False" to determine whether or not the field is for system use only. System fields cannot be managed from within LAW by users.

<Visible></Visible> - Set to "True" or "False" to determine whether or not the field is viewable within the Grid Views or the Visible Metadata Fields pane of the Main User Interface.


RightArrowFor more detailed descriptions of the various Field Types, see the Metadata Fields topic.