Basic Grid View Operations

<< Click to Display Table of Contents >>

Navigation:  Using CloudNine LAW > Processing Documents > The Grid Views >

Basic Grid View Operations

The following operations can be performed within either variant of the Grid View:


SpellingCheckInfoIcon Spell-Checking Record Data

NOTICE:  Spell-checking can only be performed on the data stored within user-created Custom Metadata Fields.

1.Begin either by performing a search with the Database Query Builder, or by clicking DisplayAllRecordsMainToolbar from the Toolbar in the Main User Interface.

2.Within the Grid View, enable every Custom Metadata Field containing the data you want spell-checked by right-clicking on any column header and checking their boxes in the Field List window.

3.Left-click on a Custom Metadata Field column containing questionable spelling to select it, and then click on the Spell Check button in the Toolbar.

i.Alternatively, from the Menu select Tools > Spell Check instead (Standalone Grid View only).

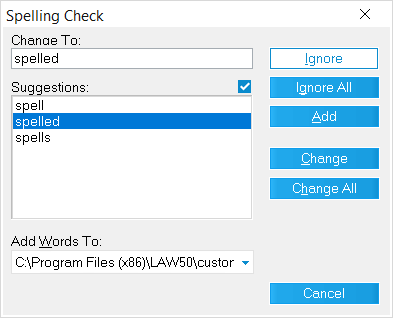
4.If improper spelling (or unknown words) are detected for the selected column, then the Spelling Check tool (shown) will open. Note the following about this tool:

i.This tool will go over every single word spelled improperly (for each record) in the selected column one at a time. This can be an incredibly time consuming process. The Grid View indicates which record is currently being inspected with an arrow on the far left.

ii.The Change To input box (dynamically named) will display these improperly spelled words. You can correct spelling issues by editing this text directly.

iii.The Suggestions area will offer possible changes in spelling for each word. If no proper spelling is known, then (No Suggestions) will appear here instead. Apply one of these suggestions to the Change To input box by double-clicking on it. You can turn these suggestions off by unchecking the box at the top-right of this section.

iv.The Add Words To drop-down menu at the bottom allows you to choose a DIC file within the root LAW install directory to save any word additions to. A custom one is provided automatically when LAW is installed.

5.For each word shown or edited within the Change To input box, you can do one of the following:

1)Skip this word for the currently selected record by clicking on the Ignore button, or skip this word for all records by clicking on the Ignore All button.

2)Add this word to the DIC file selected within the Add Words To drop-down menu by clicking on the Add button.

3)Apply changes made to this word for the currently selected record by clicking on the Change button, or apply these changes to all records by clicking on the Change All button.

6.Repeat step 5 as needed for each instance of improper spelling detected. You can click on Cancel in the bottom-right at any time to abort the spell-checking.

7.Once each instance of improper spelling has been examined, the Spelling Check tool will close, and the Grid View will begin making the necessary changes to all records.

i.Progress is shown at the top-left, displayed as a Spell Check percentage of completion.

8.When the spell-checking is completed, the Spell Check dialog appears. Click OK to finish.


InfoIcon Copying+Pasting Metadata Field Content

NOTICE:  You can follow these instructions to cut+paste Metadata Field content instead by replacing all instances of "copy" or "copied" with "cut", and C with X, but you may lose crucial data from the source field by doing so.

1.Begin by creating a custom Memo field to be used as the output destination for the copied record data.

i.Alternatively, you can use any field available from active Case File, as long as it's not a System Field. Note that using a non-custom field may cause loss of crucial data.

2.Determine which field or fields have the source data that you wish to copy from. You can refer to the Predefined Metadata Fields Table for specific field uses.

3.Either perform a search with the Database Query Builder, or click DisplayAllRecordsMainToolbar from the Toolbar in the Main User Interface.

4.Within the Grid View, make the source field(s) and the destination field viewable by right-clicking on any column header and checking their boxes from within the Field List window.

5.Locate and select the column or cell which contains the source data you want to copy. Press Ctrl+C on your keyboard to copy that data, or click the Copy button in the Toolbar.

6.Locate and select the column or cell that you wish to use as the output destination. Press Ctrl+V on your keyboard to paste that data, or click the Paste button in the Toolbar.

7.If you're copying an entire column, the Copy Column warning prompt appears. Click Yes to proceed. You have now successfully copied+pasted the Metadata Field content/data.


GridViewSaveOptionsInfoIcon Saving Grid Results

1.Begin either by performing a search with the Database Query Builder, or by clicking DisplayAllRecordsMainToolbar from the Toolbar in the Main User Interface.

2.Within the Grid View, be sure to enable every field you want included in the output file by right-clicking on any column header and checking their boxes from within the Field List window.

3.If you only want certain grid results to be saved, be sure to select/highlight those now. Shift+click or Ctrl+click within the grid to select or deselect multiple records.

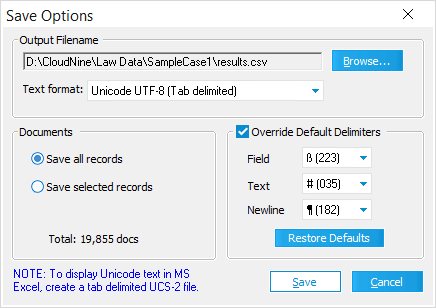
4.When you're ready, click on the Save button in the Toolbar. This will open the Save Options window (shown).

i.Alternatively, from the Menu you can select File > Save instead (Standalone Grid View only).

5.The Output Filename section at the top shows the output file path, name, and file type. Click on Browse... to the right to open an File Explorer and change these if desired. When finished, click on Save to apply any changes.

6.In the Text Format drop-down menu, select a format for delimiting the output file (how the data will be presented). This can be different than the file type selected above.

7.In the Documents section, select either Save all records or Save selected records to determine which results are included in the output file.

8.In the Override Default Delimiters section, you can check the box to establish new delimiters for the Field, Text, and Newline parameters of the output file within their appropriate drop-down menus.

i.Clicking on Restore Defaults button will return these delimiters to the default values determined by the Text format option.

9.When you've configured the Save Options as desired, click on Save at the bottom-right to start creating the new grid results file.

10.The Save Options window closes, and the Saving Results to File progress window opens. The saving process may take several minutes.

11.Once saved, the Saving Results to File progress window closes, and the Save Results dialog prompt opens. Click Yes to open and view the new grid results file. Otherwise, click No to finish.


GridViewPrintSetupInfoIcon Printing Grid Results

1.Begin either by performing a search with the Database Query Builder, or by clicking DisplayAllRecordsMainToolbar from the Toolbar in the Main User Interface.

2.Within the Grid View, be sure to enable every field you want printed by right-clicking on any column header and checking their boxes from within the Field List window.

3.If you only want certain grid results to be printed, be sure to select/highlight those now. Shift+click or Ctrl+click within the grid to select or deselect multiple records.

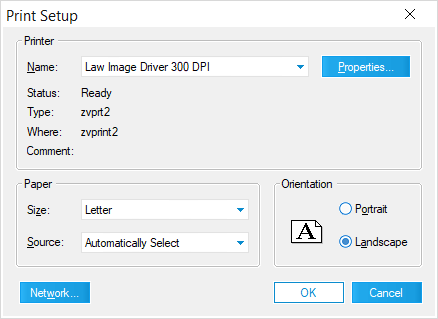
4.When you're ready, click on the Print button in the Toolbar, and then select either Print Selected Records Only or Print All from the pop-out menu. This will open the Print Setup window (shown).

i.Alternatively, from the Menu you can select File > Print > Print Selected Records Only / Print All instead (Standalone Grid View only).

5.The Print Setup window opens (shown). Select a Printer from the drop-down menu at the top. You can change page setup options for your chosen printer by clicking on the Properties... button on the right.

i.If your printer is located on a local network, but doesn't appear within this menu, then click on the Network... button at the bottom-left to open a File Explorer allowing you to select your desired printer from there instead.

6.In the Paper section at the bottom-left, you can change the page Size and paper Source from their respective drop-down menus.

7.In the Orientation section at the bottom-right, you can choose whether to orient each page by Portrait or Landscape.

8.When you're satisfied with your Print Setup, click on OK at the bottom-right to start printing the results.

GridViewBatchUpdateInfoIcon Batch-Updating Record Data

1.Begin either by performing a search with the Database Query Builder, or by clicking DisplayAllRecordsMainToolbar from the Toolbar in the Main User Interface.

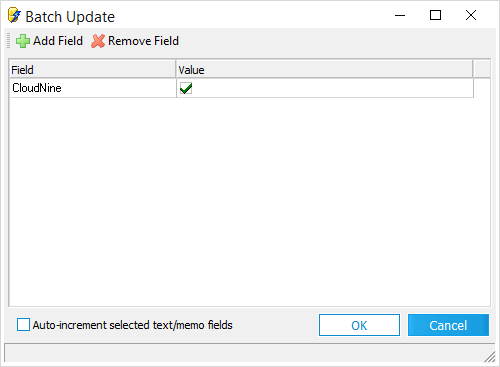
2.Within the Grid View, click on the Batch Update button in the Toolbar. The Batch Update tool opens (shown).

i.Alternatively, from the Menu select Edit > Batch Update instead (Standalone Grid View only).

3.From within this tool, use the +Add Field button at the top-left to add one or more Metadata Fields you wish to perform batch-updates on. Observe the following:

i.The Field column shows the Metadata Field names being updated. Left-click within this column on each listing to access a drop-down menu with the possible field choices.

ii.The Value column shows the data that will be written to the chosen Metadata Field for all records currently displayed within the Grid View.

4.At any point, you can remove Metadata Fields from the batch-update list by selecting them and clicking on the Remove Field button.

5.If you want the data from the Value column to be automatically incremented for each record, then check the box next to the Auto-increment selected text/memo fields option.

6.When you're satisfied with the Batch Update list, click on OK at the bottom-right to begin processing. This may take several minutes to complete.

i.Progress is shown at the top-left, displayed as an Updating Records... percentage of completion.

7.Once completed, the Batch Update Complete dialog opens indicating the number of records that were updated. Click on OK to finish.