1.Click the Case Manager tab.
2.Double-click a case to open it.
3.Click the Export tab.
4.If this is the first time you are creating an export for this case, the Create a New Export pane is displayed on the left. The Export Name defaults to Export-001, but can be modified to be whatever you want. Click Create LAW Direct Export.
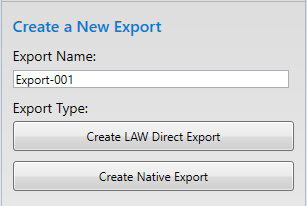
5.If this is not the first time exporting for this case, click Manage in the upper right of the left pane. The Manage Exports dialog is displayed. Select LAW Direct for the Export Type, type the Export Name you want (or accept the default), and then click Done.
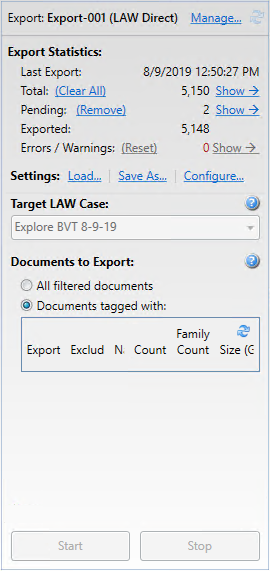
6.Determine the Settings to use by selecting one of the following:
a.Load - To load a previously saved LAW Direct Export profile.
b.Save As - Saves the current LAW Direct Export profile for use in other exports.
c.Configure - Allows you to modify the LAW Direct Export settings. See the section below on Configuring LAW Direct Export Settings.
d.Do nothing and use the defaults.
7.Select the Target LAW Case. You can choose <Default LAW Case> or an existing CloudNine™ LAW case. If you choose <Default LAW Case>, then a new case will be created for you with the same name as the Explore case. To export to an existing LAW case, that LAW case must be SQL Server based, active, and have electronic discovery enabled.
8.Choose a Documents to Export option:
a.All filtered documents - Exports all files that remained after filters were applied, regardless of the tags also applied to those files.
b.Documents tagged with - Exports files by the available tags, which are displayed below. See the section below on Exporting Files by Tags.
9.Click Start to start the LAW Direct Export. The export progress displays in the Export Statistics section. After the export is completed, the Target LAW Case disables to prevent an unintentional re-export.
10.You can review data in the Export Statistics section using the available links.
|
A CloudNine™ LAW Direct Export Set can only be sent to one new or existing CloudNine™ LAW case. An Export Set cannot be sent to multiple CloudNine™ LAW cases. |
|
If the CloudNine™ LAW case list database has not been defined in the CloudNine™ Explore case's environment settings, clicking Create LAW Direct Export opens the Unable to Create LAW Direct Export message box. Once the case list location is defined, a LAW Direct Export can be created. For more information, see Startup and Configuration. |
Configuring LAW Direct Export Settings
The Configure Export Settings dialog has 4 available tabs, allowing you to configure how you want your LAW Direct Export to work.
Output Structure
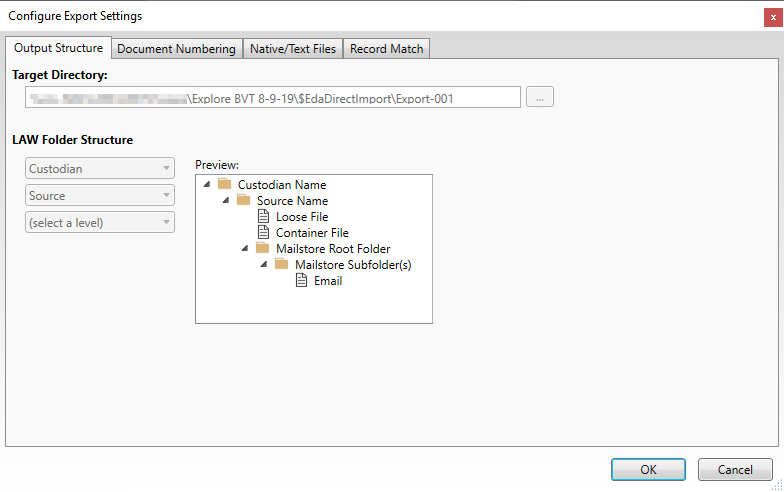
The Target Directory is the path to where the CloudNine™ Explore case resides on your network. The case directory path is followed by $EdaDirectImport\(Export Name).
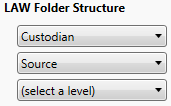
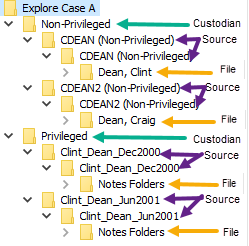
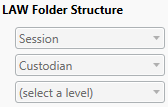
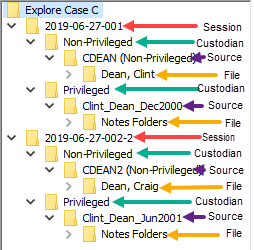
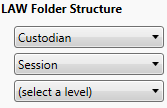
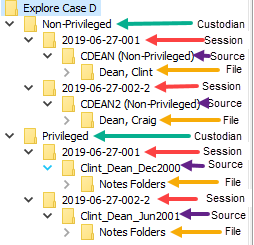
The LAW Folder Structure allows you to configure how folders and sub-folders are organized for the LAW Direct Export. Folders can be grouped by Session (Import Set), Custodian, and/or Source. The Preview window shows you an example of how the selected structure will be organized. Modify the structure by selecting the first, second, and third level folder structure in the drop-downs on the left. The table below illustrates a few examples.
LAW Folder Structure |
Example in LAW |
|---|---|
|
|
|
|
|
|
|
Each level utilized of the LAW Folder Structure adds to the length of the file path, so it is recommended to only add levels needed to help organize the data. |
|
The source is always listed in LAW as the preceding folder level to the file(s). Selecting Source for any level will produce the source name twice in LAW. |
Document Numbering
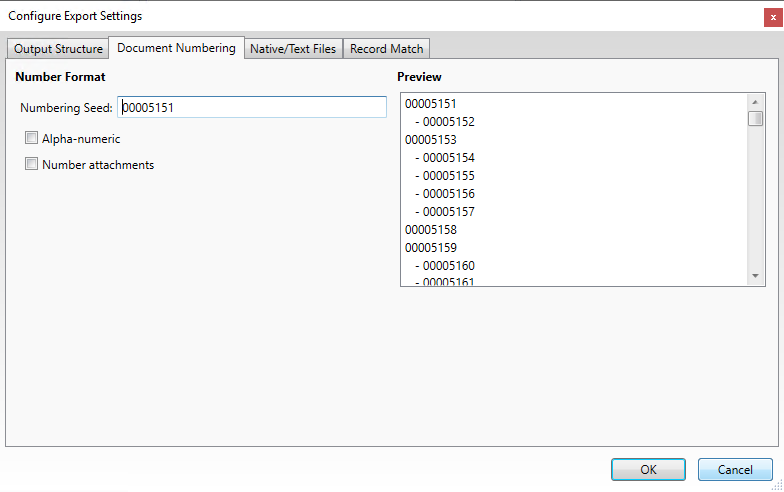
The Numbering Seed defines the id format for the exported documents. Select Alpha-numeric to have the ids increment using alphabetic characters, otherwise the numbers will increment only numerically.
Number Attachments will add a string to each document id for [Attachment Level # - Family Count #]:
•Attachment Level - Starts with 0 at the parent, and increases by 1 for each attachment.
•Family Count - The total number of attachments in the family.
The Preview window on the right illustrates how the document ids will be assigned, based on your selections.
Native/Text Files
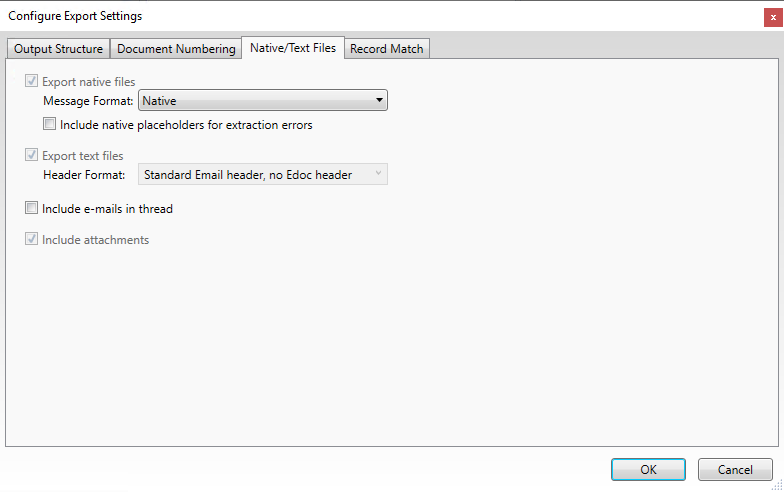
Export native files is automatically selected for LAW Direct exports. Select the Message Format you want e-mail messages to be exported as:
•Native - All files are exported in the original format (.msg, .eml, or .html). If you select Native and a message contains a number of recipients that exceeds the maximum number a .msg file can support, then the message will be converted to an .html file or to an .mhtml file if it contains inline images.
•Html - All files are exported to .html format except for mime (.eml) messages. If the message contains inline images, they will be placed in a directory with the same file name (minus extension) as the .html file (*currently, always export number).
•Html (Mhtml when images are present) - Any message that contains inline images will be converted to .mhtml format, otherwise it is converted to .html format.
•Mhtml - All messages are exported to .mhtml format.
|
The Message Format selected affects all Microsoft Outlook email settings exported: Export native files, Include e-mails in thread, or Include attachments. For Microsoft Outlook e-mail messages, you can export the messages as .msg, .html, or .mhtml files. |
Select Include native placeholders for extraction errors in order to generate placeholders for contained/embedded/attached files that have an error during export.
Export text files is automatically selected for LAW Direct exports. The Header Format is automatically selected as Standard Email header, no Edoc header.
Select Include e-mails in thread if you want all items of an e-mail thread, including any item contained in the thread that is filtered, to be included in the export. This will allow you to review the exported items in the context of the entire thread. If an email thread is tagged, and that tag has been excluded from the export, the email thread will not be exported.
|
If email threading is disabled for the case, the Include e-mails in thread check box only applies to email threads from Microsoft Outlook. Email threading is enabled on the Analysis tab in the New Case Settings or Edit Case Settings dialog box. For more information, see Analysis Case Settings and Near-Duplicate & Email Thread Analysis. |
Include attachments is automatically selected for LAW Direct exports. This forces all attachments to be included for documents that are exported.
Record Match
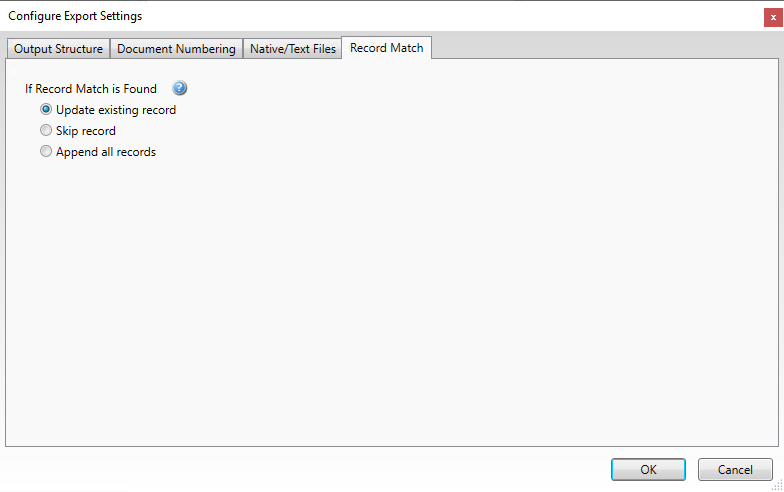
This tab determines what CloudNine™ Explore will do if a record being exported is already detected in the LAW database. The CloudNine™ Explore case ID and EDAID are used to determine uniqueness. This allows users to export from multiple CloudNine™ Explore cases to the same LAW case. Users may choose from these three options:
•Update existing record - CloudNine™ Explore will overwrite the existing record in LAW with the same CloudNine™ Explore ID. CloudNine™ Explore will replace the existing native and text file with the newly exported one (exact same EDAID). The image files and error placeholders (if they exist) will be deleted, and all metadata will be updated in LAW. Tags in LAW will be added but not removed with this option.
•Skip record - CloudNine™ Explore will skip export of the document if its CloudNine™ Explore ID already exist in LAW.
•Append all - CloudNine™ Explore will create new records in LAW for all CloudNine™ Explore documents selected for export. This may result in duplicate records in your CloudNine™ LAW database.
Exporting Files by Tags
1.In the Export column, select the check-box next to the tags you want include in the export.
i.When tag check-boxes are selected, the export will only include files containing the selected tags which have been filtered. For example, if the selected tags have been applied to 5 files in the case, but after filtering only 3 of these files are left, then only the 3 files containing the tags will be exported.
ii.In the Documents tagged with section, the Count column displays the total number of top-level files to which a tag has been applied. Top-level files include loose files and parent files, such as e-mail messages.
iii.The Family Count column displays the total number of top-level files and any attachments or child files to which a tag has been applied.
iv.The Size (GB) column displays the total size of the documents in gigabytes (GB). The total size is calculated using family size. When a parent document contains attachments, the attachments are not included in the file size calculation because the parent document file size already reflects the file size of its attachments. This prevents doubling the actual file size of attachments.
v.If you change any of the filter settings for the case before generating the export set, be sure to click the Refresh button in the Documents tagged with section to update the values in the Count, Family Count, and Size (GB) columns.
vi.To view the list of filtered files for a specific tag, in the Documents tagged with section, click the row for the tag. Clicking the row displays all files to which the tag has been applied after after filters have been applied to those files in the case.
vii.When a tag is applied to a file in CloudNine™ Explore, and the file is exported to CloudNine™ LAW, the tags are automatically exported to and created in CloudNine™ LAW. Group and individual tags are created as document-level tags in CloudNine™ LAW.
viii.Once a tag is created in CloudNine™ LAW for a document during an export from CloudNine™ Explore, if the tag is later removed from the document in CloudNine™ Explore and then re-exported into CloudNine™ LAW, the original tag created for the document will remain applied to the document in CloudNine™ LAW. The original tag cannot be removed from the export.
|
If a parent-level archive item is tagged to be Exported, but none of its attachment items are tagged for Export, then it is assumed that the archive contents are to be exported as well. The same is true for sub-archives contained within the original archive. |
2.In the Exclude column, select the check box next to the tags that you want to exclude from the export.
i.When used in conjunction with Export tag(s), the Exclude column can be used to exclude any documents associated with a tag, such as documents tagged as Privileged, Private, Confidential, or Trade Secret. The Exclude column can also be used to exclude individual documents from a mail store or archive file that is included in the export set.
|
The Exclude column settings take precedence over the Export column settings for tags. For example, if you are exporting by tag, and a document contains one tag that is flagged for export and one tag that is flagged to be excluded from the export, then the document will be excluded from the export. |
ii.E-mail items and archive items are treated differently when exported with excluded tags (Exclude check box is selected for tags). If any item contained in an e-mail thread is tagged as being excluded, the entire thread will be excluded from the export up to the first message of the thread. If an archive item (such as a zip file) contains multiple files tagged to be exported (Export check box is selected for tags), but one of the items is excluded, then the remaining items in the archive will still be exported.
|
When excluding documents from a mail store or archive file, only the first level of documents within the mail store or archive file can be excluded. For example, if the parent archive file contains another archive file, you cannot exclude the content of the sub-archive file. All the files contained within the sub-archive will be exported. |
Reviewing a LAW Direct Export Set
After a LAW Direct Export is performed, you can review the export statistics and the details of individual items in the Export Set.
Statistic |
Description |
|---|---|
Last Export |
The date and time of the most recently generated Export Set. |
Total |
The number of items included from all runs of the active Export Set. The Clear All link removes all documents from the set. For more information, see To open an existing export set. The Show link displays all documents in the Export Set in the Document list of the Export tab. |
New |
The number of new items included in the most recently generated Export Set. The Remove link removes any documents in the set that have not been exported yet. |
Exported (%) |
The total number of exported items. The percentage of the export that is currently completed is displayed next to the Exported value. |
Errors |
The number of processing errors triggered by the previous Export Set. The Reset link makes the files in the set that are associated with the errors available for re-exporting. The Show link displays files associated with the errors in the Document list of the Export tab. For more information about export errors, see Exporting. |
In the Export Statistics section, click Show next to the total field.
When you click Show, the Document list is populated with the files in the export set. The Document Details pane displays the details for the file currently selected in the Document list.