The File Type Filter only displays the file types for top-level files. Top-level files include loose files and parent files (such as e-mail messages) but exclude archives, mail stores, and forensic images. The File Type Filter does not display the file types for attachment/child files to prevent excluding attachments belonging to document families. You can view file attachments for individual documents in the Document List.
Configuring File Type Filtering
1.Click the Case Manager tab.
2.Double-click a case.
3.Click the Filters tab.
4.In the green drop-down list, select File Type Filter.
5.The file types of all files in the case are listed. The number in the Count column next to a file type indicates the number of files matching that file type in the case. By default, the Show list is set to All, and none of the Inc. or Exc. check boxes are selected for any of the file types. The Show list determines which file types are displayed for the File Type Filter based on the filter decision made for each file type. The Show list does not affect whether a file type is included or excluded from the results. Only the Inc. and Exc. check boxes determine whether a file type is included or excluded from the results. If the file type list is long, the Show list can help you quickly view which file types have been included, excluded, or are still undecided.
6.The Default Filters link opens the Set Standard File Type Filter Inclusions and Exclusions dialog box. The Set Standard File Type Filter Inclusions and Exclusions dialog box is used to define and apply the default file type inclusions and exclusions for the File Type Filter. The default File Type Filter inclusions and exclusions can be applied to both new cases and existing cases in CloudNine™ Explore. For more information, see the section below.
7.Do one of the following for each file type:
•Leave both the Inc. and Exc. check boxes blank if you have not yet determined whether the file type should be included or excluded from the filter results. Be aware that the when both check boxes are blank for a file type, the file type is automatically included in the filter results and will be included in the export. A file type is only excluded when the Exc. check box is selected for the file type.
•Select the Inc. check box to include the file type in the filter results.
•Select the Exc. check box to exclude the file type from the filter results.
•To select all or clear all check boxes in the Inc. or Exc. column, click the check box below the Inc. or Exc. header, and then click Yes when asked Are you sure you want to set all items to Not Decided? or Are you sure you want to include/exclude all items?.
8.To view the file type list by filter decision, click the down arrow in the Show list to display the Show list, and then click one of the following:
•All - All file types are displayed, regardless of whether the Inc. or Exc. check boxes are selected.
•Not Decided - Only file types without either the Inc. or Exc. check boxes selected are displayed.
•Included - Only file types with the Inc. check box selected are displayed.
•Excluded - Only file types with the Exc. check box selected are displayed.
9.You can click a specific file type to view the files in the case matching the selected file type in the center panel.
Default File Type Inclusions and Exclusions
In CloudNine™ Explore, you can define the default file type inclusion and exclusion settings for the File Type Filter on the Filters tab. The default File Type Filter inclusions and exclusions can be applied to any case in CloudNine™ Explore, and are applied to cases individually.
For new cases, the default File Type Filter inclusions and exclusions can automatically be applied to a new case by selecting the Apply default file type filters check box on the General tab in the New Case Settings dialog box when you are creating the case. For more information see Creating an Explore Case.
For existing cases, the default File Type Filter inclusions and exclusions can be applied to existing cases in CloudNine™ Explore by opening an existing case, and clicking the Apply or Save & Apply button in the Set Standard File Type Inclusions and Exclusions dialog box on the Filters tab.
Once the default File Type Filter inclusions and exclusions have been applied to a case, if there are changes to the default file type inclusions and exclusions after they have been applied to a case, the changes are not automatically updated in cases using those default settings. In order to update these cases, you will need to reapply the default File Type Filter inclusions and exclusions to the cases. To update a case with changes to the default file type inclusions and exclusions, you will need to reopen the case, open the Set Standard File Type Inclusions and Exclusions dialog box, and click the Apply or Save & Apply button to apply the changes to the case.
Defining Default File Type Inclusions and Exclusions
1.Click the Case Manager tab.
2.Double-click any case (it does not matter which case you open). You can set up the default File Type Filter inclusions and exclusions from a case without applying these settings to any case currently open in CloudNine™ Explore. If you want to define the default File Type Filter inclusions and exclusions while applying them to a case, open the case to which you want to apply the default settings.
3.Click the Filters tab.
4.In the green drop-down list, select File Type Filter.
5.Click Default Filters.
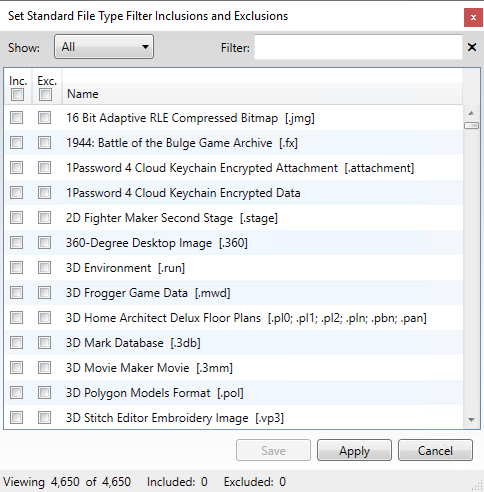
6.The Set Standard File Type Filter Inclusions and Exclusions dialog displays. The dialog contains a comprehensive list of file types. By default, the Show list is set to All, and none of the Inc. or Exc. check boxes are selected for any of the file types.
7.The Show list determines which file types are displayed in the file type list based on the filter decision made for each file type. The Show list does not affect whether a file type is included or excluded from the filter results. Only the Inc. and Exc. check boxes determine whether a file type is included or excluded from the filter results. If the file type list is long, the Show list can help you quickly view which file types have been included, excluded, or are still undecided.
8.The Filter field is used to search the filter list. The Filter field searches the currently displayed list. If you want to search for a specific file type in the Filter field, type out part/all of the file type. The file type list updates to display file types containing the text you entered in the Filter field.
9.Do one of the following for each file type:
•Leave both the Inc. and Exc. check boxes blank if you have not yet determined whether the file type should be included or excluded from the filter results. Be aware that the when both check boxes are blank for a file type, the file type is automatically included in the filter results and will be included in the export. A file type is only excluded when the Exc. check box is selected for the file type.
•Select the Inc. check box to include the file type in the filter results.
•Select the Exc. check box to exclude the file type from the filter results and export.
•To select all or clear all check boxes in the Inc. or Exc. column, click the check box at the top of the Inc. or Exc. column.
10.To view the file type list by filter decision, click the down arrow in the Show list to display the Show list, and then click one of the following:
•All - All file types are displayed, regardless of whether the Inc. or Exc. check boxes are selected.
•Not Decided - Only file types without either the Inc. or Exc. check boxes selected are displayed.
•Included - Only file types with the Inc. check box selected are displayed.
•Excluded - Only file types with the Exc. check box selected are displayed.
11.As you modify the default file type inclusions and exclusions, the counts at the bottom of the dialog are updated to reflect the counts of included and excluded file types.
12.Click Save to save the default settings without applying them to the current case.
Applying Default File Type Inclusions and Exclusions
When you are creating a new case, you can apply the default File Type Filter inclusions and exclusions by selecting the Apply default file type filters check box on the General tab in the New Case Settings dialog. When the case is created, the default file type inclusions and exclusions will automatically be applied to the case for the File Type Filter on the Filters tab. See General Case Settings for more details.
The Apply default file type filters check box is only available in the New Case Settings dialog box. To apply the default File Type Filter inclusions and exclusions to an existing case:
1.Click the Case Manager tab.
2.Double-click the case to which you want to apply the default File Type Filter inclusions and exclusions.
3.Click the Filters tab.
4.In the drop-down list, select File Type Filter.
5.Click the Default Filters link. The Set Standard File Type Filter Inclusions and Exclusions dialog opens.
6.Click the Apply button. If you made any changes to the default file type inclusion or exclusion settings in the Set Standard File Type Filter Inclusion and Exclusions dialog box, click the Save & Apply button.
7.Click Yes at the confirmation prompt.
|
When you apply the default File Type Filter inclusions and exclusions to a case, this function cannot be undone. If the Inc. or Exc. check box is selected for a file type on the Filters tab, and the Inc. or Exc. check box for the same file type is selected in the Set Standard File Type Filter Inclusions and Exclusions dialog, when you click Apply or Save & Apply, the Inc. and Exc. check box settings in the Set Standard File Type Filter Inclusions and Exclusions dialog will overwrite the Inc. and Exc. check box settings for the file type on the Filters tab. |
|
When applying the default File Type Filter inclusions and exclusions to a case, only the inclusion or exclusion settings are applied to the case. If a file type in the Set Standard File Type Filters Inclusions and Exclusions dialog is set to undecided (the Inc. and Exc. check boxes are not selected), the undecided setting is not applied to the file type when the default File Type Filter inclusions and exclusions are applied to the case. For example, if the Inc. or Exc. check box is already selected for a file type on the Filters tab, and you apply the default file type inclusions and exclusions to the case, but both the Inc. and Exc. check boxes are not selected for the same file type in the Set Standard File Type Inclusions and Exclusions dialog box, then when the default file type inclusions and exclusions are applied to the case, the undecided file type setting will not overwrite the current Inc. or Exc. setting for the file type on the Filters tab. |