Configuring a File Hash Filter
The File Hash Filter allows you to specify files to be filtered from a case based on the hash value of each file. Any file is filtered that matches either of the following conditions:
•The file is identified in the NIST Items filter.
•The file matches a custom file hash value, as specified by using the Custom File Hash Items filter.
|
NIST databases cannot be attached to cases and custom file hash value lists cannot be created or imported into CloudNine™ Explore Web. Each of these file hash filtering configurations are done for a case in CloudNine™ Explore. |
Starting from the FILTERS page for a case:
1.Choose File Hash Filter in the Selected Filter drop down. By default, Inc. is selected for the Custom File Hash Items and NIST Items filters.
2.Optionally you can click the NIST Items or Custom File Hash Items filter to view the associated items in the document list pane.
|
If a NIST database is not attached to the case the NIST Items filter will not function. If a custom file hash value list has not been created or imported into the case, then the Custom File Hash Items filter will not function. |
3.Update the Inc. and Exc. check boxes as needed:
•To allow NIST items to be included in filter results, select Inc. for NIST Items.
•To exclude NIST items from the filter results and export, select Exc. for NIST Items.
•To allow file types in the custom file hash value list to be included in filter results, select Inc. for Custom File Hash Items.
•To exclude file types in the custom file hash value list from the filter results and export, select Exc. for Custom File Hash Items.
Configuring a Duplicate Document Filter
|
Due to the different technologies used in CloudNine™ LAW and CloudNine™ Explore, the hash values generated for files in LAW will not always match the hash values generated for files in Explore. |
Starting from the FILTERS page for a case:
1.Choose Duplicate Document Filter in the Selected Filter drop down. By default, Inc. is selected for the Duplicates filter.
2.Optionally you can click the Duplicates filter to display the list of duplicate files in the document list pane.
3.Do one of the following:
•To allow duplicates to be included in the filter results, select Inc. for Duplicates.
•To exclude duplicates from the filter results and export, select Exc. for Duplicates.
Configuring Date Range Filters
Note the following about how date filtering works:
•The filter removes e-mail with date sent that falls outside the date range(s) you specify. It removes calendar items whose start and end date fall outside the date range(s).
•Dates for e-mail files are determined from the sent date field. If the sent date falls within the date range, then the filter will allow the item to pass.
•Dates for calendar appointments are evaluated based on start and end date fields.
•Dates for files other than e-mail are determined by the document's metadata. The filter will only retain items whose metadata indicates created and modified dates that fall within the date range(s) or overlap. If metadata date created or date modified is unavailable, then the filter will allow the item to pass. If both dates are known, and either of the metadata dates falls outside the date range(s) specified, the filter will allow the item to pass.
Starting from the FILTERS page for a case:
1.Choose Date Range Filter in the Selected Filter drop down.
2.Click the plus sign button to display the Add date range filter dialog.
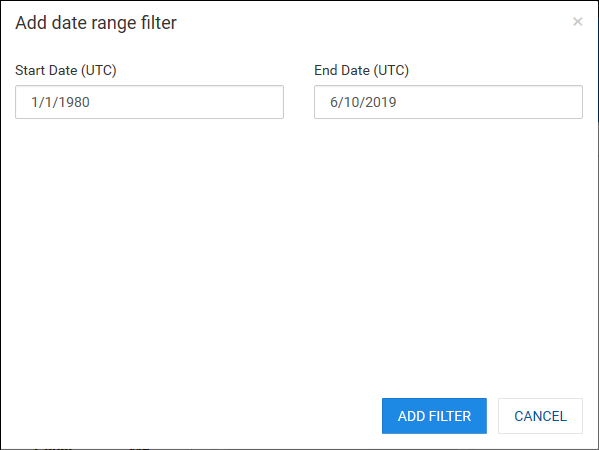
3.Update the Start Date and End Date fields to specify what should be used for the new date range filter.
4.Click ADD FILTER. A new date range filter is added with the dates you specified and the check box is automatically selected.
5.If you want to filter using multiple date ranges, click the plus sign button again to add another date range filter.
6.Edit an existing date range filter by selecting the calendar icon to the right of the filter in the list. Update the start or end date, then click UPDATE FILTER to save your changes.
7.Remove an existing date range filter by selecting the X icon to the right of the filter in the list.
8.To remove all date range filters, select the red X button at the top right of the filter list.
9.Select one of the date range filters from the filter list to display the list files in that date range in the document list pane.
10.Update the Inc. and Exc. check-boxes in the filter list to include or exclude the associated date range filter documents from the filter results.
Configuring a File Type Filter
Starting from the FILTERS page for a case:
1.Choose File Type Filter in the Selected Filter drop down.
2.The list in the left pane displays the file types for all files in the case. Count displays the number of files of that type. By default, the Show drop down is set to All (all of the file type filters are displayed in the list), and all Inc. and Exc. check boxes are unselected.
|
Show only affects what is displayed in the filter list at the bottom of the left panel. Show has no effect on what file types are included or excluded from the results. |
|
When both Inc. and Exc. are not selected, the filter is designated as "Not Decided". Any file type that is "Not Decided" will be included in the filter results and included in the export. A file type is only excluded when the associated Exc. check box is selected. |
3.Update the Inc. and Exc. check boxes as needed:
•Select Inc. to include the file type in the filter results.
•Select Exc. to exclude the file type in the filter results and export.
Configuring an E-mail Sender Domain Filter
Starting from the FILTERS page for a case:
1.Choose E-mail Sender Domain Filter in the Selected Filter drop down.
2.The list in the left pane displays the e-mail sender domains in the case. Count displays the number of files for the associated domain. By default, the Show drop down is set to All (all of the e-mail sender domains are displayed in the list), and all Inc. and Exc. check boxes are unselected.
|
Show only affects what is displayed in the filter list at the bottom of the left panel. Show has no effect on what e-mail sender domains are included or excluded from the results. |
|
When both Inc. and Exc. are not selected, the filter is designated as "Not Decided". Any e-mail sender domain that is "Not Decided" will be included in the filter results and included in the export. An e-mail sender domain is only excluded when the associated Exc. check box is selected. |
3.Update the Inc. and Exc. check boxes as needed:
•Select Inc. to include the e-mail sender domain in the filter results.
•Select Exc. to exclude the e-mail sender domain in the filter results and export.
Configuring a Language Filter
|
Some documents may contain multiple languages. When a document contains multiple languages, the document is included in the count for each language it contains. If a document contains multiple languages and one of the languages in the document is excluded from export, but another language in the document is included in the export, the export may include the document containing the excluded language, depending on the other filter and export settings. |
Starting from the FILTERS page for a case:
1.Choose Language Filter in the Selected Filter drop down.
2.The list in the left pane displays the languages identified in the case. Count displays the number of files for the associated language. By default, the Show drop down is set to All (all of the languages are displayed in the list), and all Inc. and Exc. check boxes are unselected.
|
Show only affects what is displayed in the filter list at the bottom of the left panel. Show has no effect on what languages are included or excluded from the results. |
|
When both Inc. and Exc. are not selected, the filter is designated as "Not Decided". Any language that is "Not Decided" will be included in the filter results and included in the export. A language is only excluded when the associated Exc. check box is selected. |
3.Update the Inc. and Exc. check boxes as needed:
•Select Inc. to include the language in the filter results.
•Select Exc. to exclude the language in the filter results and export.