|
Remember that your access to features and functionality in CloudNine™ Explore Web is dependent on your role in the system. •Read-only users — Access to the FILTERS, SEARCH, and EXPLORE pages, but may not tag. •Standard access users — Access to the FILTERS, SEARCH, and EXPLORE pages and have permission to create, edit, delete, import, and export tags. They can also tag and download documents in the core platform. •Administrators — Access to the FILTERS, SEARCH, and EXPLORE pages and have permission to create, edit, delete, import, and export tags. They can also tag and download documents in the core platform and in the Review module. |
Applying Tags to Individual Documents on the FILTERS, SEARCH, or EXPLORE Pages
Starting from the FILTERS, SEARCH, or EXPLORE page for a case:
1.Display a list of documents by selecting a filter on the FILTERS page, running a search query on the SEARCH page, or exploring using available criteria on the EXPLORE page.
2.Select a document from the document list pane.
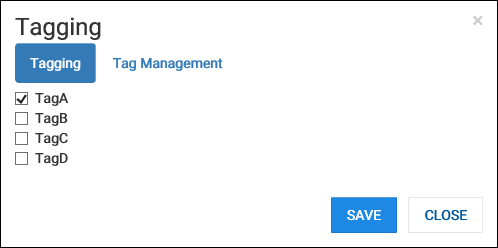
3.In the document pane on the right, click the Tag document icon at the top. The Tagging dialog displays. Tags that are already applied to the individual document are checked.
4.Select the check box next to the tag(s) you want to apply to the document.
5.Click SAVE. The Tagging dialog closes.
|
The Tag document icon at the top of the document details pane on the right will display in gray color if the document does not have any applied tags, or blue color if the document has at least one applied tag. |
Applying Tags to Search Query Results
Starting from the SEARCH page for a case:
1.Select the check box next to the search query containing the records you want to tag.
2.Click the Tag checked searches icon at the top of the Search Request pane. The Group Tagging dialog displays.
3.Select the check box next to the tag(s) you want to apply to all documents in the search query.
4.Click SAVE. The Group Tagging dialog closes.
5.The Search Request pane is updated and the search list displays a Tag icon in the Tags column indicating that this search has a tag applied.
|
If additional records are imported into the case, and some of the new records are returned in the tagged search query results, the tag is automatically applied to those newly imported records. |
Applying Tags to EXPLORE Search Results
Starting from the EXPLORE page for a case:
1.In the Selected criteria pane, configure the search you want to use to locate the documents you want to tag. You can type in search terms, enter a date filter, or filter using the filters listed at the bottom.
2.Click GO! The search is executed and the search results display in the document list in the center pane.
3.Click the Tag documents icon at the top of the document list pane. The Bulk Tagging dialog displays. The total number of documents in the current document list is shown at the bottom of the Bulk Tagging dialog.
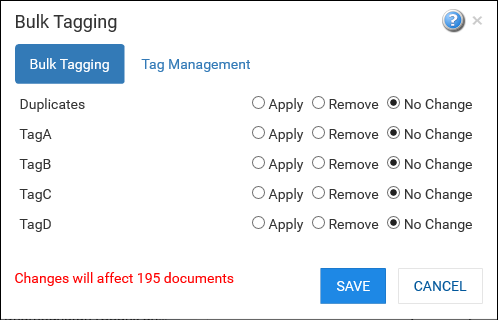
4.Select the Apply option for the tag(s) you want to apply to the document list.
5.Click SAVE. The Bulk Tagging dialog closes. The tag(s) are applied to each document in the document list.
|
Because searches on the EXPLORE page can return large sets of documents, to prevent bogging down performance on the page calculating the current tag state of each document returned in the search results, each time you open the Bulk Tagging dialog box on the EXPLORE page, the No Change option is selected for all tags listed in the dialog box, even if a bulk tag has been applied to one or more documents in the current search results during a previous session on the EXPLORE page. When the document-level tags are applied to the search results on the EXPLORE page, the tags applied to each document in the search results are saved, but the bulk tagging options associated with a search on the EXPLORE page are not retained. |
Applying Tags to Documents in the Email Thread Viewer
Starting from the FILTERS, SEARCH, or EXPLORE page for a case:
1.Display a list of documents by selecting a filter on the FILTERS page, running a search query on the SEARCH page, or exploring using available criteria on the EXPLORE page.
2.Select a document from the document list pane in the center. The document details display in the right pane.
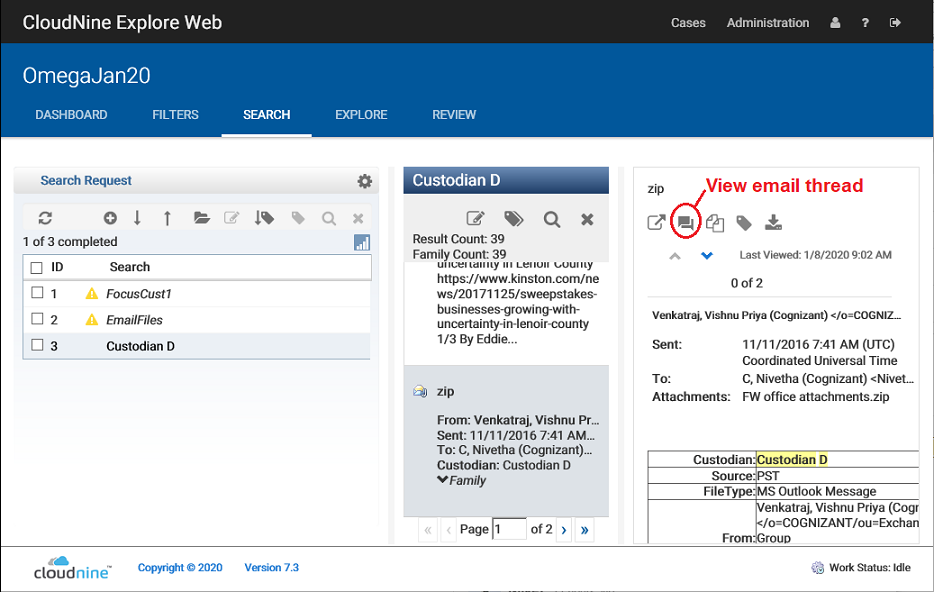
3.Click the View email thread icon at the top of the document details pane on the right. The Email Thread Viewer dialog displays.
|
If the View email thread icon is disabled, there are no email threads associated with the file or the email thread analysis has not been run yet for the case. |
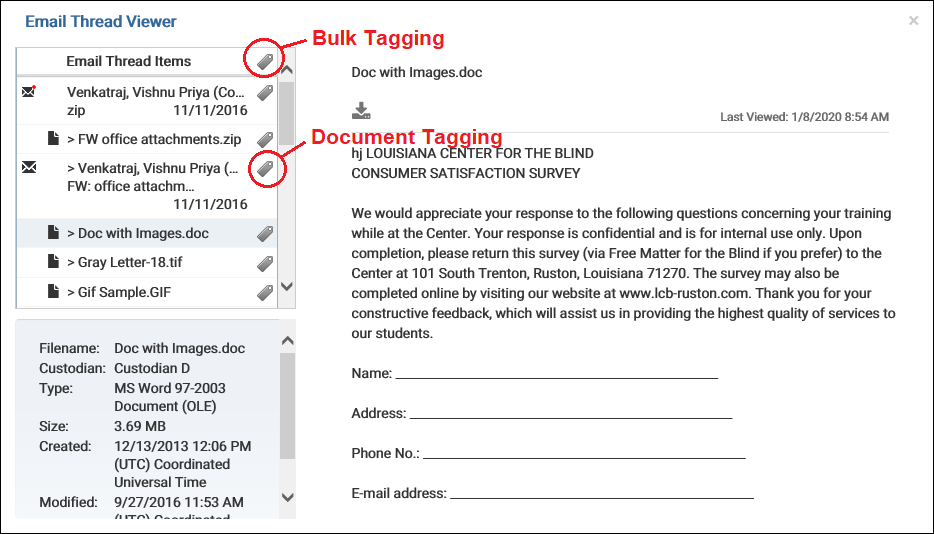
4.Click the Tags icon at the top of the Email Thread Items list to open the Bulk Tagging dialog to apply a tag to all documents in the email thread, or click the Tag icon next to an individual document to open the document Tagging dialog.
5.Select the check box next to the tag(s) you want to apply to the document(s).
6.Click SAVE. The Bulk Tagging or Tagging dialog closes.
|
When performing bulk tagging of all records in an email thread, if additional records are imported into the case and some of the new records are part of the email thread, the tag is not automatically applied to the newly imported documents in the email thread. To apply the tag to the newly imported documents, you will need to reapply the tag to the entire email thread, or apply the tag individually to the newly imported documents in the email thread. |
Applying Tags to Documents in the Near Duplicate Document Viewer
Starting from the FILTERS, SEARCH, or EXPLORE page for a case:
1.Display a list of documents by selecting a filter on the FILTERS page, running a search query on the SEARCH page, or exploring using available criteria on the EXPLORE page.
2.Select a document from the document list pane in the center. The document details display in the right pane.
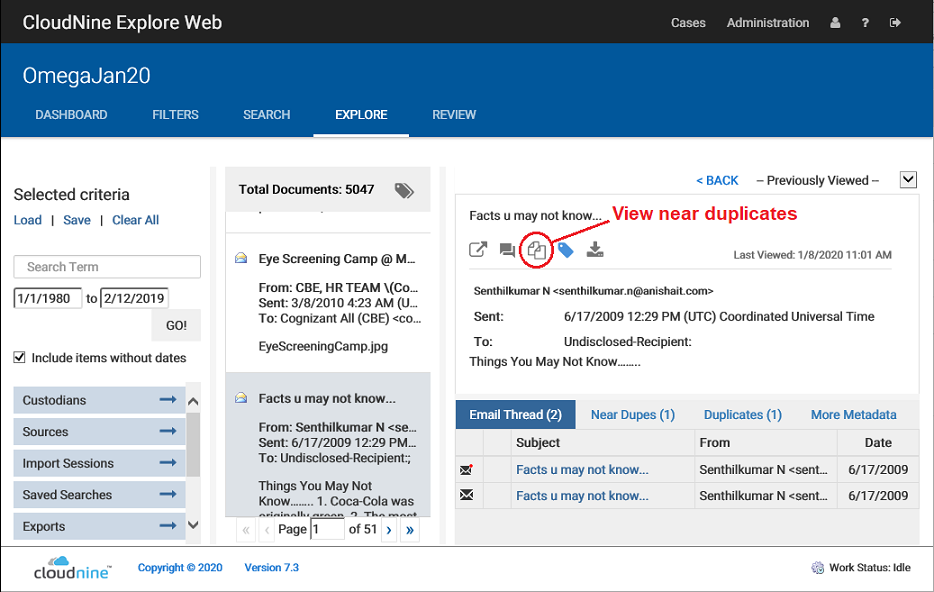
3.Click the View near duplicates icon at the top of the document details pane on the right. The Near Duplicate Document Viewer dialog displays.
|
If the View near duplicates icon is disabled, there are no duplicates associated with the file or the near-duplicate detection analysis has not been run yet for the case. |
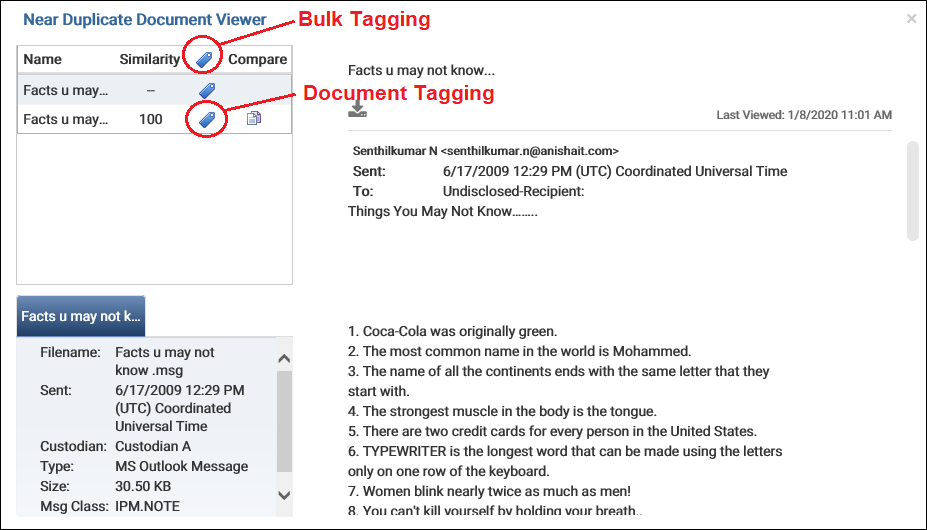
4.Click the Tags icon at the top of the document list to open the Bulk Tagging dialog to apply a tag to all documents in the list, or click the Tag icon next to an individual document to open the document Tagging dialog.
5.Select the check box next to the tag(s) you want to apply to the document(s).
6.Click SAVE. The Bulk Tagging or Tagging dialog closes.
|
When performing bulk tagging of a set of near-duplicate documents, if additional records are imported into the case and some of the new records are part of the set of near-duplicate documents, the tag is not automatically applied to the newly imported documents. To apply the tag to the newly imported documents, you will need to reapply the tag to the entire near-duplicate set, or apply the tag individually to the newly imported documents. |
Applying Tags to Documents in a Family
Starting from the FILTERS, SEARCH, or EXPLORE page for a case:
1.Display a list of documents by selecting a filter on the FILTERS page, running a search query on the SEARCH page, or exploring using available criteria on the EXPLORE page.
2.Scroll to a document in the document list in the center pane that is part of a family (you will see a Family drop-down in the document list).
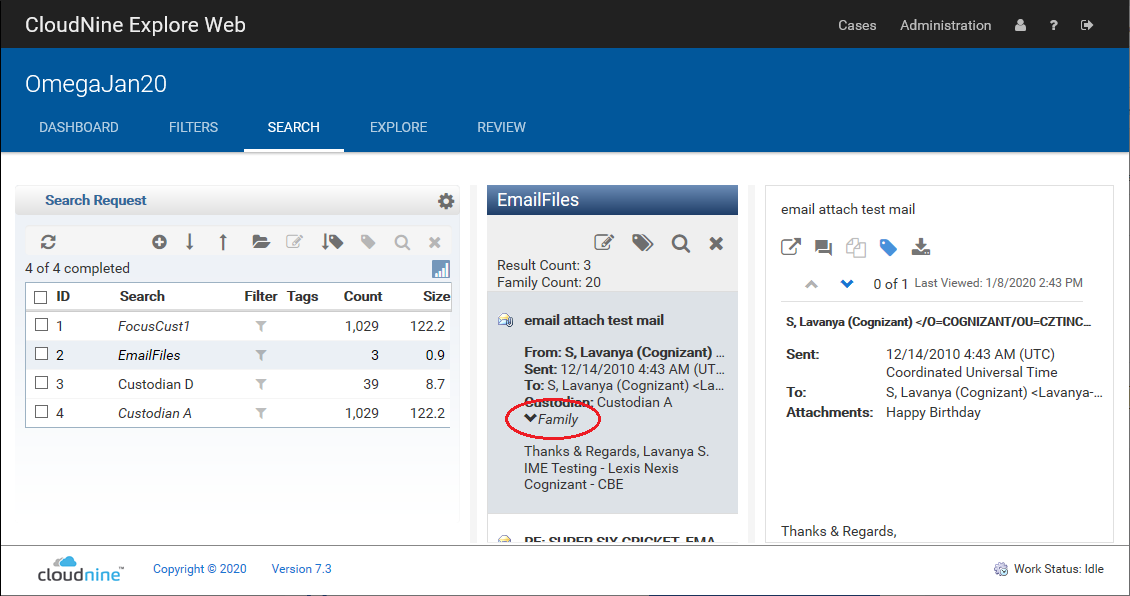
3.Click on the Family drop-down to expand the list of documents within the family. Select an individual document within the family. The document details display in the right pane.
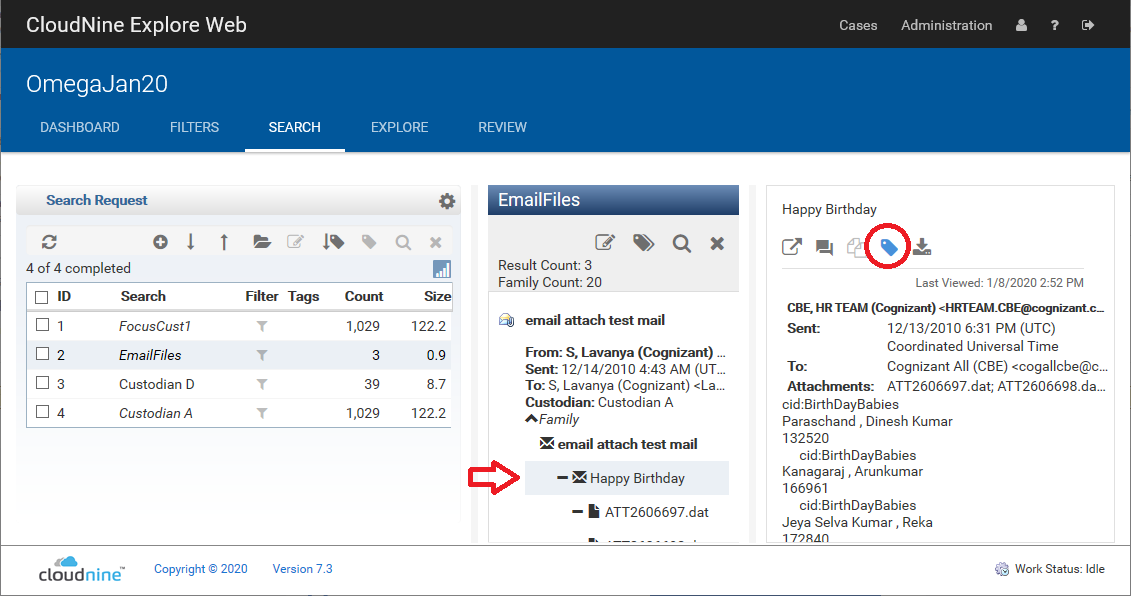
4. Click the Tag document icon at the top of the document details pane to open the Tagging dialog.
5.Select the check box next to the tag(s) you want to apply to the document.
6.Click SAVE. The Tagging dialog closes.
Applying Tags by EdaId
Every document imported into a case in CloudNine™ Explore is assigned a unique value in the case's EdaId field. When documents are exported from CloudNine Explore using the native export, by default, the export includes the EdaId field value for each document exported from CloudNine Explore.
When adding tags by EdaId, you can only add one tag to a list of EdaIds at one time. If you want to add multiple tags to the same list of EdaIds, you can import the same EdaId list multiple times, choosing a different tag each time.
Adding Tags by EdaId does not remove any tags that already exist for the associated documents. For example, if a document already has the Privileged tag applied, and the document is included in the EdaId list used to apply the Responsive tag, after applying tags by EdaId the document will have both the Privileged and Responsive tags.
Tags applied using EdaId tagging are applied as individual document-level tags. If you need to remove a tag that was applied using EdaId tagging, the tag can be removed from a document on the Tagging tab in the Tagging dialog box. For more information, see Removing Tags.
1.Create a line-delimited text file containing the EdaId value for every document you want to tag. The line-delimited text file can contain up to 50,000 EdaId values. If the import encounters a duplicate EdaId field value in the text file, it will ignore the duplicate values.
2.Verify that the tag you want to use already exists in the Explore case.
3.Go to the SEARCH page for the case.
4.In the Search Request pane, click the Tag Imported IDs icon. The Tag Imported IDs dialog displays.
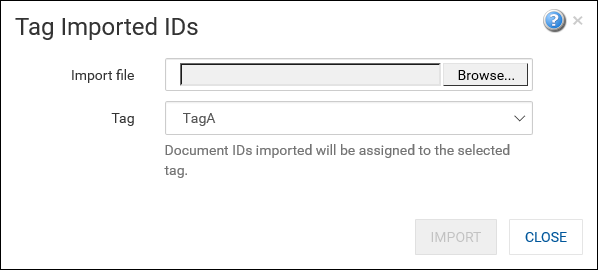
5.Click Browse and use the presented file explorer window to select the file you created in step 1.
6.Use the Tag drop down to select the tag you want to apply to the documents you specified in the file.
7.Click IMPORT. The tag you selected is applied to each document associated with a valid EdaId value from the text file. The Tag Imported IDs dialog displays a message indicating how many IDs were imported and what tag was used. If there were duplicate or invalid EdaID values in the text file, the message will also provide those details.
8.Click CLOSE. The Tag Imported IDs dialog closes.