Applying Tags to Individual Documents
1.Click the Case Manager tab.
2.Double-click a case.
3.Click the Filters, OCR, Search, Export, or Exceptions tab.
4.Display a list of documents by selecting a filter, OCR file type, search query, export setting, or exception category on the tab.
5.In the document list, click the document to which you want to apply tags.
6.Click the down arrow in the Document Tagging section.
7.Select the check box next to the tags you want to apply to the document. When a tag check box is selected, the tag has been applied to the individual document. When a tag check box is not selected, the tag has not been applied to the individual document.
i.If you need to delete or add additional tags, click the Edit Tags link in the Document Tagging section to open the Tags tab in the Edit Case Settings dialog box. For more information, see the "Add tags for the case" section in the Cases in CloudNine™ Explore topic.
Applying Tags by Search Query
1.Click the Case Manager tab.
2.Double-click a case.
3.Click the Search tab.
4.On the Search tab, select the check box next to the search query containing the records to which you want to apply tags. For more information about search queries, see Searching.
5.Click the Tag button. The Group Tagging dialog opens.
6.Select the check box next to the tag you want to apply to all documents in the search query.
i.If you need to delete or add additional tags, click the Edit Tags link in the Group Tagging dialog box to open the Tags tab in the Edit Case Settings dialog box. For more information, see the "Add tags for the case" section in the Cases in CloudNine™ Explore topic.
7.Close the Group Tagging dialog box.
i.When a tag has been applied by search query, the blue tag icon is displayed next to the search query in the Tag column, and the corresponding tag check box in the Document Tagging section is selected for each record in the group of records.
ii.If additional records are imported into the case and some of the new records are returned in the tagged search query results, the tag is automatically applied to those documents.
Applying Tags by Exception Category
1.Click the Case Manager tab.
2.Double-click a case.
3.Click the Exceptions tab.
4.Make sure All is selected in the Filter By list.
5.Select the check box next to the exception category containing the documents to which you want to apply tags. For more information about exceptions, see Reviewing Exceptions.
6.Selecting the check box opens the Group Tagging dialog.
7.Select the check box next to the tag you want to apply to all documents in the exception category.
i.If you need to delete or add additional tags, click the Edit Tags link in the Group Tagging dialog box to open the Tags tab in the Edit Case Settings dialog box. For more information, see the "Add tags for the case" section in the Cases in CloudNine™ Explore topic.
8.Close the Group Tagging dialog box.
i.When a tag has been applied by exception category, the blue tag icon is displayed next to the exception category in the Tag column, and the corresponding tag check box in the Document Tagging section is selected for each document in the group of documents.
ii.If additional documents are imported into the case and some of the new documents are returned in the tagged exception category results, the tag is automatically applied to those documents.
Applying Tags by EdaId
Every document imported into a case in CloudNine™ Explore is assigned a unique value in the case's EdaId field. When documents are exported from CloudNine™ Explore using the native export, the export includes the EdaId field value for each document exported from CloudNine™ Explore by default. If you plan on tagging documents by EdaId, make sure the EdaId field is included in the fields to export.
When applying tags by EdaId, you can only apply one tag to a list of EdaIds at one time. If you want to apply multiple tags to the same list of EdaIds, you can import the same EdaId list multiple times, selecting a different tag each time. If a tag has already been applied to a document in the EdaId list, the existing tag will continue to be assigned to the document, and the new tag applied using EdaId tagging will also be assigned to the document. For example, if the Privileged tag is applied to a document, and the document is included in the EdaId list being imported with the Responsive tag selected, after the EdaId list import, the document will have existing Privileged tag and the Responsive tag applied to it.
Tags applied using EdaId tagging are applied as individual document-level tags. If you need to remove a tag that was applied using EdaId tagging, the tag can be removed from a document in the Document Tagging section on the Filters, OCR, Search, Export, or Exceptions tab. For more information, see Removing Tags.
1.Create a line-delimited text file containing the EdaId field value for every document to which you want to apply a specific tag.
i.The line-delimited text file can contain up to 50,000 EdaId field values.
ii.Duplicate EdaId field values are not allowed in the .txt file. If the import encounters a duplicate EdaId field value in the text file, it will only import one instance of the EdaId field value.
2.Make sure the tag you want to apply to the EdaId field values exists in the CloudNine™ Explore case.
3.In CloudNine™ Explore, click the Case Manager tab.
4.Double-click the case containing the documents you want to tag.
5.Click the Search tab.
6.In the Search Request pane, click the Tag Imported IDs button, ![]() .
.
i.Clicking the Tag Imported IDs button opens the Tag Imported IDs dialog.
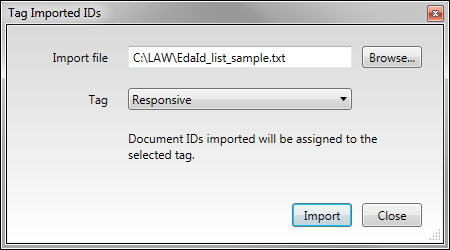
7.Click the Browse button next to the Import file field.
i.Clicking the Browse button opens the Select file containing Document IDs (Line Delimited) dialog.
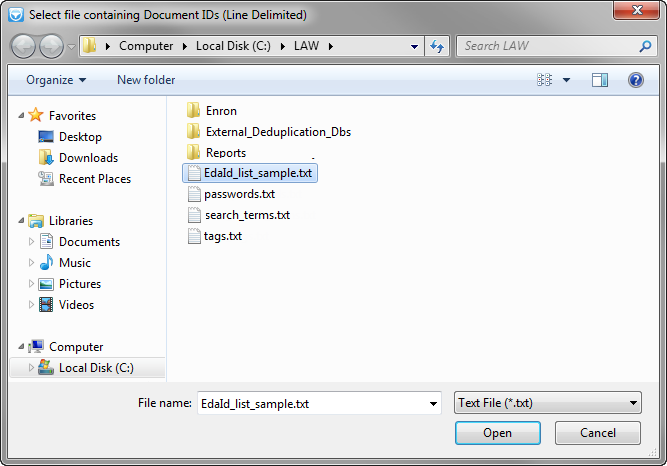
8.Navigate to and click the line-delimited text file containing the EdaId field values you want to tag.
9.Click the Open button.
i.Clicking the Open button closes the Select file containing Document IDs (Line Delimited) dialog box, and adds the text file name and path to the Import file field.
10.In the Tag list, click the tag you want to apply to the documents containing the EdaId field values.
11.Click the Import button. Clicking the Import button assigns the selected tag to each document associated with a valid EdaId field value in the line-delimited text file. When the import is complete, the "Document IDs tagging import complete, [number of documents] documents were tagged" message is displayed. If there were duplicate or invalid EdaId field values in the line-delimited text file, the message also includes the number of duplicate and invalid IDs that were identified and not tagged.
12.Click OK to close the message.
i.For each document in the case with a valid EdaId field value in the imported text file, you can view the tag assignment in the Document Tagging section on the Filters, OCR, Search, Export, and Exceptions tabs.