Production is the generation of a sub-set of document TIFF or PDF files, some of which have been redacted. Similar to other batch processes in Concordance Desktop, Concordance Desktop production parameter settings can be saved and used each time you create a production.
Before starting a production run, you need to run a query to locate all the documents for the production, then define the production run parameters or load a saved parameter set.
If your current database is using the Concordance Desktop Viewer, follow the information below. Otherwise if you are using the Concordance Viewer, see Production with Concordance Viewer.
|
Markups including redactions and header/footer/margin information may fail to be included in the produced or printed output when these processes are started from a Windows 10 workstation that is set to sleep. Windows 10 workstation used for production or print jobs should set the workstation to never sleep. The monitor may go into screensaver mode without issue but the workstation needs to maintain contact with the server in order to properly complete the production or print job. |
To Run a Production
1.If you have not done so already, run a search query to locate the documents you want to produce. See, Locating documents to produce.
2.Create a directory folder to store the production files.
3.From the Tools menu click Production, and then Production.
4.If a dialog appears stating that remote databases could run slow, click Yes if you want to continue. Click No only if you do not want to run the production at this time.
i.The Production Run Parameters dialog opens.
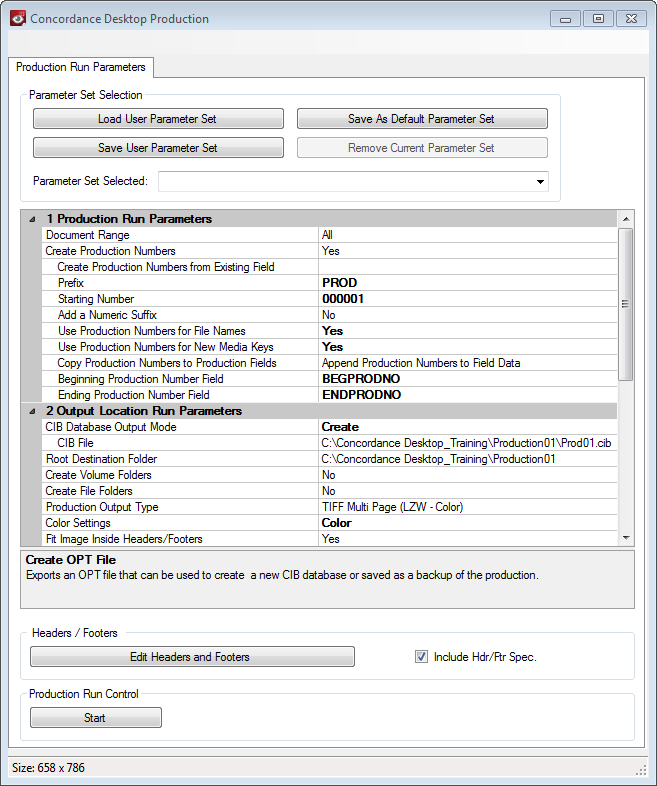
5.Specify the following production parameters:
a.To set production run parameters:
1.From the Production Run Parameters section, in the Document Range list, click one of the following:
•To include all the documents in the query, click All.
•To include a selected set of documents from the query, select Range, and then specify the range of documents you want to produce. The default range is the complete range of documents in the current Concordance Desktop query.
2.To create production numbers, do the following:
•In the Create Production Numbers field, click Yes.
•In the Create Production Numbers from Existing Field, select the Concordance Desktop database field name from which you want the Production numbers to be created.
•In the Prefix field, type the prefix you want to precede the production number. The prefix can be any combination of letters, numbers, or punctuation that are valid folder or file names. There is a limit of 57 characters.
•In the Starting Number field, type the number you want to use to start numbering the production files. Zero fill your starting number to determine the desired number width. There is a limit of 9 digits.
|
The Starting Number field accepts a zero-filled number up to 10 digits in length (maximum number of two billion). |
•In the Add a Numeric Suffix field, click Yes or No to add an incrementing numeric value to a production number for each page in a document.
|
When adding a numeric suffix, the pages within document will be produced with a beginning .0001 suffix and incremented accordingly. Therefore, if a single document within the production set contains more than 10000 pages, page 9999 will contain the suffix .9999 and page 10000 will contain the suffix .10000. This may cause sorting issues for other applications used to view documents/images if not loaded into the application with a corresponding OPT file. |
•In the Use Production Numbers for File Names, click Yes or No to replace the current file name with the generated production number.
•In the Use Production Numbers for New Media Keys, click Yes or No to replace the current media key with the generated production number in the .cib file you specified.
•In the Copy Production Numbers to Production Fields, select either Append Production Numbers to Field Data or Overwrite Field Data with Production Numbers.
•In the Beginning Production Number list, click the field you want to use to store the beginning production number in the corresponding Concordance Desktop database.
•In the Ending Production Number list, click the field you want to use to store the ending production number in the corresponding Concordance Desktop database.
|
When producing single-page .tiff formatted files, the Use Production Numbers for File Names and Use Production Numbers for New Media Keys options must be set to Yes. |
|
The BEGPRODNO and ENDPRODNO fields are included in the standard database template as production fields to ensure that the numbers do not append to a field with existing data. If the production number appends to an existing field, the numbers may truncate if the content exceeds the field length. |
3.To create a Placeholder for unsupported or missing files, Click Yes.
•The produced image for the unsupported or missing file will appear as this:

|
The placeholder pdf and tiff images are stored in the installation Program Data folder and can be replaced with a custom image of your choosing. |
b.To set the output location parameters:
1.In the Output Location Run Parameters section, in the CIB Database Output Mode list, do one of the following:
•To add the documents to an existing CIB database, click Append.
•To create a new CIB database, click Create.
2.To generate the CIB database file to store references to the production files, in the CIB File field, do one of the following:
•To append a current CIB database, click Browse ![]() , and then navigate to and select the CIB file you want to append.
, and then navigate to and select the CIB file you want to append.
•To create a new CIB database, click Browse ![]() , navigate to where you want to store the file, and then enter a new .cib file name and click Open.
, navigate to where you want to store the file, and then enter a new .cib file name and click Open.
3.To specify location where the output files are to be stored, in the Root Destination Folder field, click Browse ![]() , and then navigate to and select the folder.
, and then navigate to and select the folder.
|
The Root Destination Folder path including the folder name should not exceed 250 characters as this may cause the application to close unexpectedly. |
4.To create volume folders for the production files, in the Create Volume Folders list, click Yes, and then do the following:
•In the Prefix field, type the prefix you want to use to precede the volume number. The prefix can be any combination of letters, numbers, or punctuation; however, the characters must be valid folder and file name characters.
•In the Starting Number field, type the number, you want to use for the starting number for the volume folders.
•In the Max Volume list, click the maximum size for the folders or create a custom size.
|
The contents of the volume directories can be copied to a CD or DVD for distribution. If you plan to copy the production files to a CD or DVD, make sure that you know the recording capacity of the CD or DVD prior to setting the Max Volume value. This ensures that the entire contents of the volume can be copied without running out of disk space. After a volume fills to the maximum size, a new volume folder is created and, if requested, will continue sequentially. Production files will not be split across volumes. |
5.To organize the production files within the volume folder, in the Create File folders list, click Yes, and then do any of the following:
•In the Prefix field, type the prefix you want to use to precede the file folder number. The prefix can be any combination of letters, numbers, or punctuation.
•In the Starting Number field, enter the number, you want to use as the starting number for the file folders. Zero fill your starting number to determine the desired number width.
•In the Maximum Record Count field, type the maximum number of records to include in each folder.
•To use the first file name in each folder as the folder name, click Yes.
6.To specify the output type and image compression, in the Production Output File Type list, do one of the following:
•Click PDF Single Page to convert the documents to single-page .pdf formatted files that can be loaded into a new or existing Concordance Desktop Viewer imagebase.
•Click PDF Multi Page to convert the documents to multi-page .pdf formatted files that can be loaded into a new or existing Concordance Desktop Viewer imagebase.
•Click TIFF Multi Page (Color) to convert the documents to multi-page LZW compressed .tif formatted files that can be loaded into a new or existing Concordance Desktop Viewer imagebase.
•Click TIFF Single Page (Color) to convert the documents to single-page LZW compressed .tif formatted files that can be loaded into a new or existing Concordance Desktop Viewer imagebase.
•Click TIFF Multi Page (Black & White) to convert the documents to multi-page CCITT Group-4 compressed .tif formatted files that can be loaded into a new or existing Concordance Image imagebase.
•Click TIFF Single Page (Black & White) to convert the documents to single-page CCITT Group-4 compressed .tif formatted files that can be loaded into a new or existing Concordance Image imagebase.
|
LZW compression produces a small file size image, which cannot be used with Concordance Image. |
7.To specify the output color settings, from the Color Settings list, select one of the following:
•To convert the documents to shades of gray, click Grayscale.
•To produce the files with original colors, click Color.
8.From the Fit Image Inside Headers/Footers list, click Yes.
i.This option reduces the size of the produced document or image to accommodate the space needed for the number of lines of text and font size for the specified headers and footers.
9.To generate a .opt file for the production files, do the following:
•In the Create OPT file, click Yes.
•Click the Output path for OPT file field, click Browse ![]() , and then navigate to and enter a name for the .opt file.
, and then navigate to and enter a name for the .opt file.
|
It is recommended that you create an OPT file when using the Numeric Suffix option to ensure the produced documents/images can be loaded properly in Concordance Desktop viewer and Concordance Image, as well as other viewer applications. |
c.To specify markup types to include in the production:
1.In the Markup Types section, do any of the following:
•To include all markups, from the Select All list, click Yes.
•To exclude all markups, from the Select All list, click No.
•To include some of the markups, from the Select All list, click No and then for each mark up you want to include click Yes from the corresponding markup list.
|
Due to how the markups are rendered during production, if you want to include any applied crossout, strikeout, highlight, or underline markup in a production, please note that all four markups are treated as one and all four if applied will be included in the produced file. For example, if a crossout and highlight markup are applied to a document, if the crossout markup is selected in the Production parameters, both the crossout and the highlight markup are produced. |
d.To edit a header, footer, or watermark:
i.Headers and footers are a string of text assigned to a specific location within a document. Headers and footers contain information such as date, time, page number, user name, etc. For productions and printing, the text is not restricted to just the top and bottom of a document, you can also place them in the right and left the margins of a document. Each margin may be 10 lines deep giving you 120 individual strings of text.
ii.A watermark is a semi-transparent string of text that appears behind the existing document content. A watermark appears across each produced file from bottom left to top right and has a transparency setting of 20%.
iii.Similar to markups and redactions, headers, footers, and watermarks are integrated into a production file as a fixed element that cannot be moved, changed, or deleted.
1.In Concordance Desktop, from the Tools menu, click Production.
2.In the Production Parameters dialog box, select the Include Hdr/Fts Spec check box.
3.Click the Edit Headers/Footers and Watermarks button.
4.Click the (+) sign next to the Header/Footer folders or the watermark folder you want to edit.
5.For each header, footer, or watermark, do one of the following:
•Type the text you want to be displayed.
•Type % to display the available macros list, and then select the macro(s) you want to add.
1.Keep the following in mind when adding macros to headers/footers, and watermarks:
•Each line of header or footer can use multiple macros. For example, you can add %Date %Time to the Top Left header. This prints the date and time in the location you specified on each page of the production.
•All macro values are case insensitive, except for the %FIELD_ macro, this must remain all uppercase.
|
When producing Concordance Desktop viewer documents/images in Concordance Desktop, do not modify the %BatePgNo() macro as this will cause the creation of new production numbers to fail. |
Macro |
Description |
%FIELD_ |
Inserts database field data up to 60 characters for a each specified field. For example, %FIELD_OCR1 %FIELD_OCR2, would produce the first 60 characters of the OCR1 field and the first 60 characters of OCR2 field. If security is enabled, only those fields with a minimum of "Read" access are displayed. |
%Date |
Inserts the current date |
%SysDatePlusDays(0) |
Inserts a date the specified number of days after the system date. Replace the 0 a number to indicated the number of days. |
%Time |
Inserts the current time the production is executed based on a 12-hour clock |
%MilTime |
Inserts the current time the production is executed based on a 24-hour clock |
%Title |
Inserts the current title of the document |
%Page |
Inserts the page number |
%TotalPages |
Inserts the total number of pages |
%BatesPgNo() |
Indicates the starting number for each page within a document. The generated number is appended to the production number creating a unique document ID for each page of a document stored in the corresponding Concordance Desktop database. For example, a production run of three single page documents are generated as ABC00001, ABC00002, ABC00003. |
%Login, %User |
Inserts the user name of the person who executed the production |
%Hostname |
Inserts the hostname of the machine where the production was executed from |
%IPAddress |
Inserts the IP address of the machine where the production was executed from |
%% |
Inserts a single % character |
© |
Inserts a copyright symbol |
® |
Inserts a registered trademark |
6.To edit the font for the all the text, click the Font button, and then in the Font dialog box, specify the font name, style, and size.
|
Overlapping of text in headers and footers may occur if the specified font size is too large. |
7.Click List to review the applied header/footer and watermark text and macros set for the production.
8.Click Edit to make any changes.
9.When finished, OK.
|
Production and Printing headers/footers and watermark settings are separate entities. Parameters you set in the Production dialog box are only available for production. |
6.After all production parameters have been specified, click Start.
7.Verify the header/footer and watermark settings, and then click Ok.
i.The Production Control dialog box opens. For more information about the Production Control dialog box, see Monitoring the production run.
8.When the production is finished, in the Production Control dialog box, click Close.