Using the print command in Concordance Desktop Viewer, you can print the current document displayed in the viewer. If you need to print a set or batch of documents, you can run a query and use the CDV Printing command in Concordance Desktop. See, Batch Printing with Concordance Desktop Viewer.
When printing documents, be aware of the following:
•When printing documents that have been reviewed and redacted using the viewer, be aware that any redaction placed on the document will print transparent revealing the text underneath. If you want to print redactions as opaque, you must run the documents through the Production process in Concordance Desktop, then print the document produced document.
•Printing documents that contain markups to Adobe PDF using the File > Print option, does not permanently burn the markups in the document. If you want markups burned in, you must run the documents through the Production process in Concordance Desktop, then print the produced document.
To Print the Current Document in the Viewer
1.In the Concordance Desktop Viewer window, locate the document you want to print.
2.From the File menu, click Print.
3.In the Printer section, select the printer to use.
4.To modify the printer settings, click the Printer Setup button, specify the paper size, orientation, and other general printing options, and then click OK. Options will vary with different printers and drivers.
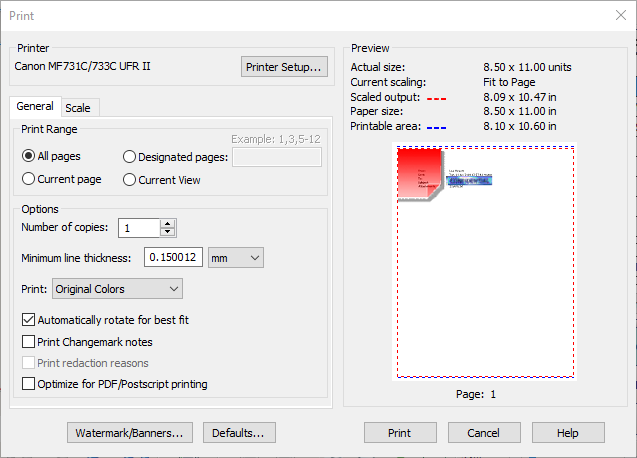
5.In the Print dialog box, click the General tab, if not already displayed.
6.In the Print Range section, click one of the following:
•Select All Pages, to print all the pages in the document.
•Select Current page to print the current document displayed.
•Select Designated Pages to define specific pages or a range of pages from the current document.
•Select Current View to only print the area of the image that is displayed in the viewer workspace.
7.In the Options section, specify the following:
•In the Number of copies field, type or select the number of copies you to print.
•In the Minimum line thickness field, type a value from 0 to 99 for the thinnest line weight for markups, and then click points (1 point = 1/72 inch) or mm (millimeters) for the unit value.
7.From the Print list, click one of the following:
•Click Lines as Black to print all lines black, markups print with color (if applicable).
•Click As Grayscale to print in shades of gray.
•Click Original Colors to print using the colors shown in the viewer.
8.Specify any of the following print settings:
•Select the Automatically rotate for best fit check box to allow more of the image to fit within the margins of the printed page.
•Select the Print Changemarks notes check box to include the text in any notes in the current document on a separate sheet.
•Select the Print redaction reasons check box to include the text in any redactions in the current document on a separate sheet.
•Select the Optimize for PDF/Postscript printing check box if you are printing a PDF document.
|
The Optimize for PDF/PostScript Printing option resolves the issue where some older printers and the PDF Distiller and Writer may not properly invert printouts resulting in reversed prints (black background and white foreground). When selected, this produces a bitmap of the current document/image that is sent to the printer giving accurate printouts for the problematic printer or print driver. However, selecting this option results in slower print time and a larger print spool file. |
9.To add header, footer, or watermark text to the printed page, click the Watermark/Banners button, edit the text strings, and then click OK.
10.In the Print dialog box, if desired, click on the Scale tab to select options such as Fit document within banners.
11.When finished, click Print.
To Edit Headers/Footers and Watermarks
1.Click the folder next to the Header/Footer or the Watermark you want to edit.
2.For each header, footer, or watermark, click the <blank> field, and then do one of the following:
•Type the text you want to be displayed.
•Type % to display the available macros list, and then select the macro you want.
Macro |
Description |
%Date |
Inserts the current date |
%SysDatePlusDays(X) |
Inserts a date the specified number of days after the system date. |
%Time |
Inserts the current time the print is executed based on a 12-hour clock |
%MilTime |
Inserts the current time the print is executed based on a 24-hour clock |
%Title |
Inserts the current title of the document |
%Page |
Inserts the page number of the document |
%TotalPages |
Inserts the total number of pages of the document |
%BatesPgNo(X) |
Inserts a page number (x) to include for each printed document. The number entered is the beginning page number for each document. Multi-page documents are numbered incrementally. For example, %BatesPgNo(0001) would print 0001 on each single-page document. However, if a document had more than one page, the first page would appear as 0001, the second as 0002, and so on. |
%Login, User |
Inserts the user name of the person who executed the print |
%Hostname |
Inserts the hostname of the machine where the print was executed from |
%IPAddress |
Inserts the IP address of the machine where the print was executed from |
%% |
Inserts a single % character |
© |
Inserts a copyright symbol |
® |
Inserts a registered trademark |
5.To edit the font for all headers, footers, and watermarks, click the Font button, and then in the Font dialog box, specify the font name, style, and size.
6.To view a list of all the headers, footers, and watermark set for the production, click List.
7.When finished, click OK.
|
Printing and Production headers/footers and watermark settings are separate entities. Parameters you set in the CDV Printing dialog box are only available for printing. |