When creating a database, Concordance Desktop uses a wizard type interface that walks you through each step of the database creation process. The Database Creation Wizard for load files uses the header row of a delimited text file, an existing Concordance Desktop database structure, or a setting file that was saved from an existing database, to create the fields and import the data.
Keep the following in mind when creating a database from load files:
•Field names longer than 12 characters will be automatically truncated.
•Single-page OCR text files are grouped together into a single database record and separated in the specified OCR field using page tags (i.e. ***00010002***).
•Only one OPT file can be loaded. If you have more than one OPT file, you can "drag and drop" each additional OPT onto the database, after the database has been created. See the Adding extra OPT files to a database topic.
•Make sure that OCR fields (i.e., OCR1, OCR2, OCR3, etc.) exist in the load file - if not, use the Customize feature in the Load File window to add them.
oThese fields can be named anything (example; TEXT1, TEXT2, etc.). As long as you reference the correct name when selecting the OCR field in the Load File window, the OCR'ed text will appear in the correct field in the database records.
•Make sure that there are enough OCR fields to support all the text in the OCR'ed text files - each OCR field can hold a maximum of 12 million characters
•If you add OCR fields using the Customize feature, make sure that you set them up as 'Paragraph' type fields so that the data can be indexed and searched.
|
Only files with a .DAT or .CSV file extensions can be loaded. If you have a .TXT, or .ASC file, you must rename the file extension to either .DAT or .CSV prior to loading the file. |
The format and delimiters used in the load file help determine the options you select to create the new database. For example, if the load files were created using Concordance Desktop, than the format and delimiters should be the same Concordance Desktop standards, meaning, that the default settings in the Load File window can be used. However, if the load files were created using a different application such as Microsoft Excel, or they are simple comma delimited, or text files, the formatting, delimiters and date format are probably not set to the Concordance Desktop standards. For these files, you will need to customize the settings in the Load File window.
Additional factors to consider when creating a new database are:
•Do you want the Concordance Desktop import process to OCR the native document files? (See the About OCR topic for more information)
•Do you want the Concordance Desktop import process to create near-native PDFs of each native file for better viewing in the viewer?
By default, the above two processes are not run, thus minimizing the time required to create the database. However, you can select to run these processes during the import. Please note that if not run during the import, you can run the processes later on one, several, or all of the files in the database, using the Optimize feature. For more information about the Optimize feature, please see the Optimizing documents to PDF topic.
Based on the above information, you can choose to use default settings, or customized settings, when creating a new database from load files. Below is a summary of what needs to be considered for each:
•Use the Create a new database using load files and Concordance Desktop default settings instructions to create the new database if:
oThe format, delimiters, and date format in the load file all match the Concordance Desktop standards, and your load file (DAT or CSV) already has a one or more fields (usually named OCR, TEXT, or something similar) designated for OCR data (document-level text)
OR
oYour load file contains OCR data (document-level text), the format, delimiters, and date format in the load file all match the Concordance Desktop standards, and the fields defined for the do not want to the import process to create PDF files from the native files.
•Use the Create a new database from load files using customized settings instructions to create the new database if any of the following are true:
oThe load file does not contain the same standard format, delimiters, and/or date format as those in Concordance Desktop
oYou have an OPT file that references the OCR text files, and your load file does not contain fields for holding OCR data
oYour DAT file does not contain fields for holding the OCR data (OCR fields are required for the input of the text files into the database records)
oYou need to add fields that don't currently exist in the load file, for example fields to attorney comments, or administrator comments
oYour load file is a DAT that contains OCR data, but the format, delimiters, and date format in the load file do not match the Concordance Desktop standards
oYou want to include beginning and ending attachment fields
oIf you need to make any setting changes to accommodate what is included in the load file
oYou would like to add a previously defined Tag List to the new database
Create a New Database Using Load Files and Concordance Desktop Default Settings
1.Review the load files you are importing into the database, see Reviewing load files.
2.In Concordance Desktop, on the File menu, click New.
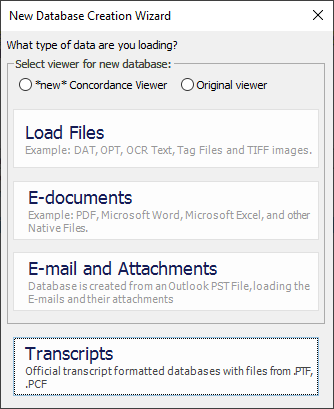
3.Select the viewer for the new database. The "new" Concordance Viewer is recommended.
4.In the New Database Wizard dialog box, click the Load Files button.
i.Load File opens in a new window to configure your load file import settings.

ii.If you know the exact path where you want to save the new database:
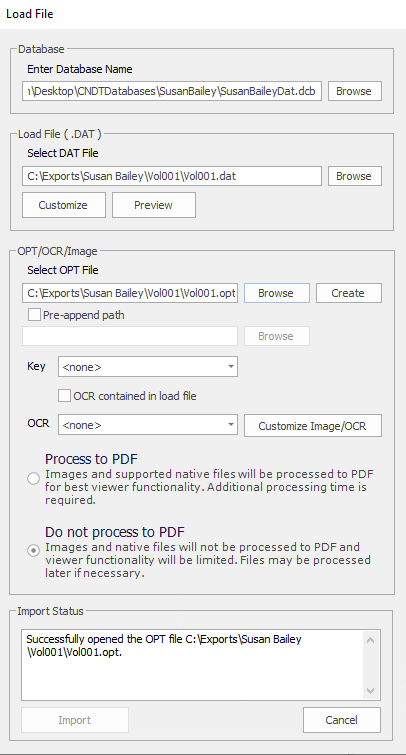
•In the Database Name field, type the path where you want to save the database, along with a name for the database.
|
If there isn't a folder previously created for the new database, it is recommended to create a new folder. Name the new folder according to your database. Double click the newly created folder to open it. |
iii.If you do not know the exact path where you want to save the new database:
a.Click the Browse button next to the Enter Database Name field.
b.Select the location where you want to save the new database.
|
It is recommended that each database be created in its own unique folder. Name the new folder according to your database. Double click the newly created folder to open it. |
c.In the File name field at the bottom of the window, type a name for the database you are creating.
d.Click Save.
i.You are returned to the Load File window where the Enter Database Name field is populated with the information you entered in the Create Database window.
5.Click the Browse button next to the Select DAT file field.
6.Locate and select the DAT file, and then click Open.
7.To preview the records prior to loading the file:
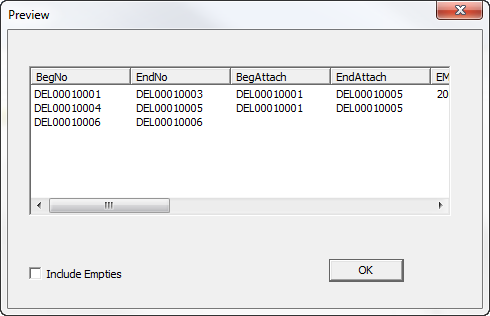
a.Click the Preview button to open the Preview window.
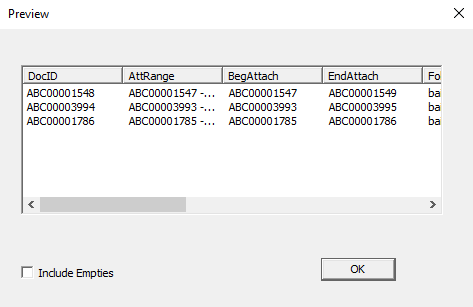
i.The Preview window displays all fields in which there is data, along with a few of the records in the load file.
b.To turn on the visibility of empty fields, check the Include Empties check box.
i.When checked, empty fields are displayed in the preview, along with the populated fields.
c.When finished viewing the records, click OK to close the Preview window.
8.If you need to alter the format and delimiter settings, stop here and go to the Create a new database from load files using custom settings section for detailed instructions.
i.List of settings you can change when selecting to customize:
oLoad Field Names From: Location from which to load Field Names. You can select to load Field Names from the DAT file you are loading, from a Template/Structure file, from a previously defined Settings File, or define a new set by manually creating all field names.
oSelect the delimited format to import or select custom values: You can change the delimiter settings to match the settings in the load file, should they differ from the standard Concordance Desktop delimiters.
oSelect the date format for importing date fields: You can change the date format, if the format in the load file differs from the standard yyyymmdd used in Concordance Desktop.
oLoad Tag List: You can load a set of Tags from a saved Tag List file so that those tags are available in the new database.
oField Names: You can add or modify field names.
oChange the order in which fields display in the database.
oShow System fields: You can select to include the display of system fields in the database.
oSkip first line: You can select to skip the first line in the DAT load file.
oImport rich text: You can select to import rich text formatting when importing a text file.
oSet Attachment Fields: You can select the field to store the attachment range data, or select the beginning attachment number and ending attachment number fields.
9.Select the path and File name of the load file to use for creating the database.
10.Click Open.
i.You are returned to the Load File window where the Select DAT File field is populated with the information you entered in the Open window.
11.Do one of the following:
1.If you have an OPT file to load, select it.
a.Click the Browse button next to the Select OPT File field.
b.Locate and select the .opt file you want to load.
c.Click Open.
i.You are returned to the Load File window where the Select OPT File field is populated with the selection you just made
2.If you do not have an OPT file to load, you need to create one.
a.Click the Create button next to the Select OPT File field.
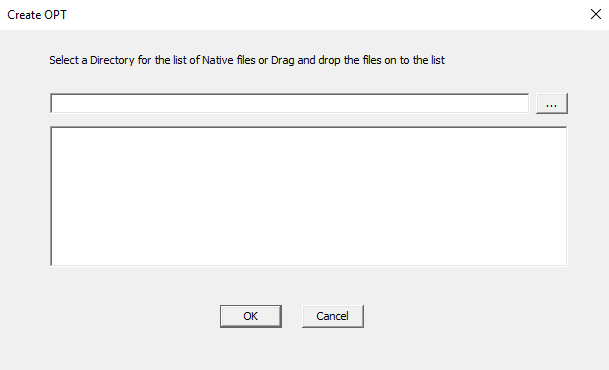
b.Click the ellipse button and select the location where you want to store the OPT file.
i.We suggest that you enter a folder and sub-folder that is located in the same directory as the database .DCB file, and name the .OPT file the same as the .DCB file, but with a .OPT extension. Alternatively, you can open Windows Explorer, locate and open the folder where the native files are, and then drag and drop the native files into the large box below the OPT file.
c.Open a Windows Explorer window.
d.Locate and open the folder where the native (.tif, .ppt, .doc, etc.) files are located.
e.Drag and drop the native files into the large box below the OPT file.
f.Click OK.
i.You are returned to the Load File where the Select OPT file is populated with the OPT file location you just entered.
12.Select Pre-append path. In the Pre-append dialog box the UNC path upto the image path in the .opt or browse out to the folder containing the image folder.
|
What is a pre-appended path?For example, the path in the .opt is: Images\0001\T000001.tif The folder structure where the data was copied is: \\uncpath\Matter001\Vol001\Images\0001\T000001.tif Select Pre-append path and add \\uncpath\Matter001\Vol001\ in the Pre-append dialog box or browse to \\uncpath\Matter001\ and select Vol001. The UNC path is added before the image path in the .opt during import. Pre-append path assists the administrator in appending the path without having to change the structure of the .opt. |
13.Click the Key down-arrow and select the name of the field used to identify the beginning of new records.
i.An example would be BEGNO.
14.If OCR text is included in the load file, check the OCR contained in load file check box, otherwise leave the check box blank.
15.Click the OCR arrow and select the name of the field to contain the OCR text in the record.
i.Some examples are TEXT1 or OCR1
|
The wizard can import both single or multi-page text files. |
16.(Optional) Click the Customize Image/OCR button if you want to change the default OCR method. This option is not available when you check the 'OCR contained in load file' check box, as the OCR'ed text already exists.
i.The Customize Image/OCR dialog box opens.
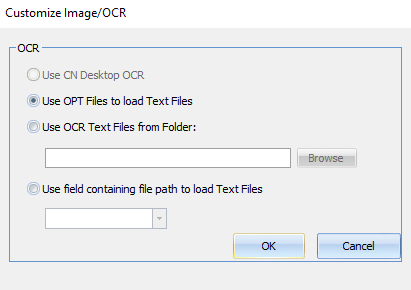
ii.Options are:
oUse CN Desktop OCR - Use this option if you want Concordance Desktop to OCR all the files regardless of any existing OCR'ed text files. By default, Concordance Desktop does not OCR the text files.
oUse OPT Files to load Text Files - Use this option if you want Concordance Desktop to load the document-level text from files existing in designated folders that are referenced in the OPT file. Concordance Desktop does not OCR the document-level text, it simply takes the text from the text files and loads it into the associated records. This option can help save processing time.
oUse OCR Text Files - Use this option if you have text files that have already been OCR'ed and you want Concordance Desktop to use those OCR'ed text files. As with the Use OPT Files to load Text Files option, Concordance Desktop will not do any OCRing of the text, it will simply load the text from the text files into the associated records. This option can help save processing time. When this option is selected, you also need to click the Browse button to locate and select the text files.
oUse Field Containing File Path to load Text Files - Use this option if you want Concordance Desktop to load the document level text from an OCR path referenced in the DAT file. This new import option allows you to import document level text if your DAT file references an OCR path. The OCR path needs to be edited to reflect the directory where the text is located or edited to reflect a relative path. Save the edited copy of the DAT file to the same directory as your text folders.
|
If the file path pointing to your text files is not accurate the text will not be imported. |
17.If you want Concordance Desktop to create optimized PDFs of the native files during the import process, check the Process to PDF.
i.By default, Do not process to PDF is checked, which helps to reduce processing time. When Process to PDF is checked, rendering of supported native file types is done on the fly as they are viewed in the viewer. Unsupported files types however, cannot be viewed in the viewer until they are optimized. For more information about optimizing, please see the Optimizing documents to PDF topic.
18.Click Import to start the import of the load files you have selected.
19.A status bar is displayed showing the import record currently in process during the load file import process.
20.If one or more files did not import properly, a dialog box displays telling you to see the log file. Click OK.
21.In the DAT Database dialog box:
•If all files imported properly (i.e., you did not see a dialog box stating one or more files imported properly) , click the Open button to open the database in Concordance Desktop.
•If any files did not import properly, click the View Log button to check the log for any files that did not import properly.
Create a New Database From Load Files Using Customized Settings
You can customize to the settings for the database so that they match the settings in the load file you are importing.
1.Review the load files you are importing into the database, see Reviewing load files.
2.In Concordance Desktop, on the File menu, click New.
3.In the New Database Wizard dialog box, click the Load Files button.
i.If you know the exact path where you want to save the new database:
oIn the Database Name field, type the path where you want to save the database, along with a name for the database.
|
If there isn't a folder previously created for the new database, it is recommended to create a new folder. Name the new folder according to your database. Double click the newly created folder to open it. |
ii.If you do not know the exact path where you want to save the new database:
1.Click the Browse button next to the Enter Database Name field.
2.Select the location where you want to save the new database.
|
If there isn't a folder previously created for the new database, it is recommended to create a new folder. Name the new folder according to your database. Double click the newly created folder to open it. |
3.In the File name field at the bottom of the window, type a name for the database you are creating.
|
The Concordance Desktop server does not support Unicode characters (such as Chinese or Japanese characters) in database names. Currently, only single-byte characters (such as English characters) are supported. |
4.Click Save.
i.You are returned to the Load File window where the Enter Database Name field is populated with the information you entered in the Create Database window.
4.Click the Browse button next to the Select DAT file field.
5.Locate and select the DAT file, and then click Open.
6.To view a display of a few records prior to loading the file
a.Click the Preview button to open the Preview window.
i.The Preview window displays all fields in which there is data, along with a few records in the load file so you can ensure that the expected meta data for each field is correct.
b.To turn on the visibility of empty fields, check the Include Empties check box.
i.When checked, fields containing no meta data are displayed in the preview, along with those fields containing meta data.
c.When finished viewing the records, click OK to close the Preview window.
7.Click the Customize button to open the Choose Delimiter window.
8.Use the Load Field Names From pane to define the database structure.
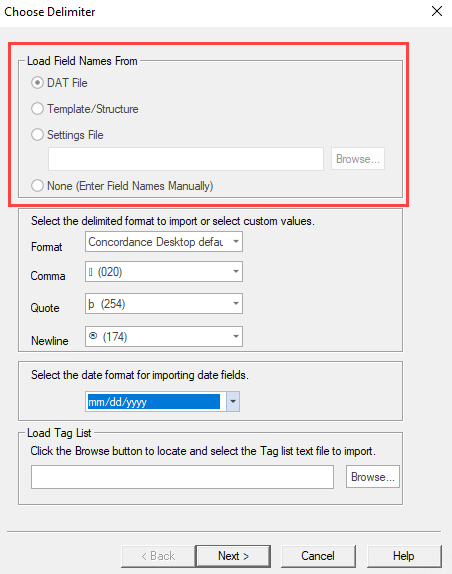
i.In the Load Field Names From section, do one of the following:
oSelect DAT File to load the database field names from the DAT file header row you are importing. The field type settings are automatically set to Paragraph.
oSelect Template/Structure to import the field names and types from a template or existing database structure. In the Load Database Structure dialog box, click the Browse button to locate and select the template/database you want to load.
oSelect Settings File to import the field names and field type settings from a specified Field Properties File (.TXT), click the Browse button to locate and select the Field Properties file.
|
The Field Properties file is a text file that can be exported using the Save to File option in the Modify dialog box (File > Modify). The properties file lists the field names and type settings for the database structure. |
|
Concordance Desktop requires that each field name be unique; therefore, if the imported settings file and/or DAT file contain duplicate fields, the duplicate field names are appended with a suffix of 01 up to the maximum number of characters allowed for field length. |
oSelect None (Enter Field Names Manually) to manually enter all field names to include in the database.
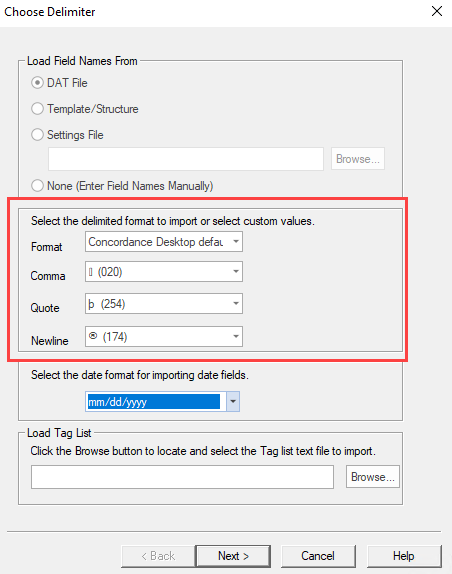
9.Define delimiter formats.
i.The delimiter format defaults to the Concordance Desktop delimiters. If you are exporting and importing documents within the Concordance Desktop system, then you won't need to change these default values. However, if the load file uses a different format (i.e., comma delimited, tab delimited or a custom delimited format) you need to change the delimited format to match that which is in the file you are loading.
Concordance Desktop Default Delimiters |
||
|---|---|---|
Delimiter Character |
Function |
Numeric Value |
Format |
A selection of predefined delimiter formats. |
|
Comma |
The field delimiter separates one field from the other. |
20 |
Quote |
The text qualifier encloses text to differentiate it from field delimiters which may appear in the data. |
254 |
Newline |
Substitute carriage return. Some programs use this character to designate multi-level fields or fields-within-fields. Concordance Desktop replaces all carriage returns or carriage return linefeed combinations with the newline code within the data of a field. The record itself is still terminated with a real carriage return and a line feed. |
174 |
ii.To select a predefined format:
1.Click the Format down-arrow.
2.In the menu that appears, select the format that matches the format of the load file.
3.Make any other format changes necessary.
iii.To select a custom format:
1.Click the Format down-arrow.
2.In the menu that appears, select Custom.
3.To modify the Comma, Quote, or Newline delimiter settings, click on the associated down-arrow and select the format that matches the format in the load file.
iv.Define the date format used in the load file.
1.In the Select the date format for importing date fields field, click the down-arrow.
2.Select the date format that matches the date format in the load file.
10.Optional: Import a Tag List.
a.In the Load Tag List pane, click the Browse button.
b.In the Open window, locate and select the directory containing the tag list you want to include.
c.Click the Open button.
|
Tags and tag folders do not support Unicode characters. Only ASCII (values 032-126) characters are allowed. If a tag name or tag folder name contains an invalid character, you are prompted to make corrections. For more information about creating a Tag list, see Importing and Exporting Tags. |
11.Click the Next button.
12.Define the database field names and type properties.
|
If you selected to import the field names from a DAT file, the field names are created from the header row of the DAT file and the type property for each field is set to Paragraph by default. |
|
If you selected to import the field names from a DAT file, the field names are created from the header row of the DAT file and the type property for each field is set to Paragraph by default. |
|
Make sure that the database fields you are creating match the fields in the header row of the corresponding delimited text file you are using to import the field data. |
a.In the Modify dialog box, review the Field Name list and modify the Type settings for each database field as needed.
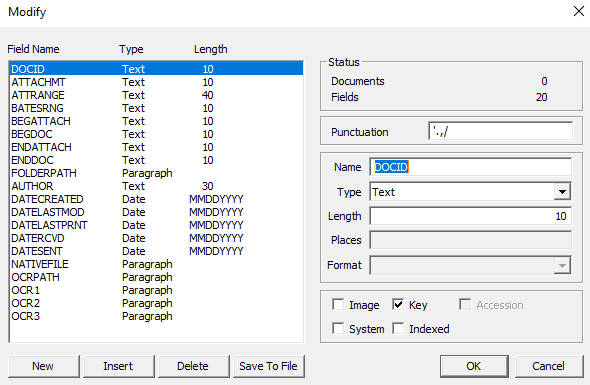
i.Field names must begin with an alphabetic character. Only alphanumeric characters and the underscore character are allowed in the field name. The maximum number of characters for a field name is twelve.
ii.The order the fields are listed, is the order the fields appear in Concordance Desktop.
|
If you are creating database fields using an existing database template or structure, or a settings file, make sure that the database fields you are defining match the fields in the header row of the corresponding delimited text file you will be using to import the field data. |
|
If you accidentally click the OK button or press ENTER while entering fields in the Modify window, the window clsoes. To reopen it, click the Back button and then click the Next button. |
iii.To create a text field:
1.In the Type field, click Text.
2.In the Length field, type the number of characters allowed in the field value.
i.Text fields can have from 1 to 60 characters. Fixed length text fields should be used for numeric values that are not used mathematically, such as telephone numbers, social security numbers, and other serial numbers.
|
Sorting is alphanumeric. The numbers 1 and 1000 sort before 9 and 999. Use zeros for any numeric values or serial numbers stored in text fields so that they sort correctly, 0009 before 1000. |
|
The field length value, affects the column width and how the field name appears in the Table View. The larger the number the wider the column. Values smaller than 20 cause the field name to appear truncated. |
iv.To create a numeric field:
1.In the Type field, click Numeric.
2.In the Length field, type the number of characters allowed in the field value.
i.Numeric fields can have up to 20 characters, including the decimal place. The number you type in the Length field defines the total length of the number including the decimal place and all digits following the decimal place.
|
The field length value, affects the column width and how the field name appears in the Table View. The larger the number the wider the column. Values smaller than 20 cause the field name to appear truncated. |
3.In the Places field, type the number of decimal places for the numeric field.
a.For example, the number 1234.56 would have a field length of seven and a places value of two.
|
Negative numbers use an extra place for the negative sign. |
4.In the Format field, choose one of the following numeric field formats:
oPlain
oComma
oCurrency
oZero Filled
i.The Format field determines how numeric fields are displayed and printed in Concordance Desktop.
v.To create a date field:
1.In the Type list, select the date format:
oDate MMDDYYYY (month-day-year)
oDate YYYYMMDD (year-month-day)
oDate DDMMYYYY (day-month-year)
2.The date field format you choose is the date format that is displayed in Concordance Desktop.
i.You need to use the date format selected in the Type field when searching for dates and entering dates during data entry.
ii.Concordance Desktop sorts date fields correctly, regardless of the date format you choose in the Type field.
vi.To create a paragraph field:
1.In the Type field, click Paragraph.
2.Paragraphs fields can have up to 12 million characters. Even though paragraph fields are variable in length, Concordance Desktop only sorts paragraph fields by the first 60 characters in the first line of text.
b.For each field, select the check boxes for the properties that apply.
i.Image (Media) check box
1.An image/media field is used to link Concordance Desktop with the viewer. The Image check box needs to be selected for only one of the database's fields. It is best practice to select the Image check box for the BEGNO field or it's equivalent. This box should only be checked if you select to produce near native PDFs
2.When you view a document associated with a record in Concordance Desktop, the corresponding media/image is displayed in the viewer.
1.Selecting the Key check box makes the field a key field. Any field can be a key field, but most often fixed-length fields and date, numeric, and text fields that you need to search are designated as key fields. Key fields perform a function similar to indexing, but they do not require reindexing. When fields are designated as key fields, Concordance Desktop creates a database .key file, which is used in searching key fields.
2.Full-text paragraph fields are usually made into key fields for only one reason, which is to quickly locate empty paragraph fields.
3.For example, the search author = "", where AUTHOR is full-text paragraph field, would normally perform slowly, but it will work quickly when the AUTHOR field is a key field. To locate records where this field is not empty use the search author > "". Note that there are no spaces between the quotes.
4.So, why not make all fields key fields? The key field file takes up room. The more key fields your database has, the more room it will take up. Typically, full-text paragraph fields are not searched using comparison operators. Making full-text paragraph fields key fields is of marginal benefit and adds administrative overhead to the database management system. Also, if you have fixed-length fields that you do not need to search, it is best practice not to designate those fields as key fields.
iii.Accession check box
1.Accession numbers are unique serial numbers internally assigned to each record in Concordance Desktop version 6.x or later databases. Accession numbers are stored with each record and are managed entirely by the database software. They stay with the document as long as the document stays in the database, even if other records are deleted around it. Accession numbers cannot be edited or modified in any way, but they can be viewed.
2.The Accession check box only needs to be selected for one of the database's fields. To create accession numbers, create an accession field by adding a numeric field to your database and selecting the Accession check box. It is best practice to select the Accession check box for the ACCESSID field or it's equivalent. The internal accession number for each record will be displayed in the accession field you create.
iv.System check box
1.System fields are created by Concordance Desktop. Concordance Desktop automatically selects the System check box for system fields, which are hidden fields with no read or write end-user privileges. System fields are used for internal system administration features such as replication. Under normal circumstances, system fields should never be indexed, added, deleted or modified by users.
v.Indexed check box
1.A field must be indexed to use Concordance’s full-text search capabilities. Indexing places every word in the field into a dictionary for fast retrieval. Concordance Desktop automatically selects the Indexed check box when you create a paragraph field. You need to manually select the Indexed check box if you want to index other field types.
2.You can change the Indexed check box setting at any time, however changing the setting will not update the dictionary. Index the database after modifying the Indexed check box setting to update the dictionary files.
c.To add additional fields to the database, click the New button and define the field name and type settings.
d.To remove fields from the database, select the field you want to delete, and then click the Delete button.
e.Review the punctuation in the Punctuation field and add any other punctuation that is integral to your searches, such as :;-@$.
f.The Punctuation field defaults to the following punctuation: '.,/. The punctuation list is used in full-text searching, see About Punctuation.
g.To save these field settings so you can use them as a template, click the Save to File button, locate where you want to save the template file, give it a file name and then click Save. The file must be saved in Text (.txt) format.
13.When finished defining the database field names and type properties, click OK.
i.An Import Wizard - Fields window opens.
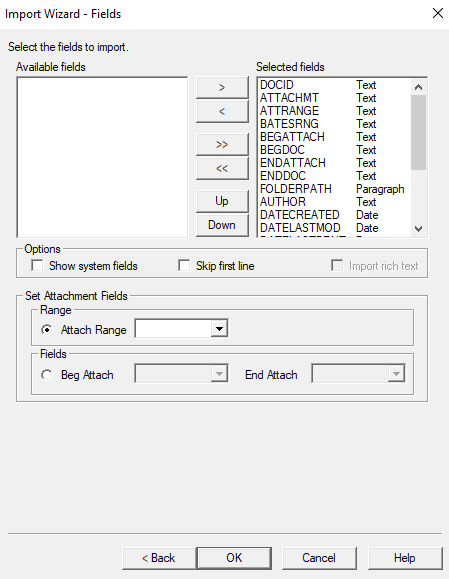
14.Select database fields to import.
i.By default, all of the database fields are added to the Selected fields list for the import. In the Fields dialog box, you can also set up the fields associated with document attachments (Optional). The attachment fields can be set up or changed any time after the database is created. For more information, see Defining preferences.
a.To only select some of the fields for the import, click the double arrow (<<) button to move all the fields to the Available fields list.
b.In the Available fields list, select the fields you want to include in the import, and click the right arrow (>) button to add the fields to the Selected fields list.
c.Once you have added the applicable fields to the Selected fields list, use the Up and Down buttons to make the field order match the field order of your delimited text file.
i.The field order in the Selected fields list, must match the field order of your delimited text file. If you created the database fields using a DAT file and haven't made any modifications to the field names, the fields are listed in the same order in which they appear in the DAT file. However, it is recommended to open the DAT file to verify the fields are correct.
|
Print a one-page copy of your delimited text file so you can reference your header row while determining the field order during the import. |
|
If the field structure that you enter in Selected fields list does not match the field structure of your delimited text files, the data won’t transfer into Concordance Desktop properly. |
15.To display system fields in the database, select the Show system fields check box.
i.System fields are fields used by Concordance Desktop to administer database functions, such as replication. They are generally not visible, but you can display and import them if you select the Show system fields check box.
16.To prevent Concordance Desktop from creating a record for your field name row, select the Skip first line check box.
i.The first line of a data file sometimes contains the field names used in creating the database, with each field name taking the place of the data for that record. When you select the Skip first line check box, Concordance Desktop ignores that line of data during the import.
17.If you are loading from a text file that includes Rich Text, and you want to include that Rich Text formatting, check the Import rich text check box.
i.This option is only available when you are loading/importing a text file that includes Rich Text formatting.
18.To setup the attachment fields, in the Set Attachment Fields section, do any of the following:
•To set a field to a range of attachments, select the Attach Range option, and then select the field to store the attachment range data.
•To set up the beginning and ending attachment fields, select the Fields option, and then from the Beg Attach and End Attach lists select the beginning attachment number and ending attachment number fields.
|
When using the Find Attachments feature, it is best practice to setup the fields as paragraph type fields to increase the performance and make sure to index/reindex the database. For more information about the Find Attachments command, see Finding attachments. |
19.When finished, click OK.
i.You are returned to the Load File window.
20.Select or create an OPT file.
i.If you have an OPT file to load, select it.
1.Click the Browse button next to the Select OPT File field.
2.Locate and select the .opt file you want to load.
3.Click Open.
i.You are returned to the Load File window where the Select OPT File field is populated with the selection you just made.
ii.If you do not have an OPT file to load, create one.
1.Click the Create button next to the Select OPT File field.
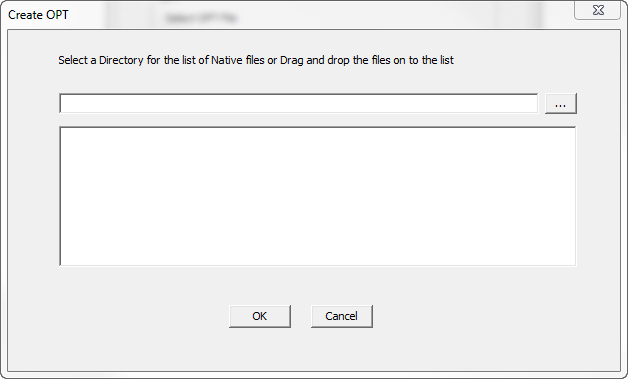
2.Click the ellipse button and select the location where you want to store the OPT file.
i.We suggest that you enter a folder and sub-folder that is located in the same directory as the This should be in a sub-folder as your DAT file,and have the same name as. Alternatively, you can open Windows Explorer, locate and open the folder where the image files are, and then drag and drop the image files into the large box below the OPT file
3.Open a Windows Explorer window.
4.Locate and open the folder where the image (.TIF) files are located.
5.Drag and drag the image files into the large box below the OPT file.
6.Click OK.
i.You are returned to the Load File where the Select OPT file is populated with the OPT file location you just entered.
21.Select Pre-append path. In the Pre-append dialog box the UNC path upto the image path in the .opt or browse out to the folder containing the image folder.
|
What is a pre-appended path?For example, the path in the .opt is: Images\0001\T000001.tif The folder structure where the data was copied is: \\uncpath\Matter001\Vol001\Images\0001\T000001.tif Select Pre-append path and add \\uncpath\Matter001\Vol001\ in the Pre-append dialog box or browse to \\uncpath\Matter001\ and select Vol001. The UNC path is added before the image path in the .opt during import. Pre-append path assists the administrator in appending the path without having to change the structure of the .opt. |
22.Click on the Key down-arrow and select the name of the field used to identify the beginning of new records.
i.An example would be BEGNO.
23.Click on the OCR down-arrow and select the name of the field to contain the document-level text of each record.
i.Some examples are TEXT1 or OCR1
|
The wizard can import both single or multi-page OCR text files. To import the files correctly, make sure that all the text files are located within the same directory. |
24.(Optional) Click the Customize Image/OCR button if you want to change the default OCR method.
i.The Customize OCR dialog box opens.
ii.Options are:
oUse CN Desktop OCR - Use this option if you want Concordance Desktop to OCR all the files regardless of any existing OCR'ed text files. By default, Concordance Desktop does not OCR the text files.
oUse OPT Files to load Text Files - Use this option if you want Concordance Desktop to load the document-level text from files existing in designated folders that are referenced in the OPT file. Concordance Desktop does not OCR the document-level text, it simply takes the text from the text files and loads it into the associated records. This option can help save processing time.
oUse OCR Text Files - Use this option if you have text files that have already been OCR'ed and you want Concordance Desktop to use those OCR'ed text files. As with the Use OPT Files to load Text Files option, Concordance Desktop will not do any OCRing of the text, it will simply use load the text from the text files into the associated records. This option can help save processing time. When this option is selected, you also need to click the Browse button to locate and select the text files.
oUse Field Containing File Path to load Text Files - Use this option to import document-level text files if the DAT file references an OCR path. The OCR path needs to be edited to reflect the directory where the text files are located or edited to reflect a relative path. When using the relative path in the DAT file, the edited copy of the DAT file must be in the same directory as your text folders.
|
If the file path pointing to your text files is not accurate the text will not be imported. |
25.If you want Concordance Desktop to create optimized PDFs of the native files during the import process, check the Process to PDF.
|
If the load file contains other file types than .tif or .pdf, then Process to PDF needs to be enabled for viewing those files. |
i.By default, Do not process to PDF is checked, which helps to reduce processing time. When Process to PDF is checked, rendering of supported native file types is done on the fly as they are viewed in the viewer. Unsupported files types however, cannot be viewed in the viewer until they are optimized. For more information about optimizing, please see the Optimizing documents to PDF topic.
26.Click Import to start the import of the load files you have selected.
27. A status bar is displayed showing the import record currently in process during the load file import process.
28.If one or more files did not import properly, a dialog box displays telling you to see the log file. Click OK.
29.In the DAT Database dialog box:
•If all files imported properly (i.e., you did not see a dialog box stating one or more files imported properly) , click the Open button to open the database in Concordance Desktop.
•If any files did not import properly, click the View Log button to check the log for any files that did not import properly.