We recommend that you set up security for all users and enable logons. To help make this task easier, we suggest you create user templates based on review team roles like attorney and paralegal. This allows you to quickly apply security for new users because role templates already contain pre-defined settings. Once a user is added to the Security dialog box based off a role template, you can further customize any access rights for each user.
|
When you set up security, Concordance automatically saves passwords and security setting to a .sec file. You should also export a copy of your Security dialog box security settings to a .csv file and store the file in a secure location to reference in an emergency. Share this file with your supervisor or one other administrator. If you are setting up security and adding users to a new database, and want to import the security settings, including users, from another database, be sure to import the security settings before manually defining any security settings or users in the database. When you import a security settings .csv file, the file overwrites all existing security settings defined in the Security dialog box. |
There are three files that hold security information:
•The .trk file stores all users’ field and menu access rights
•The .sec file stores all user IDs and passwords
•The .dcb file stores the security console administrator’s user ID and password
|
If you create new users from a role template, the settings are only duplicated from one tab in the Security dialog. We recommend duplicating settings from the Field rights tab, and then selecting the user’s menu rights. |
|
Whenever you add or rename a field in the database, it is added to the database without field access rights. In the Security dialog, the No rights check box is automatically selected for the field. You will need to set the field privileges for the new or renamed field for users already entered in the Security dialog box. |
|
When you make changes to security settings in Concordance, some security setting changes will not be applied until the database is closed and reopened. |
Before you can manage the Concordance database, you must set up the Concordance administrator user ID and password. Concordance requires the administrator user ID and password to access some of the administration menu commands.
Administrator-Only Menu Commands
On the File menu, there are several administrator-only commands:
•Security
•Pack > Database
•Pack > Dictionary
•Zap
•Convert Single Database
•Bulk Convert Databases to Current Version
•Remove Kashida Characters
Optional Field and Menu Restrictions
There are two options you can implement to prevent users from accessing fields and menus.
Restricting Field Access
Even if security is not applied to a database, you can apply read-only rights to fields in Data Entry Attributes dialog box . Any field marked as read-only in this box applies to all database users and also overrides field rights applied in the security console.
For more information about the Data Entry Attributes dialog, see Data Validation.
Hiding Menu Items
If security is not applied to a database, you can restrict menu items from users for all Concordance databases by listing them in the Concordance_<version>.ini file. Any menu items listed in a corresponding .ini file are hidden from specified users.
Example: Entries in the .ini file are formatted as follows:
[DeletedMenuItems]
smithja=zap,modify
This example prevents user John Smith from being able to see or access the Zap and Modify menu items in any database that he accesses through the Concordance executable sharing the same folder as the .ini file. Concordance recognizes the user’s Windows or network user ID to apply the restriction of menu items.
This feature is only available when Concordance security is not enabled on the Field rights tab in the Security dialog, and it does not allow you to hide custom menu items.
|
Users can potentially find the .ini file on your organization’s network and then modify it. We recommend hiding menu items in the security console as the highest level of security. |
Security Guidelines for Concatenated Databases
Setting up security for concatenated databases includes the following guidelines:
•Security settings need to be set up in each database. Setting security in a concatenated database set only affects the primary database.
•The user name and password must be the same for all databases in the concatenated set when security is enabled.
•When the user name and password in the primary database does not exist in a secondary database, and security is enabled, the concatenated database will not open. The user will receive a message that they do not have access rights to the specific database.
•When a secondary database has security enabled and the primary database does not have security enabled, the user is prompted for the user name and password when using the secondary database. The user name and password entered becomes the user name and password for the concatenated database set.
Setup the Concordance Administrator Account
1.Open the database in Concordance.
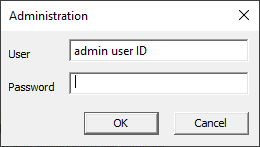
2.On the File menu, point to Administration, and click Security. The first time you click Security in the database, the Administration dialog displays. The User field defaults to the your Windows user ID.
|
The first time you attempt to login to the security console, you may notice a slight delay due to improvements to Concordance security encryption and logging features. |
3.In the User field, type the administrator user ID. Blank user names are not allowed in Concordance.
4.In the Password field, type the administrator password.
|
If you do not want to set the password to open the Security dialog box, leave the password empty and click OK. However, this allows anyone else to enter their own user name (or yours) and a password, locking you out of the administration functions or the database. |
5.Click OK. The Confirm New User/Password dialog displays.
6.In the User field, type the administrator user ID again.
7.In the Password field, type the administrator password again.
|
Concordance only allows one administrator user ID and password per database. The database's administrator ID and password should be shared with a supervisor or one other administrator, with a copy of all security settings stored on your network in a secure location. Once the administrator user ID and password is created it is encrypted and is not visible or accessible anywhere in Concordance. |
8.Click OK to open the Security dialog.
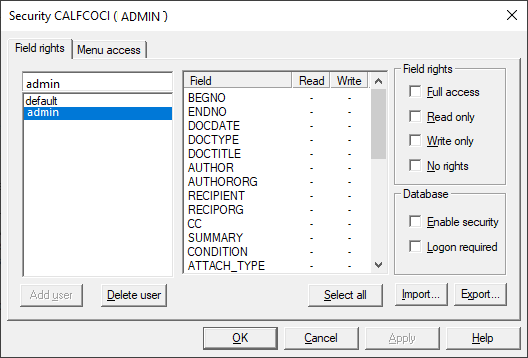
9.You will see the administrator user ID and the default user ID in the user list on the left of the Field rights tab. By default, new users, including the administrator user ID, will have no rights on the Field rights tab and full menu access rights on the Menu access tab.
10.On the Field rights tab, make sure that the administrator user ID is selected in the user list.
11.Click the Select all button to select all the database fields, and select the Full access check box.
•Clicking the Select all button and selecting the Full access check box gives the Concordance administrator full read/write access to all fields.
•Enabling security is optional, but it is best practice to enable security for Concordance databases.
12.To enable security for all users, select the Enable security check box. Once the Enable security check box is selected, Concordance enforces the field privileges for the users in the users list on the Field rights tab. This generally works on networks without requiring manual user IDs and passwords for each database.
13.To require all users to log on to Concordance each time they access Concordance, select the Logon required check box.
|
Selecting Logon required affects database access in FYI Reviewer. If selected, the user needs to log on with a non-blank password to access this database in FYI Reviewer. Be sure to inform FYI Reviewer users when setting the database security to Logon required. |
•Enabling security requires momentary exclusive control of the database. Concordance attempts to gain exclusive control of the database when you save the Enable security and/or Logon required setting. An error message is displayed if users are logged on to Concordance and Concordance could not make the change. The check boxes will remain selected after you click OK or the Apply button if the change was successful.
•If you do not want to enable security for the database, leave the Enable security and Logon required check boxes empty.
14.With the administrator user ID still selected in the user list, click the Menu access tab.
15.Click the Supervisor button to ensure the administrator user ID has full rights to everything in Concordance.
16.Click the Apply button to save the administrator user and its security settings.
Modify a User, Including the Default User
When first accessing the Security dialog box, you will see that a default user already exists. If you enable security, but don’t check the Login required check box, Concordance first checks to see if there is a Windows or network ID matching the user name in the security console. If a match is found, then you’ll be logged into that database with those security settings applied. If there is not a match, you will receive the security settings that were applied to the default user.
For minimal level of database security, you can create users that match the Windows or network IDs for all administrators and give them full rights. Then, apply a lower level of security to the default user and apply that security setting to everyone else. Another option is to delete the default user completely.
1.On the File menu, point to Administration, and click Security. The Administration dialog displays.
2.In the User field, type the administrator user ID.
3.In the Password field, type the administrator password.
4.Click OK to open the Security dialog.
5.On the Field rights tab, click user name in the user list.
•If you are modifying the default user, click default in the user list.
•By default, the No rights check box is selected for all fields.
6.In the Field list, select the fields you want to apply field rights. To select multiple fields, use CTRL+click or SHIFT+click.
7.In the Field rights section, select one of the following:
•Full access - gives users read/write access to a field. This level of access for all fields is required for anyone who will be performing maintenance functions such as indexing, packing, or a database modify. If the user does not have full access to the fields, Concordance does not either.
•Read only - gives users the ability to search, browse, and print the field. They may not edit or otherwise modify read-only fields. Commands such as Global edit and Load will not display fields which have read-only access. These fields are displayed in Edit view, but only for reference or to copy text to the clipboard.
•Write only - gives users limited access. Users with write-only field access can load data into these fields using Load, and assign values to them through the programming language, but they will not be able to view or search these fields. The Edit view will not display write-only fields and therefore they cannot be edited. The searches will be post-processed to remove any references to hits in these fields. The searches may also run slower.
•No rights - denies all access to the field. Users will not be able search for data in these fields. Searches will be post-processed to remove any references to hits in these fields. The searches may run slower and the results may not contain the same count as a search with read-only field access.
|
Field privileges do not take effect until the database is closed and reopened. |
8.Click the Menu access tab.
•By default, new users have full access to all menus and menu commands on the Menu access tab. You can manually select the menu access permissions for each menu, select one of the menu access presets, or select a preset and then manually customize the menu permissions for the individual user.
•Menu access presets:
oSupervisor - access to all menus and menu commands.
oAdministrator - access to all menus and menu commands except the Modify, Security, and Zap menu commands.
oEditor - no access to the menu commands restricted in the Administrator preset and does not have access to the following menu commands: New, Reindex, Index, Pack, Begin program, Edit program, or the menu commands for data validation . Editors can, of course, search and edit, global edit, load and unload data, and run reports.
oResearcher - no access to the menu commands restricted in the Administrator and Editor presets, and cannot edit or append, load, overlay, or import data, perform global edits, or unload a copy of the database's structure.
oNo access - no access to any menus or menu commands. User can only open and exit the database.
•After selecting one of the menu preset buttons, you can explore the menu tree on the Menu access tab to view the default menu settings provided by Concordance for the selected preset. You can further customize the menu settings for each user depending on the user's role and skill level, as needed.
•When a menu or menu command check box is selected, the user has access to this menu or menu command.
•When a menu check box is selected but the check box is gray, the user has access to the menu, but does not have access to some of the menu commands on the menu.
•When a menu or menu command check box is not selected (blank), the user does not have access and cannot view the menu or menu command in Concordance.
9.In the Presets section, click one of the menu access preset buttons, and/or manually define the menu and menu command access for the user in the menu tree.
10.Click the Apply button to save your changes to the user settings.
Create Role Templates
Role templates allow you to use pre-defined field rights or menu access settings when you create a new user to help speed up the user creation process. For example, you can create a role template for your most commonly used roles, such as attorney, paralegal, and reviewer, and use the templates each time your create a user ID for one of your attorneys, paralegals, or reviewers.
The steps for creating a role template are the same as the steps for creating a new user. The only difference is that you will be using this role template user to create individual users in Concordance.
1.In the Security dialog box, click the Field rights tab.
2.In the field above the user list, select all the text of the user name currently selected in the user list, and type the role template name.
3.Click the Add user button.
4.On the Field rights tab, define the field rights for the role template.
5.Click the Menu assess tab and define the menu access rights for the role template. See the next section for specific steps for defining field and menu access rights.
6.Click the Apply button to save your settings.
Create a User
1.On the File menu, point to Administration, and click Security. Clicking Security opens the Administration dialog.
2.In the User field, type the administrator user ID.
3.In the Password field, type the administrator password.
4.Click OK to open the Field rights tab in the Security dialog.
5.When you are creating a user from an existing role template, you can only use the field rights settings or menu access settings from the role template to create a new user. You cannot use both the field rights and menu access settings from a role template to create a new user. We recommend duplicating settings from the Field rights tab, and then selecting the user’s menu rights on the Menu access tab.
6.To use the field rights settings from a role template, on the Fields rights tab, in the field above the user list, select all the text of the user name currently selected in the user list, and type the new user name.
7.To use the menu access settings from a role template, click the Menu access tab, in the field above the user list, select all the text of the user name currently selected in the user list, and type the new user name.
|
The FYI Server and FYI Reviewer do not support user names, passwords, or database names containing characters in Unicode, such as Chinese or Japanese characters. Currently, FYI Server and FYI Reviewer only support user names, passwords, or database names containing single-byte characters, such as English characters. If your organization uses FYI Server and FYI Reviewer, be sure to only use single-byte characters when creating user names, passwords, and database names in Concordance. |
8.Click the Add user button.
9.To modify the field rights settings, click the Field rights tab.
10.By default, the No rights check box is selected for all fields, unless you created the new user from a role template on the Field rights tab, in which case, the new user with have the same field rights as the role template.
11.In the Field list, select the fields you want to apply or remove field rights. To select multiple fields, use CTRL+click or SHIFT+click.
12.In the Field rights section, select one of the following:
•Full access: gives users both read/write access to a field. This level of access for all fields is required for anyone who will be performing maintenance functions such as indexing, packing, or a database modify. If the user does not have full access to the fields, Concordance does not either.
•Read only: gives users the ability to search, browse, and print the field. They may not edit or otherwise modify read-only fields. Commands such as Global edit and Load will not display fields which have read-only access. These fields are displayed in Edit view, but only for reference or to copy text to the clipboard.
|
The read-only setting for fields in the Data Entry Attributes dialog box takes precedence over the read-only setting for fields on the Field rights tab in the Security dialog box. For example, if the Read only check box is selected for the OCR1 field in the Data Entry Attributes dialog box, and the Full access check box is selected for the OCR1 field on the Field rights tab in the Security dialog box, the OCR1 field will be read-only for the user in the Edit view. For more information about the Data Entry Attributes dialog box, see Data Validation. |
•Write only: gives very limited access. Users with write-only field access can load data into these fields using Load, and assign values to them through the programming language, but they will not be able to view or search these fields. The Edit view will not display write-only fields and therefore they cannot be edited. The searches will be post-processed to remove any references to hits in these fields. The searches may also run slower.
•No rights: denies all access to the field. Users will not be able search for data in these fields. Searches will be post-processed to remove any references to hits in these fields. The searches may run slower and the results may not contain the same count as a search with read-only field access.
13.Click the Menu access tab. By default, new users have full access to all menus and menu commands on the Menu access tab, unless you created the new user from a role template on the Menu access tab in which case, the new user with have the same menu access settings as the role template.
•You can manually select the menu access permissions for each menu, select one of the menu access presets, or select a preset and then manually customize the menu permissions for the individual user.
•Menu access presets:
oSupervisor: user has complete access to all menus and menu commands.
oAdministrator: user has access to all menus and menu commands except the Modify, Security, and Zap menu commands.
oEditor: user does not have access to the menu commands restricted in the Administrator preset and does not have access to the following menu commands: New, Reindex, Index, Pack, Begin program, Edit program, or the menu commands for data validation . Editors can, of course, search and edit, global edit, load and unload data, and run reports.
oResearcher: user does not have access to the menu commands restricted in the Administrator and Editor presets, and cannot edit or append, load, overlay, or import data, perform global edits, or unload a copy of the database's structure.
oNo access: user does not have access to any menus or menu commands. User can only open and exit the database.
•After selecting one of the menu preset buttons, you can explore the menu tree on the Menu access tab to view the default menu settings provided by Concordance for the selected preset. You can further customize the menu settings for each user depending on the user's role and skill level, as needed.
•When a menu or menu command check box is selected, the user has access to this menu or menu command.
•When a menu check box is selected but the check box is gray, they user has access to the menu, but does not have access to some of the menu commands on the menu.
•When a menu or menu command check box is not selected (blank), the user does not have access and cannot view the menu or menu command in Concordance.
14.In the Presets section, click one of the menu access preset buttons, and/or manually define the menu and menu command access for the user in the menu tree.
15.Click the Apply button to save your new user settings.
|
Field rights and menu access settings do not take effect until the database is closed and reopened. |
Delete a User
1.On the File menu, point to Administration, and click Security. Clicking Security opens the Administration dialog.
2.In the User field, type the administrator user ID.
3.In the Password field, type the administrator password.
4.Click OK to open the Field rights tab in the Security dialog box.
5.Click the user name in the user list and click the Delete user button.
6.Click OK to close the Security dialog box.
Exporting Security Settings
You can export the security settings from a Concordance database and import them into another Concordance database. When you export Concordance security settings, you are exporting all of the security settings, including users, that are defined for the database in the Security dialog box. The exported settings can be used to set up a database template with your security specifications.
|
It is best practice to always export a copy of your security settings each time you update them so you have a current backup copy to reference. Be sure your supervisor or secondary database administrator has access to this file in case of an emergency. |
1.On the File menu, point to Administration, and click Security. Clicking Security opens the Administration dialog.
2.In the User field, type the administrator user ID.
3.In the Password field, type the administrator password.
4.Click OK to open the Field rights tab in the Security dialog box.
5.Click the Export button.
6.Navigate to where you want to save the exported security settings file, type the name of the file in the File name field, make sure that Comma separated file (*.csv) is selected in the Save as type field, and click Save. It is best practice to store this file in a separate, secure folder on your network.
7.Click OK to close the Security dialog box.
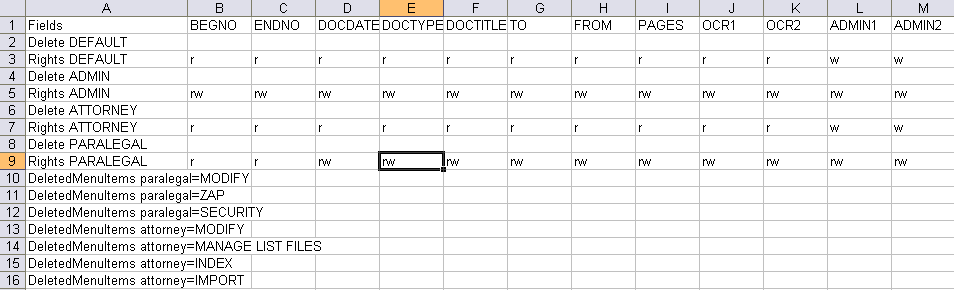
Here is an example of exported security settings file in a spreadsheet:
Importing Security Settings
You can import the security settings from one Concordance database into another Concordance database. When you import Concordance security settings, you are importing all of the security settings, including users, that were defined for the database in the Security dialog box.
The import requires at least one commonly named field between the .csv file and the database to which the file is being imported. Before importing a .csv file exported from another Concordance database, make sure that there is at least one commonly named field. For example, the security settings for the DOCTITLE field are exported to the security settings .csv file, and the .csv file is being imported into a database also containing a field named DOCTITLE.
|
If you are setting up security and adding users to a new database, and want to import the security settings, including users, from another database, be sure to import the security settings before manually defining any security settings or users in the database. When you import a security settings CSV file, the file overwrites all existing security settings defined in the Security dialog box. |
1.On the File menu, point to Administration, and click Security. Clicking Security opens the Administration dialog.
2.In the User field, type the administrator user ID.
3.In the Password field, type the administrator password.
4.Click OK to open the Field rights tab in the Security dialog box.
5.Click the Import button.
6.Browse to and click the .csv file containing the security settings you want to import and click the Open button.
7.The security settings from the file are imported into the database. If there were any existing security settings defined in the Security dialog box, they are overwritten by the security settings defined the .csv file during the import.
7.Click OK to close the Security dialog box.